Grasshopper in Revit
 GH Definition
Revit-Aware Components
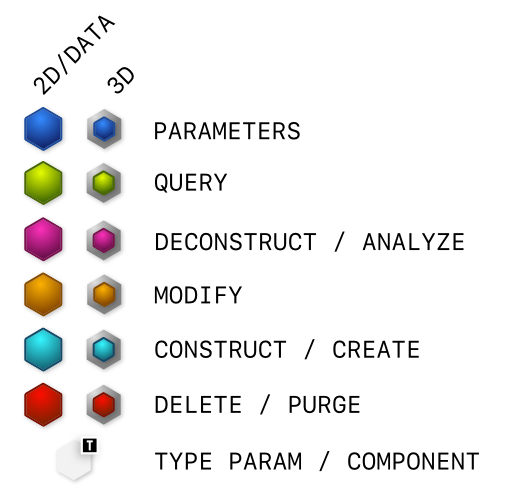
The Revit-aware component icons help identifying the action that the component performs. As shown below, the base color shows the type of action (Query, Analyze, Modify, Create). There are a series of badges applied to icons as well, that show Type, Identity, or other aspects of the data that the component is designed to work with:
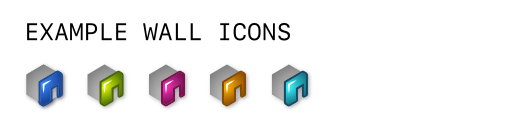
For example, this is how the Parameter, Query, Analyze, Modify, and Create components for
 Wall
are shown:
Wall
are shown:
Pass-through Components
In some cases, a special type of pass-through component has been used that combines the Analyze, Modify, Create actions in to one component. This helps reducing the number of components and avoid cluttering the interface. These components have a split background like
Flip Element
or
 Material Identity
:
Material Identity
:

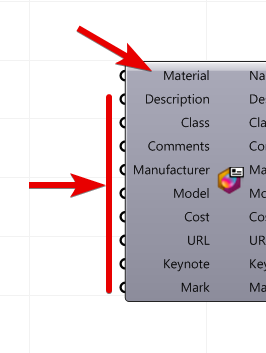
Let’s take a look at
Material Identity
as an example. These components accept two groups of inputs. The first input parameter is the Revit element that this component deals with, in this case
 Material
. Below this input parameter, are a series of inputs that could be modified on this Revit element:
Material
. Below this input parameter, are a series of inputs that could be modified on this Revit element:
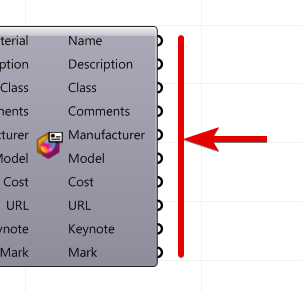
The other side of the component, shows the output parameters as usual. Note that the list of input and output parameters are not always the same. Usually a different set of properties are needed to create and element, and also some of the output properties are calculated based on the computed element (e.g. Walls don’t take Volume as input but can have that as output). Moreover, not all of the element properties are modifiable through the Revit API:
The pass-through components also have an optional output parameter for the type of Revit element that they deals with, in this case
Material
:
Now it makes more sense why these components are called pass-through. They pass the input element to the output while making modifications and analysis on it. They also encourage chaining the operations in a series instead of parallel. This is very important to ensure the order of operations since all the target elements are actually owned by Revit and Grasshopper can not determine the full implications of these operations:

Transactional Components
Some of the Revit-aware components need to run Transactions on the active document to create new elements or make changes. On each execution of the Grasshopper definition, it is important to know which components contributed to the document changes. This helps understanding and managing the transactions and their implications better (e.g. A developer might change the graph logic to combine many transactional components and improve performance).
These components show a dark background when they execute a transaction:
![]()
Note that if the input parameters and the target element does not change, the component is not going to make any changes on the next execution of the Grasshopper definition and the component background will change to default gray
You can also use the Grasshopper Trigger component, to control when these components are executed:
![]()
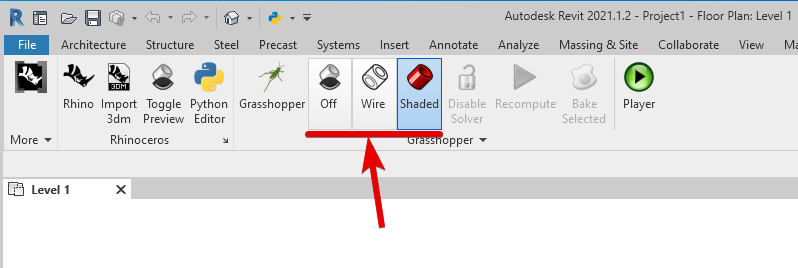
Previewing Geometry
You can use the toggle preview on Grasshopper components to turn the Revit previews on or off. You can also toggle the preview globally from the Rhinoceros tab in Revit:
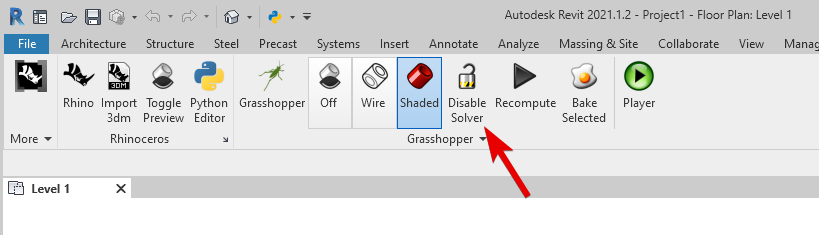
Toggling Solver
Grasshopper solver can also be toggled from the Rhinoceros tab in Revit. This is especially helpful to reduce wait times on on large Revit models:
Element Tracking
Tracking allows Grasshopper to replace the Revit elements that are previously created, even between saves. Each component output remembers which Revit elements it added and avoids creating duplicates. Only Add components in Grasshopper use tracking. Grasshopper will remember these elements after the file is closed and re-opened in the future.
This video explains many of the details:
The Tracking Mode can be controlled by right-clicking on the component center.
![]()
There are 3 modes:
- Disabled - This turns off any tracking of created Revit elements. This can result in duplicate elements being created in Revit.
- Enabled : Replace - This will create completely new elements in Revit, replacing the previously-created element, each time Grasshopper runs.
- Enabled : Update - The default setting. Grasshopper will try to modify existing elements in Revit if possible (if Revit API allows the type of modification). Otherwise, new objects will be created and the component would behave like Enabled : Replace
Each output on Add Component has additional controls to help manage tracking:
![]()
- Highlight - Select and highlight the Revit elements created by this output.
- Unpin - Remove the Pin from any Revit element created by this output. There is also an Unpin component that can be used for this.
- Delete - Delete any Elements tracked by this output.
- Release - The output will forget the objects and not continue to track them. Be aware that this might create duplicate objects if the Grasshopper definition is run again.
Unit Systems
In Revit, when choosing a unit system only the interface numbers change, Revit is always working in feet behind the scenes. When the Rhino and Revit unit systems are not the same, Rhino will prompt to change the units to match the Revit display units.
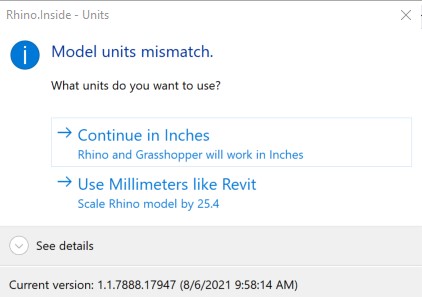
Not matter how this dialog is answered the geometry will be converted to be the correct size in both products.
Be aware that scaling a model in Rhino will also effect the tolerances below. A model that needs to be scaled up a great amount, for example mm to meters can adversely effect the tolerance.
Tolerances
Revit can handle Curves, BREP (NURBS) and Mesh geometry from Rhino. An important aspect of geometry is the Geometric Tolerance that any shape was built to. When converting geometry, tolerance issues can effect Revit in multiple ways.
- Ideally Rhino Breps can be converted into Revit directly, but if tolerances are not correct, Revit may reject the geometry.
- Geometry that cannot be converted to Revit directly will be directed to a secondary transfer method using SAT files. SAT transfer is much slower. A warning will show up on components that need to use the SAT method.
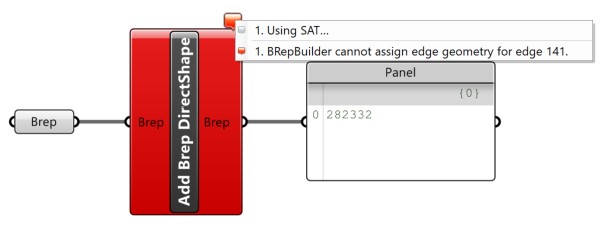
- Directshape elements that pass neither the normal or the SAT transfer may be imported as Mesh models with dense black edges.
- Family Types can only accept NURBS geometry, so tolerance issues must be solved. An error message will show if some geometry is not converted to the Family Type.
- Models that are a long distance from the origin may not be able to hold tight tolerances and therefore will may get rejected by Revit.
Ideally a Rhino model and a Revit model can be modeled to the same tolerance.
For curves, Revit will not accept curve segments less then about 1mm in length. This include surface trim edges.
- 1/256 (0.0039) of a foot
- 3/64 (0.047) of and inch
- About 1mm
For NURBS tolerances Rhino should be set to the built-in Revit tolerance. To set tolerance go to Tools pulldown > Options > Units. Then set that to the Revit tolerance based on the Unit type:
- 0.1 mm
- 0.0001 of a meter
- 0.006 of an inch
- 0.0005 of a foot
It is not always possible in practice to have Rhino models at the same tolerance as Revit would like. Models created in other software or imported are a good example. The general process of fixing models that do not transfer will is as follows:
- Search And repair bad objects in Rhino using the Selbadobject repair process.
- Set tolerance in file and reset tolerance on objects as covered shown above.
Existing models that have a tolerance problem can be reset to a newer tolerance. This process can get complicated. To reset tolerance and update all the join information on the model:
- Explode the polysurfaces into surfaces.
- Select all the surfaces and run the RebuildEdges command. Use the default settings.
- Select the surfaces and hit the Join command.
- Run the Show Edge command to check for naked edges. These are the edges that are out of tolerance.
Grasshopper Performance
As mentioned in the sections above, paying close attention to the items below will help increasing the performance of Grasshopper definition:
- Grasshopper runs on top of Revit. So when Revit gets slow (large models, too many open views, …) Grasshopper might not get the amount of time it needs to update its resources and previews
- Grasshopper previous in Revit require geometry conversions. Having too many previews also slows down the Revit view. Keep the preview on for Grasshopper components when necessary. You can also toggle the preview globally from the Rhinoceros tab in Revit
- Running many transactions on individual elements is slower that running one transaction on many elements at once. Try to design the graph logic in a way that a single transactional component can operate on as many elements as you need to modify at once
- Toggling the Grasshopper solver can be helpful in reducing wait times on large Revit models
- Poor quality geometry or models out of tolerance can slow down the transfer process. See Tolerances section above