Revit: Elements & Instances
 |
This section shows how you can manually reference a specific element and bring that into your Grasshopper definition. Later sections discuss the generic ways of collecting elements of various types. To review how Revit Elements and Instances are organized see the Revit: Elements & Instances overview. |
Referencing Elements
There are more elaborate ways to collect various elements in Revit. The most basic way to to directly reference an element.
By Selection
Use the context menu on the
 Graphical Element
parameter to reference geometrical Revit elements in your definition:
Graphical Element
parameter to reference geometrical Revit elements in your definition:
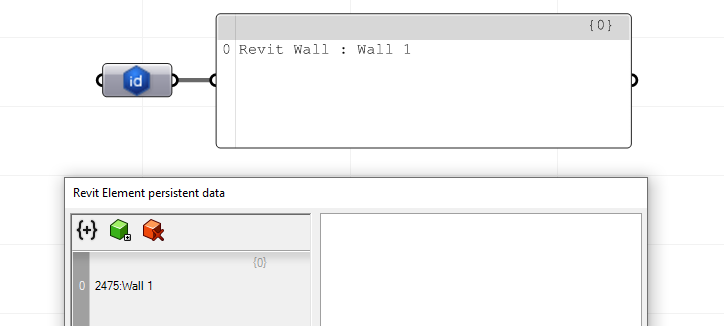
By Element Id
You can use the
 Element
parameter and add the element Ids into the Manage Revit Element Collection on the component context menu:
Element
parameter and add the element Ids into the Manage Revit Element Collection on the component context menu:
Instances
Instances are individual graphical/geometric elements placed in a Revit model e.g. a single Wall, or a single Door, or any other single element. As a subset of Revit Elements, Instances inherit a series of Parameters from their Category and Type and might have instance parameters as well that only belongs to that single instance.
Query Filters
Filter components will allow Grasshopper to select specific Revit elements thru many different properties. These filters can also be combined together to make sophisticated selections.
Normally Filters are created then sent into one of the many Query Components in Grasshopper.
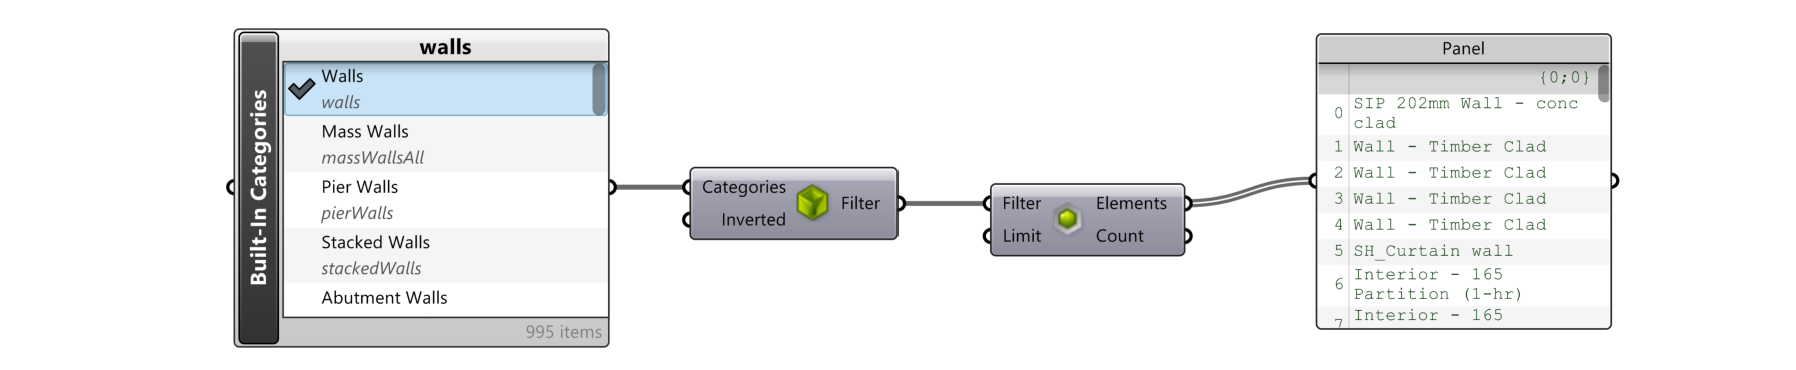
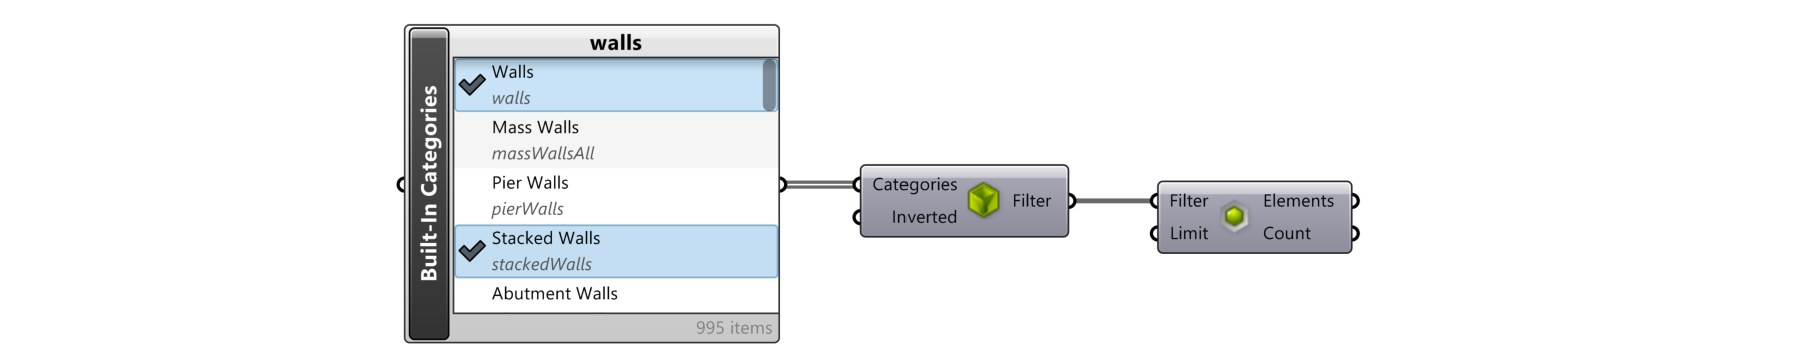
By Category
Filter all the objects in the selected category.
By Type
Use a combination of
 Built-In Categories
component, connected to
Built-In Categories
component, connected to
 Element Type Picker
,
Element Type Picker
,
 Type Filter
, and
Type Filter
, and
 Query Elements
to query all the instances of a specific type. The example below is collecting all the instance of a specific Window type:
Query Elements
to query all the instances of a specific type. The example below is collecting all the instance of a specific Window type:

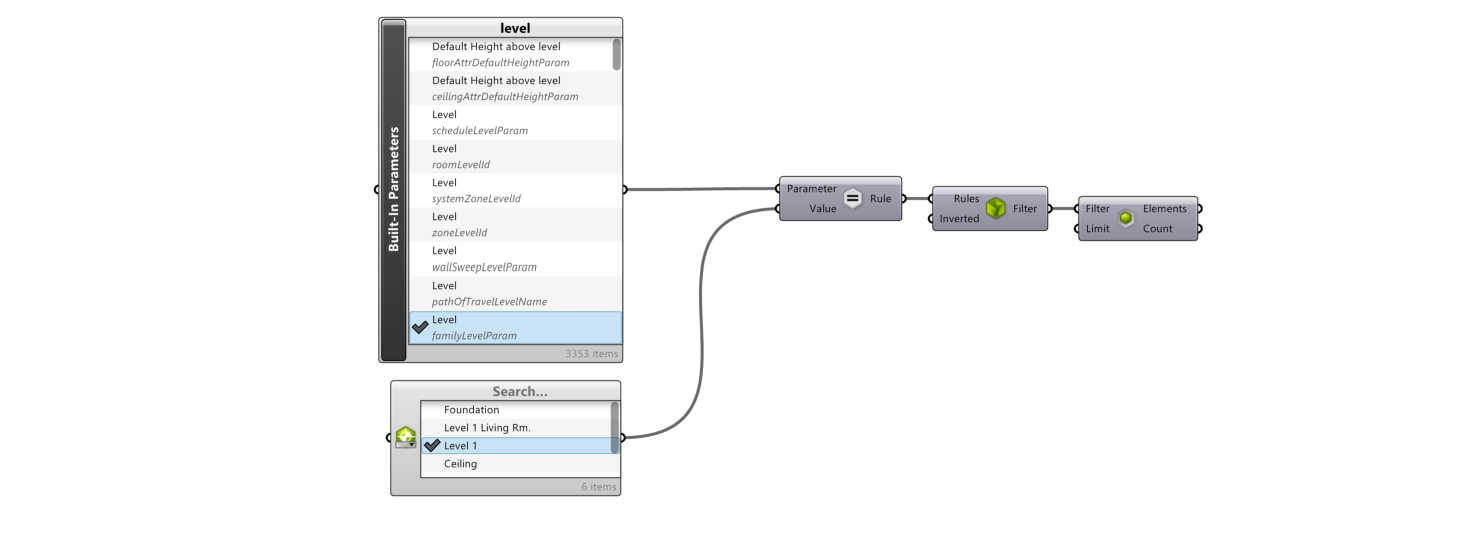
By Parameter Value
You can use the
 Parameter Filter
component in combination with a Filter Rule (e.g.
Parameter Filter
component in combination with a Filter Rule (e.g.
 Greater Or Equal Rule
or
Greater Or Equal Rule
or
 Equals Rule
) to filter elements by their parameter values.
Equals Rule
) to filter elements by their parameter values.

The
Parameter Filter
is used to filter for values of specific parameter on elements. Filter Rules specify the type of comparison that is to be performed on the parameter values. The list of built-in parameter names and types are quite long in Revit. Using the
 Built-In Parameters
is a great way to select the proper parameter with its additional listed detail in the selector.
Built-In Parameters
is a great way to select the proper parameter with its additional listed detail in the selector.
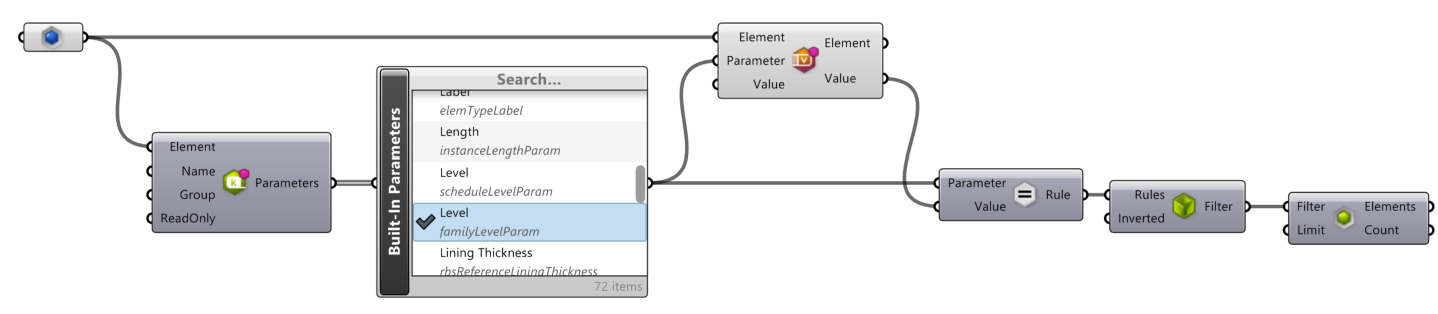
Filter Rules
Filter Rules can be used with the
Parameter Filter
to compare values. This example shows using the value of one element to find all other elements in the model with that same parameter value:
By Level
The
 Level Filter
allows you to filter project elements by Level.
Level Filter
allows you to filter project elements by Level.

Filter for elements only on a specific level. This component is best used with the
 Levels Picker
.
Levels Picker
.

By API Class
Use the Revit API Class names to select Elements in the project. The input can be the
 Element Classes
selector or a string of the class name.
Element Classes
selector or a string of the class name.

More Query Filters
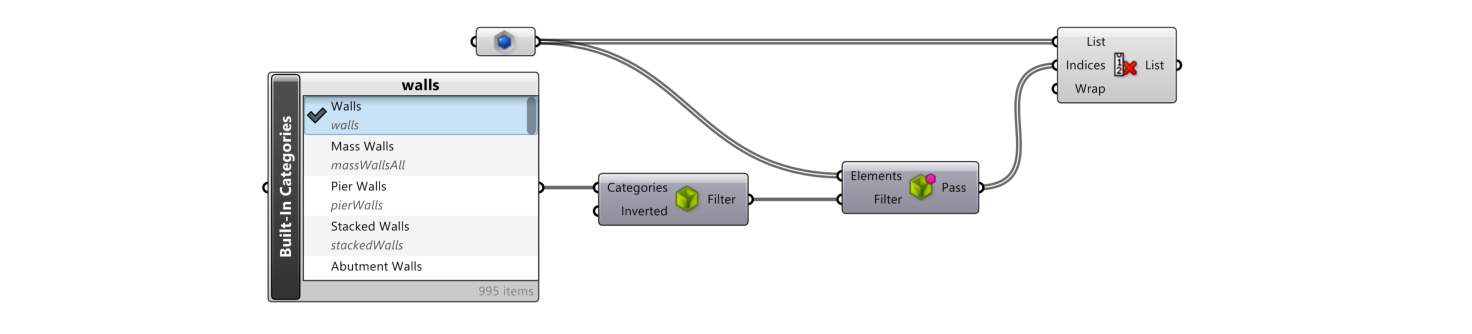
Filter Element
This component takes a previous selection of Revit elements and returns a True/False list of whether each element matches the filter or not. For example a set of pre-selected Revit elements in the
Graphical Element
can be filtered by using the
Built-In Categories
input to the
 Filter Elements+ v1.0
to create the filter. The
Filter Elements+ v1.0
component will return a list of True/False that can be used to filter the original elements list using Cull Pattern component:
Filter Elements+ v1.0
to create the filter. The
Filter Elements+ v1.0
component will return a list of True/False that can be used to filter the original elements list using Cull Pattern component:
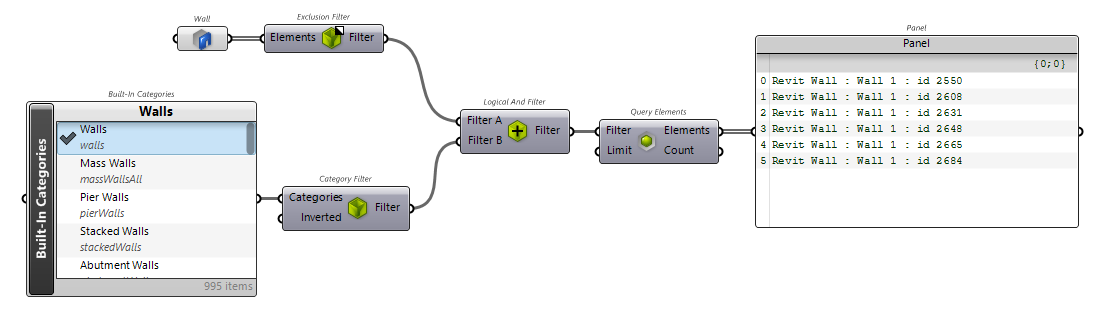
Exclusion Filter
The
 Exclusion Filter
is used to exclude a specific set of elements from query results. The example below, excludes two manually selected walls from the results of the generic wall query that normally returns all the walls in the model:
Exclusion Filter
is used to exclude a specific set of elements from query results. The example below, excludes two manually selected walls from the results of the generic wall query that normally returns all the walls in the model:
Exclude Types Filter
 Exclude Types+ v1.0
can be used to filter out types from a list. This component implements the API method WhereElementIsNotElementType.
Exclude Types+ v1.0
can be used to filter out types from a list. This component implements the API method WhereElementIsNotElementType.
Bounding Box Filter
 Bounding Box Filter
is used to match Revit elements by their geometric bounding box. The initial geometric object can be either from Rhino or Revit.
Bounding Box Filter
is used to match Revit elements by their geometric bounding box. The initial geometric object can be either from Rhino or Revit.
Input parameters:
- Bounding Box (Geometry) - World aligned bounding box to query.
- Union (Boolean) - Target union of bounding boxes.
- Strict (Boolean) - True means element should be strictly contained.
- Tolerance (Number) - Tolerance used to query.
- Inverted (Boolean) - True if the results of the filter should be inverted.
Intersects Brep Filter
 Intersects Brep Filter
is used to match Revit elements that geometrically intersect a NURBS Brep.
Intersects Brep Filter
is used to match Revit elements that geometrically intersect a NURBS Brep.
Intersects Element
 Intersects Element Filter
is used to match Revit elements that geometrically intersect another Revit element.
Intersects Element Filter
is used to match Revit elements that geometrically intersect another Revit element.
Intersects Mesh Filter
 Intersects Mesh Filter
is used to match Revit elements that geometrically intersect a Rhino mesh.
Intersects Mesh Filter
is used to match Revit elements that geometrically intersect a Rhino mesh.
Design Option Filter
 Design Option Filter
is used to match Revit elements that belong to a specific design option.
Design Option Filter
is used to match Revit elements that belong to a specific design option.
Owner View Filter
 Owner View Filter
is used to filter elements that belong to a specific view. This component is best used with a selector that returns a view from the model.
Owner View Filter
is used to filter elements that belong to a specific view. This component is best used with a selector that returns a view from the model.

Phase Status Filter
 Phase Status Filter+ v1.2
is used to match elements associated to the given Phase status. The Phase and the status can be found by right clicking on the inputs.
Phase Status Filter+ v1.2
is used to match elements associated to the given Phase status. The Phase and the status can be found by right clicking on the inputs.

Selectable In View Filter
 Selectable In View Filter
is used to match selectable elements into the given View
Selectable In View Filter
is used to match selectable elements into the given View
Combining Query Filters
Logical And Filter
Combine multiple filters together using the
 Logical And Filter
. All elements must pass all filters.
Logical And Filter
. All elements must pass all filters.
Note that more inputs can be added by zooming in on the component.
Logical Or Filter
Combine multiple filters together using the
 Logical Or Filter
. Elements pass by any one of the input filters.
Logical Or Filter
. Elements pass by any one of the input filters.
Storing Filters or Selections
Add Parameter Filter
 Add Rule-based Filter
creates a parameter-based filter in the Revit model. This will also be used as a parameter filter in Grasshopper.
Add Rule-based Filter
creates a parameter-based filter in the Revit model. This will also be used as a parameter filter in Grasshopper.
Add Selection Filter
 Add Selection Filter+ v1.0
creates a selection filter in Revit and then use that filter in the Grasshopper definition.
Add Selection Filter+ v1.0
creates a selection filter in Revit and then use that filter in the Grasshopper definition.
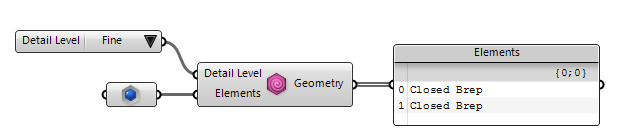
Extracting Instance Geometry
 Element Geometry
used to extract the geometry of an instance. In the example below, the complete geometry of a Stacked Wall instance has been extracted. The
Element Geometry
used to extract the geometry of an instance. In the example below, the complete geometry of a Stacked Wall instance has been extracted. The
 Detail Level
picker can be used to select the level of detail for geometry extraction:
Detail Level
picker can be used to select the level of detail for geometry extraction:
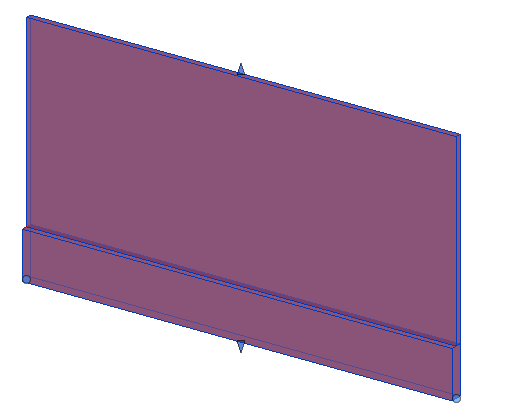
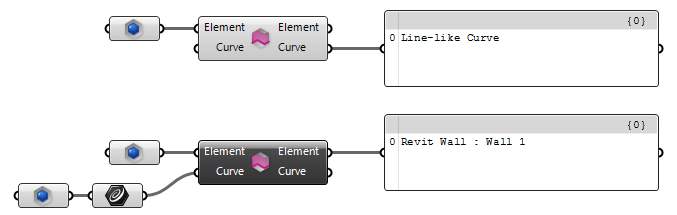
Instance Base Curve
For elements that are constructed on a base curve (e.g. Basic Walls) you can use the
 Element Curve
to get and set the base curve.
Element Curve
to get and set the base curve.
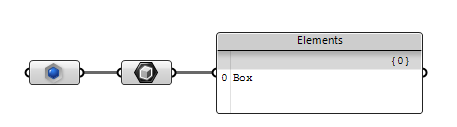
Instance Bounding Box
You can pass an instance into a Grasshopper Box component to extract the bounding box of the geometry very easily:
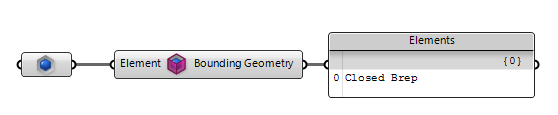
Instance Bounding Geometry
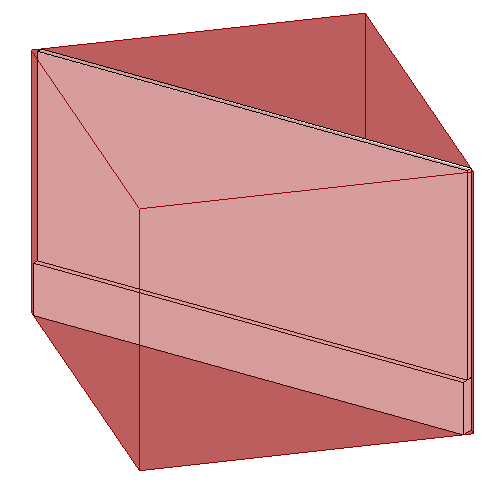
 |
Currently, Bounding Geometry component only works with Walls but will be extended to work with other Revit categories in the future. |
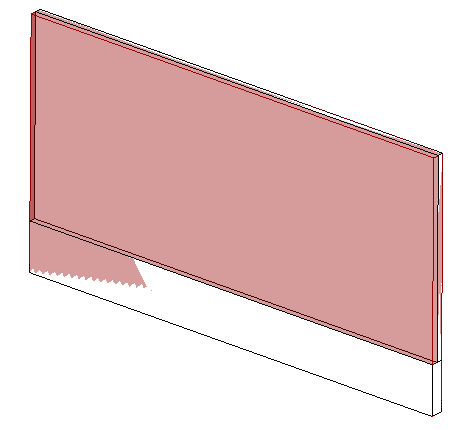
Sometimes it is necessary to extract the Bounding Geometry of an instance. Bounding Geometry is a geometry that wraps the instance geometry as close as possible and generally follows the instance geometry topology. You can use the
 Element Bounding Geometry
component to extract this geometry. In the example below, the bounding geometry of a Stacked Wall is extracted. Notice that the bounding geometry is as thick as the thickest part of the Stacked Wall:
Element Bounding Geometry
component to extract this geometry. In the example below, the bounding geometry of a Stacked Wall is extracted. Notice that the bounding geometry is as thick as the thickest part of the Stacked Wall:
Changing Instance Type
Use the
 Element Type
component to both query the Type of an instance, and to change it to another type.
Element Type
component to both query the Type of an instance, and to change it to another type.


Placing Instances of Types
Use the
 Add Component (Location)+ v1.0
component to place an instance of a Type into the Revit model space.
Add Component (Location)+ v1.0
component to place an instance of a Type into the Revit model space.

For types that require a host, you can pass a host element to the
Add Component (Location)+ v1.0
component as well.
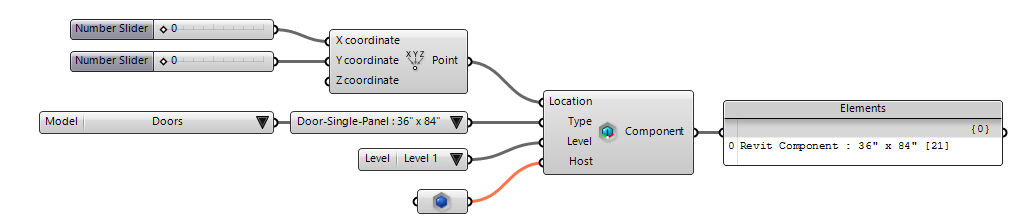
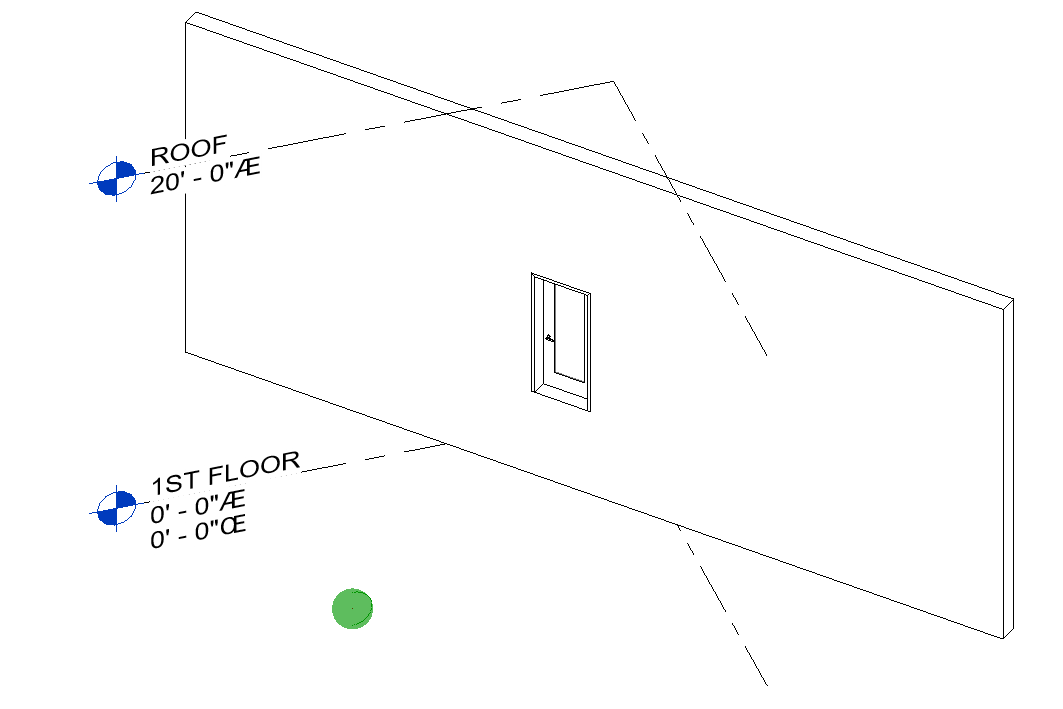
The component, places the given type on the nearest location along the host element. In the image below, the green sphere is the actual location that is passed to the component. Notice that the door is placed on the closest point on the wall.