This guide continues where the Bongo: Video Encoder and Formats guide ended.
Overview
The Bongo object properties panel manages the animation data for each animated object.
 Animate selected objects
Allows the object to be animated. Adds the object to the Animation Manager.
See also: Bongo Basics 1: Simple Object Animation.
 Remove animation
Removes the object from the Animation Manager.
 Remove all keyframes
Removes all keyframes from the object. The pivot and IK data are not removed.
 Match animation data
Matches the animation properties of one object to another.
 Move pivot
Moves the object’s pivot.
 Rotate pivot
Rotates the object’s pivot.
 Set parent
Specifies a parent object for the selected object. See the Animation Manager guide.
 Advanced hierarchy settings
Opens the Advanced Hierarchy Settings dialog box for the object.
 Change constraint heading
When the object is constrained, the pivot displays a dotted constraints heading indicator. The constraint heading determines the direction the object will use to face an object to which it is constrained.
By default, the constraints heading is along the object pivot’s x-axis.
A dotted arrow shows the direction of the constraint heading direction.
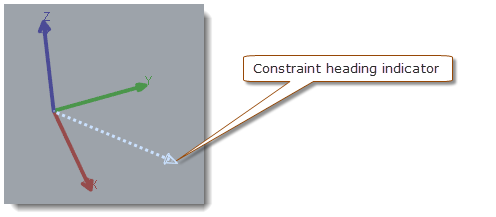
To change an object’s constraint direction
- At the Pick new heading vector prompt, pick a new direction on the screen, press Enter to use the current direction heading, or choose a command-line option.
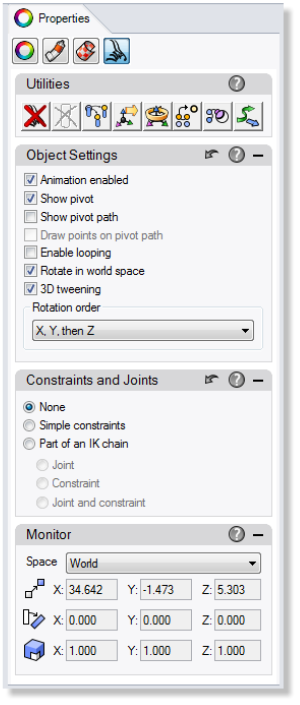
Object Settings
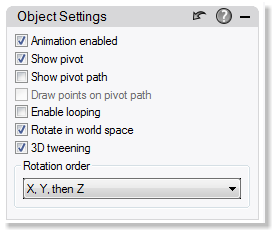
Animation Enabled
Clearing the checkbox temporarily turns the object animation off.
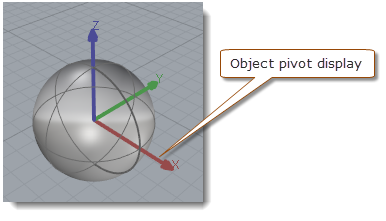
Show pivot
Toggles the pivot display for the selected objects.
Animated objects display a pivot icon in the Rhino viewports. By default, the pivot is created at the center of the object’s bounding box. Bongo rotation is applied around the x, y, and z-axes of the object pivot. Bongo scaling is applied along the x, y, and z-axes of the object pivot.
Show pivot path
Displays a curve showing the path of the object’s pivot over the entire course of the animation.
Draw points on pivot path
Displays points or dots at keyframes and specified intervals along the path of the object’s pivot. Set the style and interval on the Bongo Document Options page.
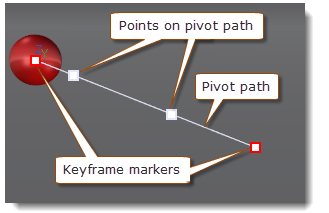
Pivot path display.
To turn off the pivot path display
- On the Bongo Document Options page, under Show pivot/view path, check Never show pivot/view paths.
To change the point display for the view paths
- The display can either be point objects or dots. The dots display the tick number.
On the Bongo Document Options page, under Show pivot/view path, for Show keyframes and frame marks as, choose Points or Dots.
To change the interval for the point display
- On the Bongo Document Options page, under Show pivot/view path, set the value for Draw point/dot every _ticks.
Enable looping
Repeats the animation action between looping markers.
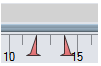
Looping markers appear for selected looping objects. This shows which tick is determining the properties of the object given the current looping values for that object.
Looping Tutorial
To set the position and number of loops
- Double-click the looping markers to open the Bongo Looping dialog box.
- In the Bongo Looping dialog box, enter values to set the marker positions, and specify the number of loops.
Rotate in world space
Sets object rotation around world x, y, and z instead of rotating around its own pivot.
3D tweening
Rotation and scale are tweened componentwise as three separate numbers. Position can be tweened either componentwise or with 3D tweening.
When 3D tweening is not checked, componentwise tweening is used. This means that each component x, y, and z are tweened as numbers - each forming its own curve.
See the Tweening tutorial.
Rotation order
Sets the order of rotation when rotation in 3D occurs simultaneously in all axes. By default, objects apply the rotation transformations in the order X, Y, and then Z.
Constraints and Joints
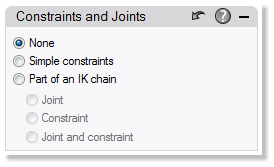
Objects can be constrained to path curves or objects.
A constraint can be animated on or off or with varying weight over time. Keyframes also store the position of the object along a path constraint. This is called the constraint parameter and varies from 0.0 at the start of the path to 1.0 at the end.
Common uses for constraints include:
- Moving a car along a path and keeping the car facing in the direction it is moving (a look-along constraint).
- Forcing a view to look at a specific object in the scene (a look-at constraint).
- Creating a walk-through animation (a look-along constraint).
- Animating the view from within an object (constrain camera location to object).
To constrain an object to another object
- Select an object.
- In the Properties panel, click the Bongo button.
or
- In the Animation Manager tree, right-click the object, and on the menu, select Constraints Manager.
None
All animated objects start with simple pivots and no constraints. Selecting the Simple Pivot option effectively disables any constraints that may have been applied to the object.
Simple constraints
Simple constraints force objects to attach themselves to other objects. Original object location:
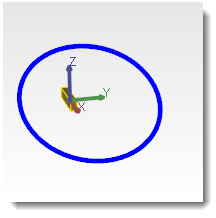
Look Along Z Up
The object will move along the path curve tangent to the curve, while keeping the object’s z-axis pointed up (the world z-direction) as much as possible.
To add a Look Along Z Up constraint
- With an object selected, in the Simple Constraints section, click the
 (Add constraint) button, and on the menu, select the Look Along Z Up constraint.
 - At the Pick new heading vector prompt, pick a new direction on the screen, press Enter to use the current direction heading, or choose a command-line option.
- At the Select curve prompt, pick near starting end to select a curve.
Look Along Curve Normal
The object will move along the path curve while keeping the object’s constraint heading parallel to the curve tangent:
To add a Look Along Curve Normal constraint
- With an object selected, in the Simple Constraints section, click the (Add constraint) button, and on the menu, select the Look Along Curve Normal constraint.
- At the Pick new heading vector prompt, pick a new direction on the screen, press Enter to use the current direction heading, or choose a command-line option.
- At the Select curve prompt, pick near starting end to select a curve.
Look At
The object’s constraint heading to face another object’s pivot.
Multiple constraints can be used. In the clip below, the object is constrained to path and to look at the center of the circle.
To add a Look At constraint
- With an object selected, in the Simple Constraints section, click the (Add constraint) button, and on the menu, select Look At constraint.
- At the Pick new heading vector prompt, pick a new direction on the screen, press Enter to use the current direction heading, or choose a command-line option.
- At the Select curve prompt, pick near starting end to select a curve.
To Path
The To Path constraint forces the object along a curve without changing its orientation.
To add a To Path constraint
- With an object selected, in the Simple Constraints section, click the (Add constraint) button, and on the menu, select To Path constraint.
- At the Select curve prompt, pick near starting end to select a curve.
Object to Pivot
The object’s pivot moves to the pivot of a target object. In the video below, the point is constrained to move along the circle, then the box’s is constrained to the point’s pivot. The box will then start to move along the circle following the point’s pivot.
To add a Object to Pivot constraint
- With an object selected, in the Simple Constraints section, click the (Add constraint) button, and on the menu, select Object to Pivot constraint.
- At the Select target object prompt, pick an object.
Monitor
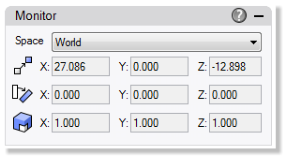
The Monitor section displays information about the object. The space, location, rotation, and scale of the object pivot are displayed and updated as the timeline slider is moved or the animation preview is played. The values shown in the monitor are especially useful when using expressions.
Next Steps
Please continue with the Bongo: View Animation guide.
Related Topics
- Animating Object Properties tutorial
- Looping guide
