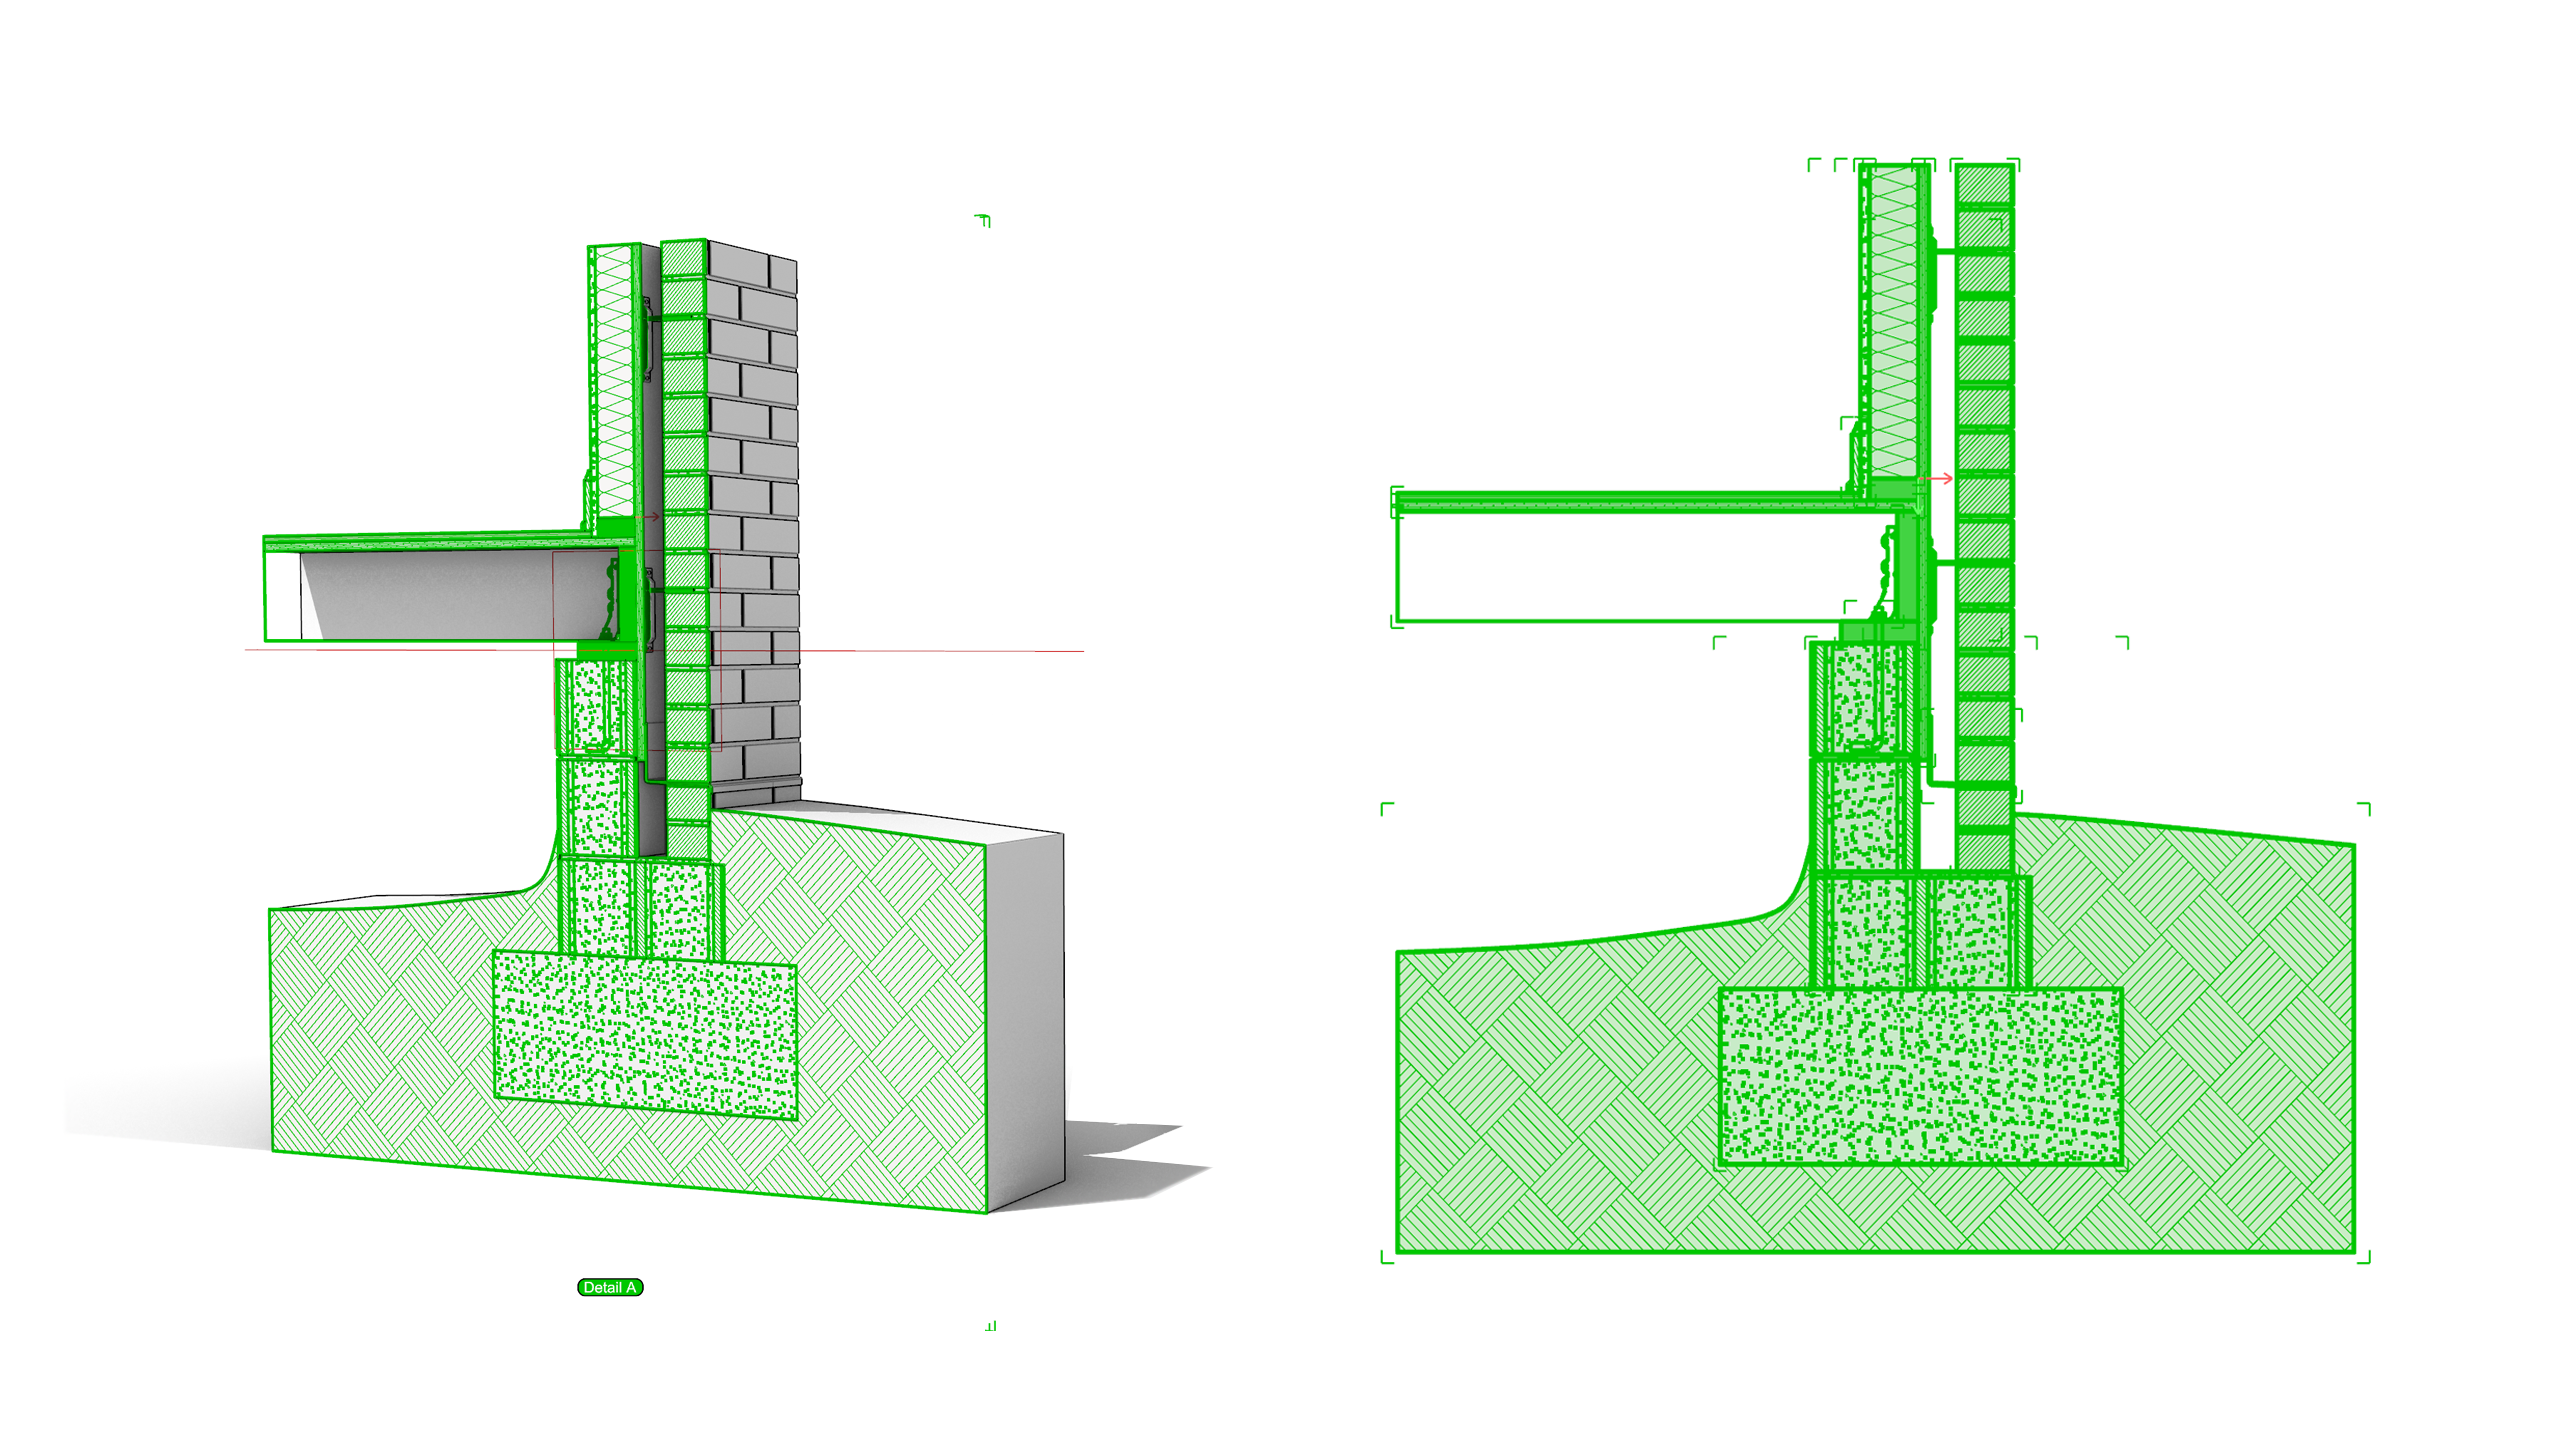
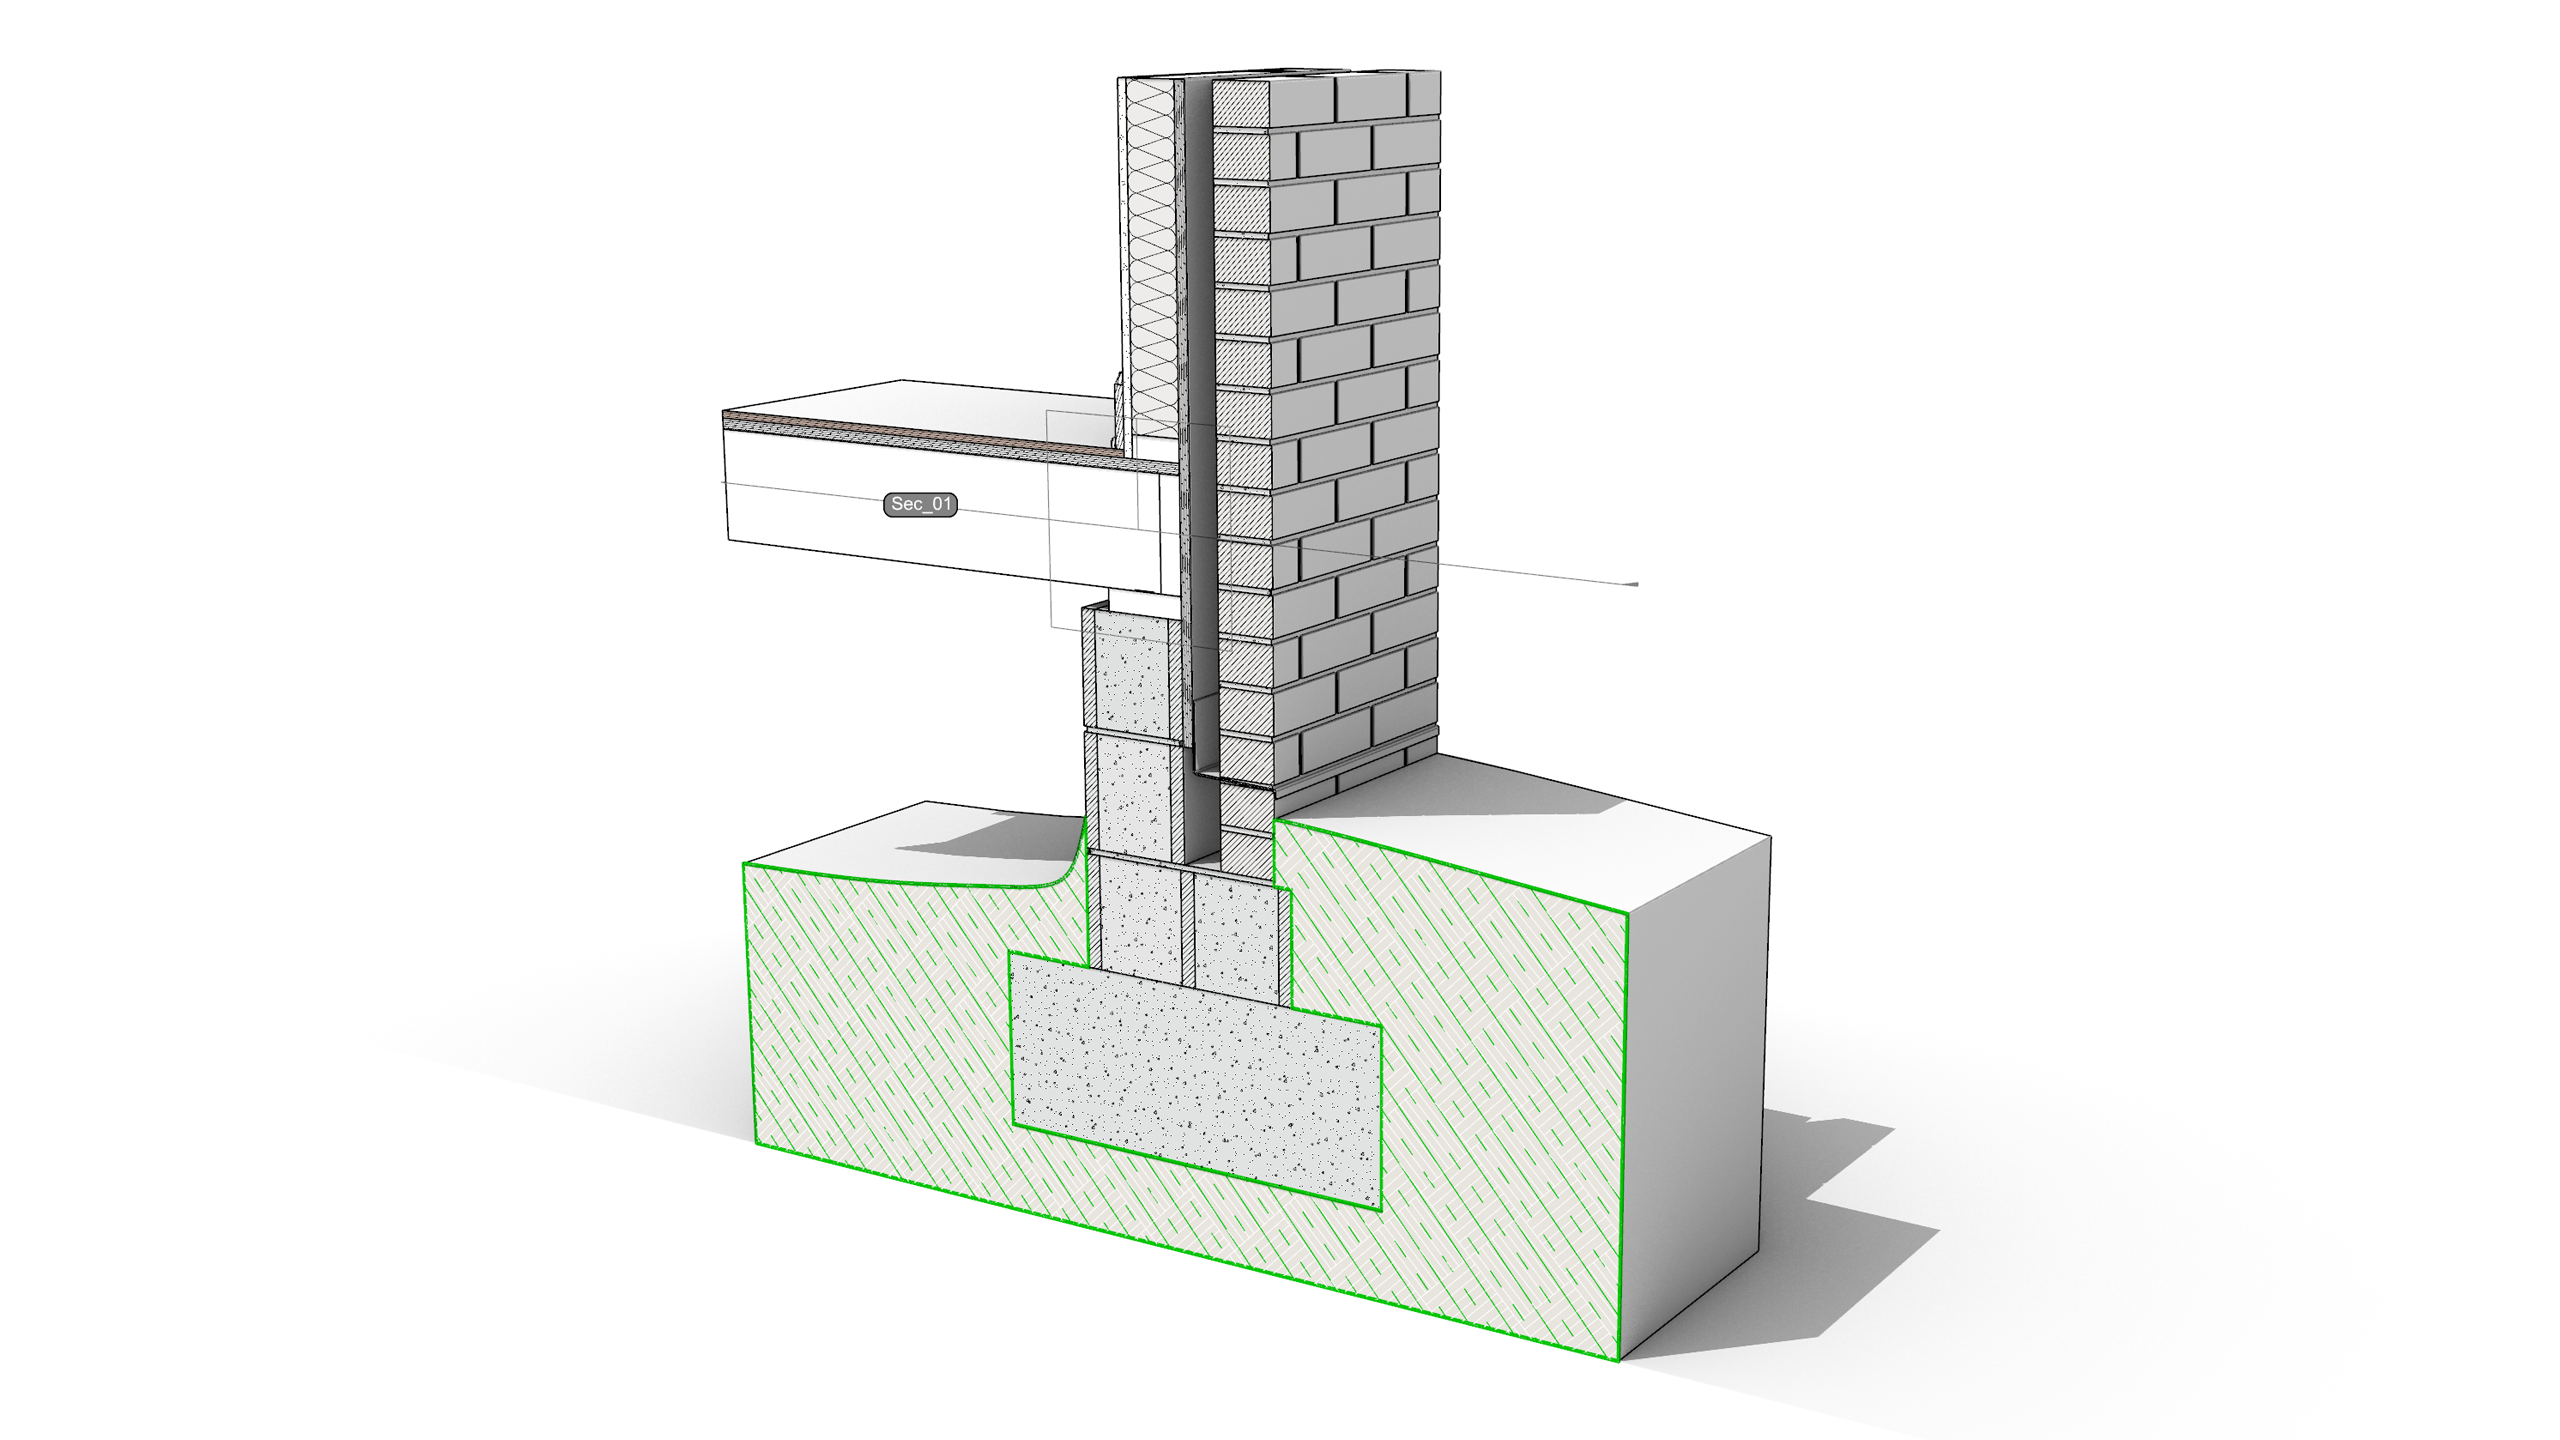
Architects and BIM specialists model construction details in 3D, but the deliverable is almost always a 2D drawing: a section through the wall assembly with the correct material hatches (insulation, concrete, brick, sealant) placed on the right layers, at the right scale.
With Rhino 9, the entire section workflow lives in  Grasshopper
1. Sections become parametric: move a slider and the clipping plane moves, the 2D drawing regenerates, and the hatches follow. Custom hatch patterns are no locfanger hand-edited
.pat files but Grasshopper definitions you can preview, adjust, and export as new .pat files.
What you'll learn
- How to create and control a
 Clipping Plane from the Grasshopper canvas, and limit it to specific objects and layers.
- How to extract a live 2D clipped drawing (section curves, hatches, background linework) that updates when the model changes.
- How to build a custom hatch pattern parametrically and apply it to the section.
- How to browse and filter hatch patterns with the
 Value Picker.
- How to inspect hatches, geometry, and non-geometry data on the canvas with the
 Content Viewer.
Prerequisites: Rhino 9, basic Grasshopper knowledge (placing components, wiring parameters). Download the model Foundation3D.3dm and the Grasshopper definitions for each section.
The model: a wall construction detail
In this section, we’ll go through:
- What is in the example file and how the layers are organized.
- Why section styles per layer matter for the parametric workflow.
Download the 3D model Download Foundation3D.3dm.
The example model is a typical exterior wall detail: a concrete foundation with a CMU, a floor slab, a wood stud wall system with an air cavity, and a brick veneer. Each building element sits on its own layer, and section styles are assigned per layer so that every material can carry its own hatch when sectioned.
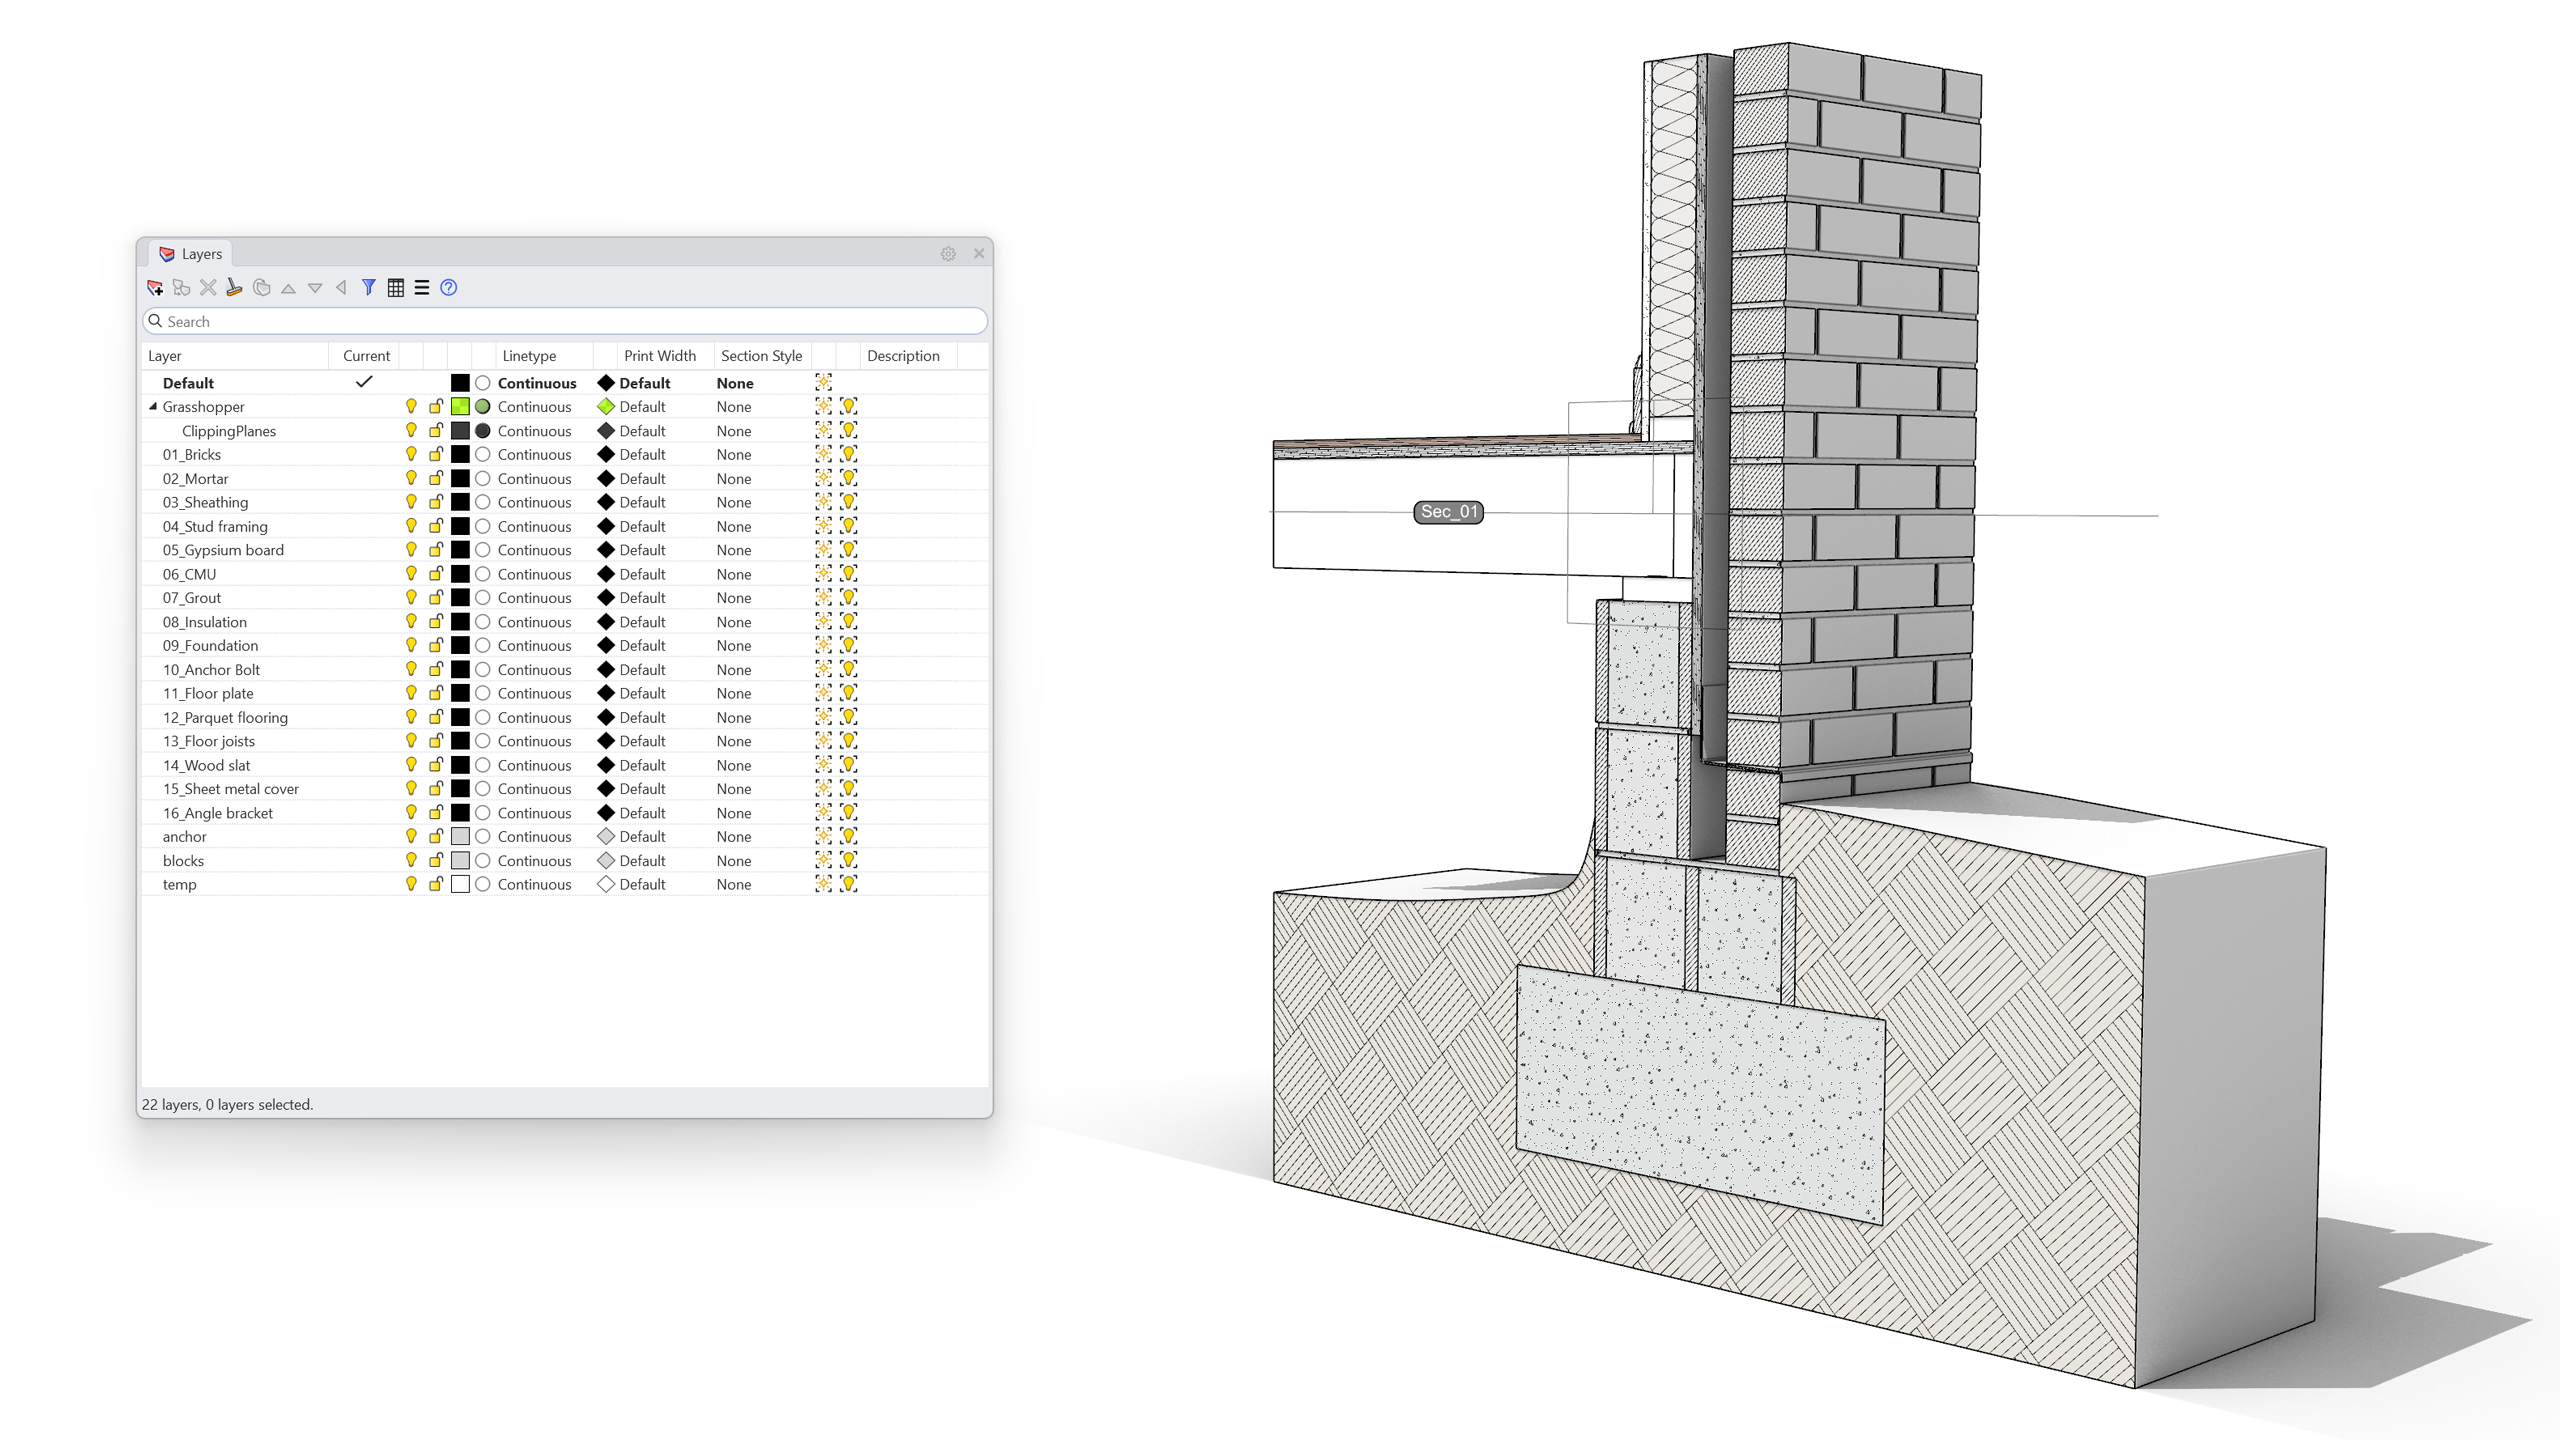
This layer organization is the backbone of the workflow. The new Grasshopper components respect Rhino’s Section Styles (the hatch pattern, boundary settings and colors you assign to objects or layers), so the time invested here pays off in every drawing extracted later.
Grasshopper
.Create a Parametric Clipping Plane
In this section, we’ll learn how to:
- Build a Model Clipping Plane driven by a
 Number Slider.
- Use
 Construct Point and an
 XZ Plane. Drive the Y input of [Construct Point] with a Number Slider to move the section along the Y axis.
- Name the section with the
 Model Object Grasshopper component.
- Target a specific viewport with the Value Picker.
Let’s get started!
- Download the Download Foundation3D-01.gh Grasshopper file.
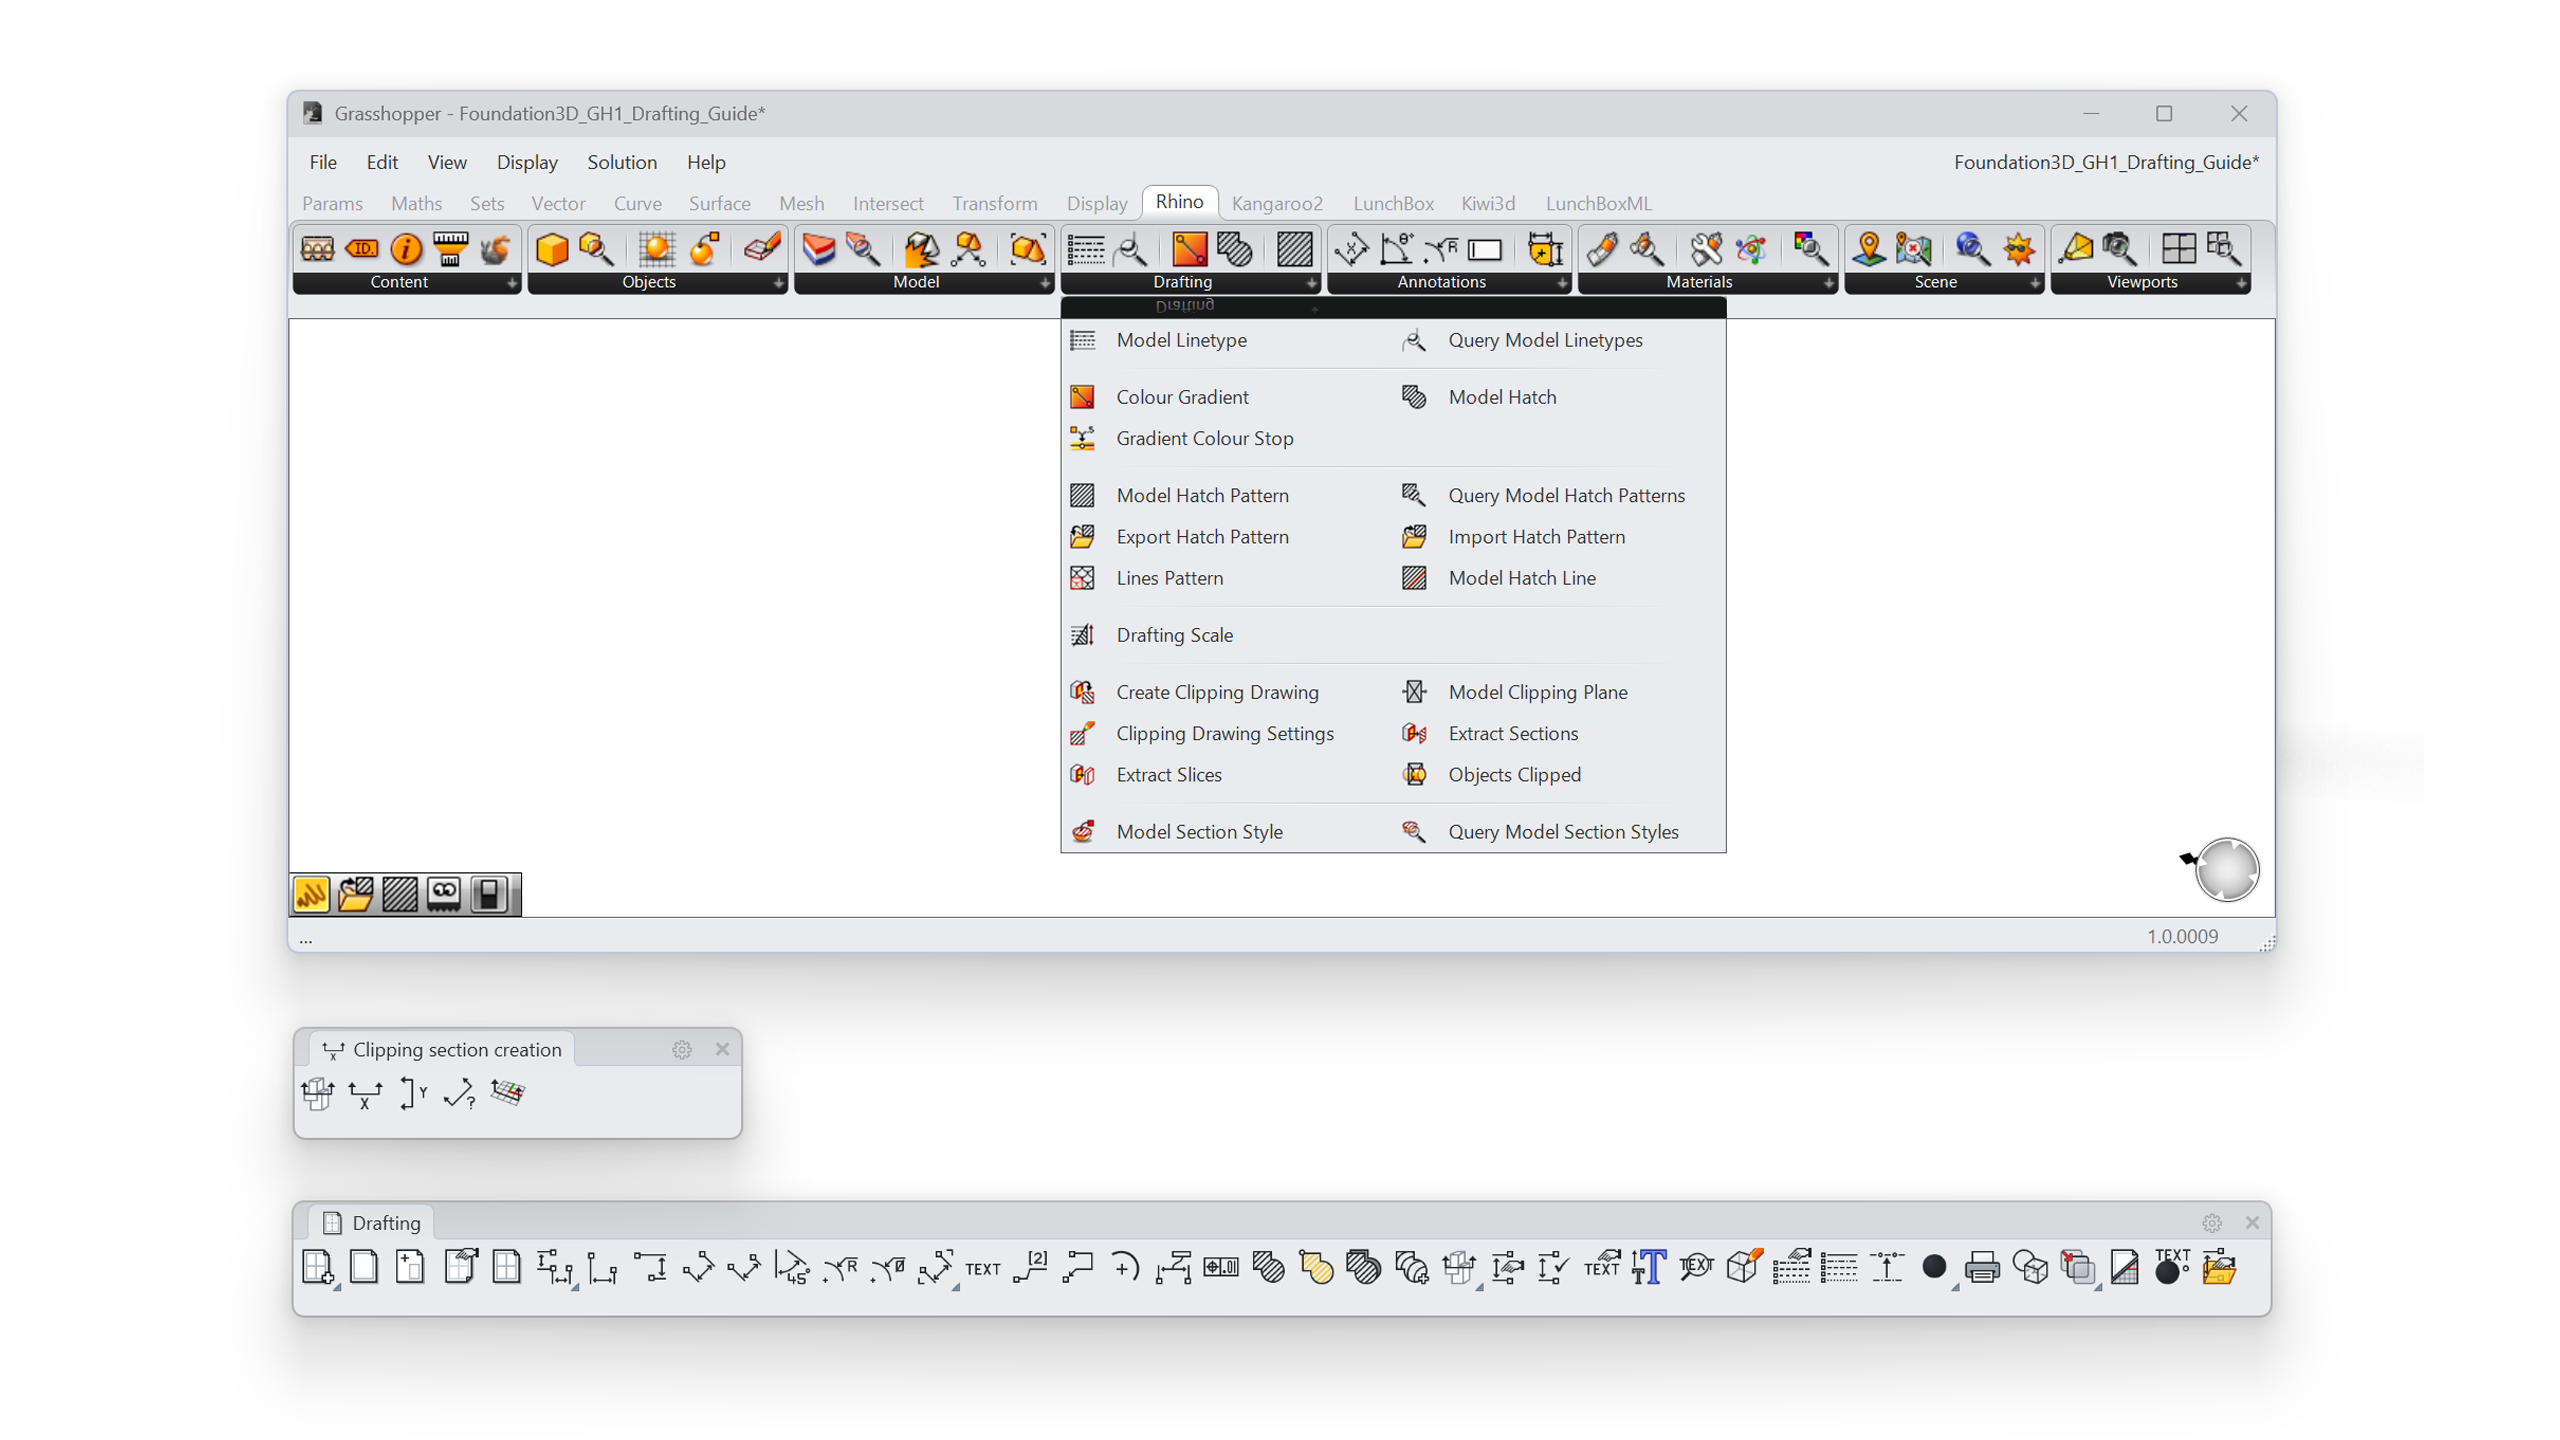
- All new clipping components live in the Rhino tab, Drafting subcategory in Grasshopper
.
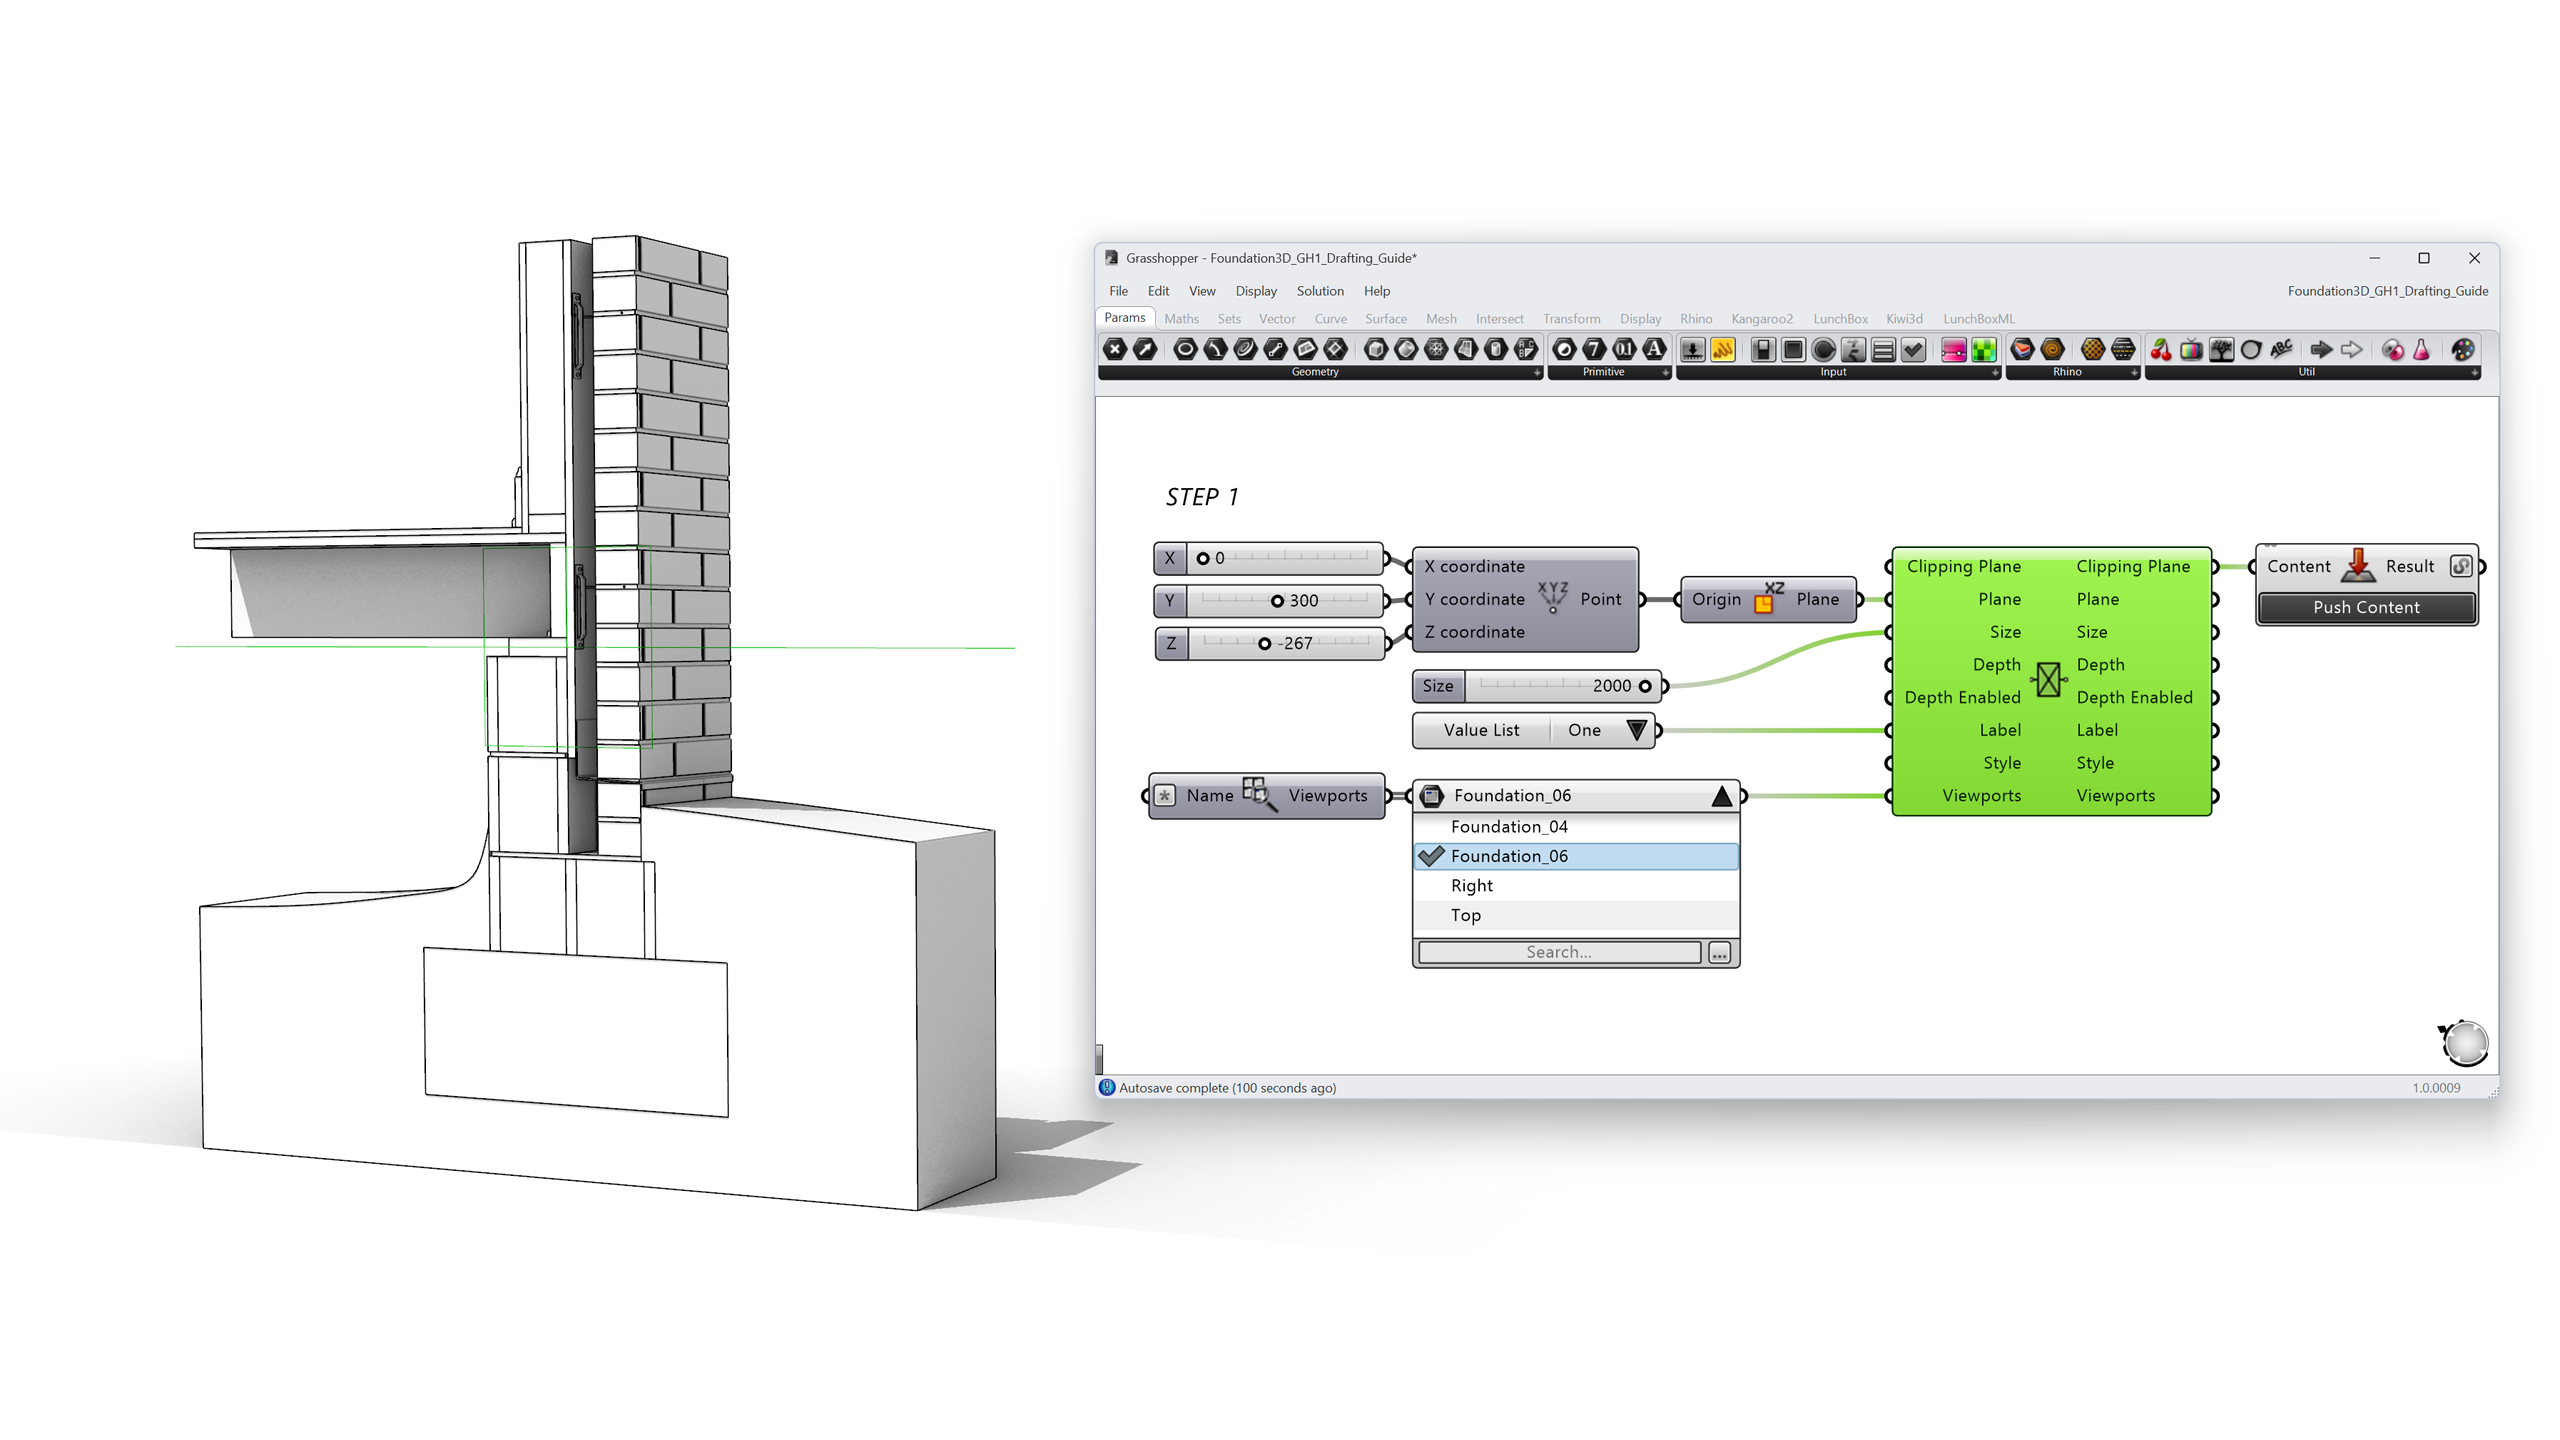
- Place a Model Clipping Plane component. Rather than referencing an existing clipping plane from the document, we build one from scratch so every property stays parametric:
- Plane sets the position and orientation of the section cut. Because we want a vertical section through the wall, feed it an XZ Plane (from Vector > Plane). To keep the plane’s origin parametric, build the origin with a Construct Point and drive the Z input from a Number Slider. That slider becomes the “section height” control for the whole detail.
For this example:
X = 0,Y = 300,Z = -267(slider range from-500to500, integer step). Move the slider and the section cuts up and down through the assembly. - Size and Depth set the width and depth of the clipping plane. For this example: Size = 2000 (mm), Depth = 100 (mm), Depth Enabled = False.
- For this example:
Size = 2000(mm),Depth = 100(mm),Depth Enabled = False.
- For this example:
- Label and Style define how the section marker is annotated: (0) None, (1) Dot, (2) Text. For this example, we chose Text so the section marker appears as readable text in the viewport. Style references an annotation style from the document; leave it empty to use the default.
- Viewports sets which viewports the plane clips. A
 Query Viewports component with an empty name filter returns every model viewport, but for a specific drawing you often want just one. Wire a Value Picker into the Viewports input and tick only the viewport you want to work in. For this example, we chose the viewport named
Foundation_06. - When the clipping plane should become part of the document, to use it in layouts or share the file, bake it with a Content Cache component. By default a baked clipping plane clips all objects in the model.
- Plane sets the position and orientation of the section cut. Because we want a vertical section through the wall, feed it an
- To name the section
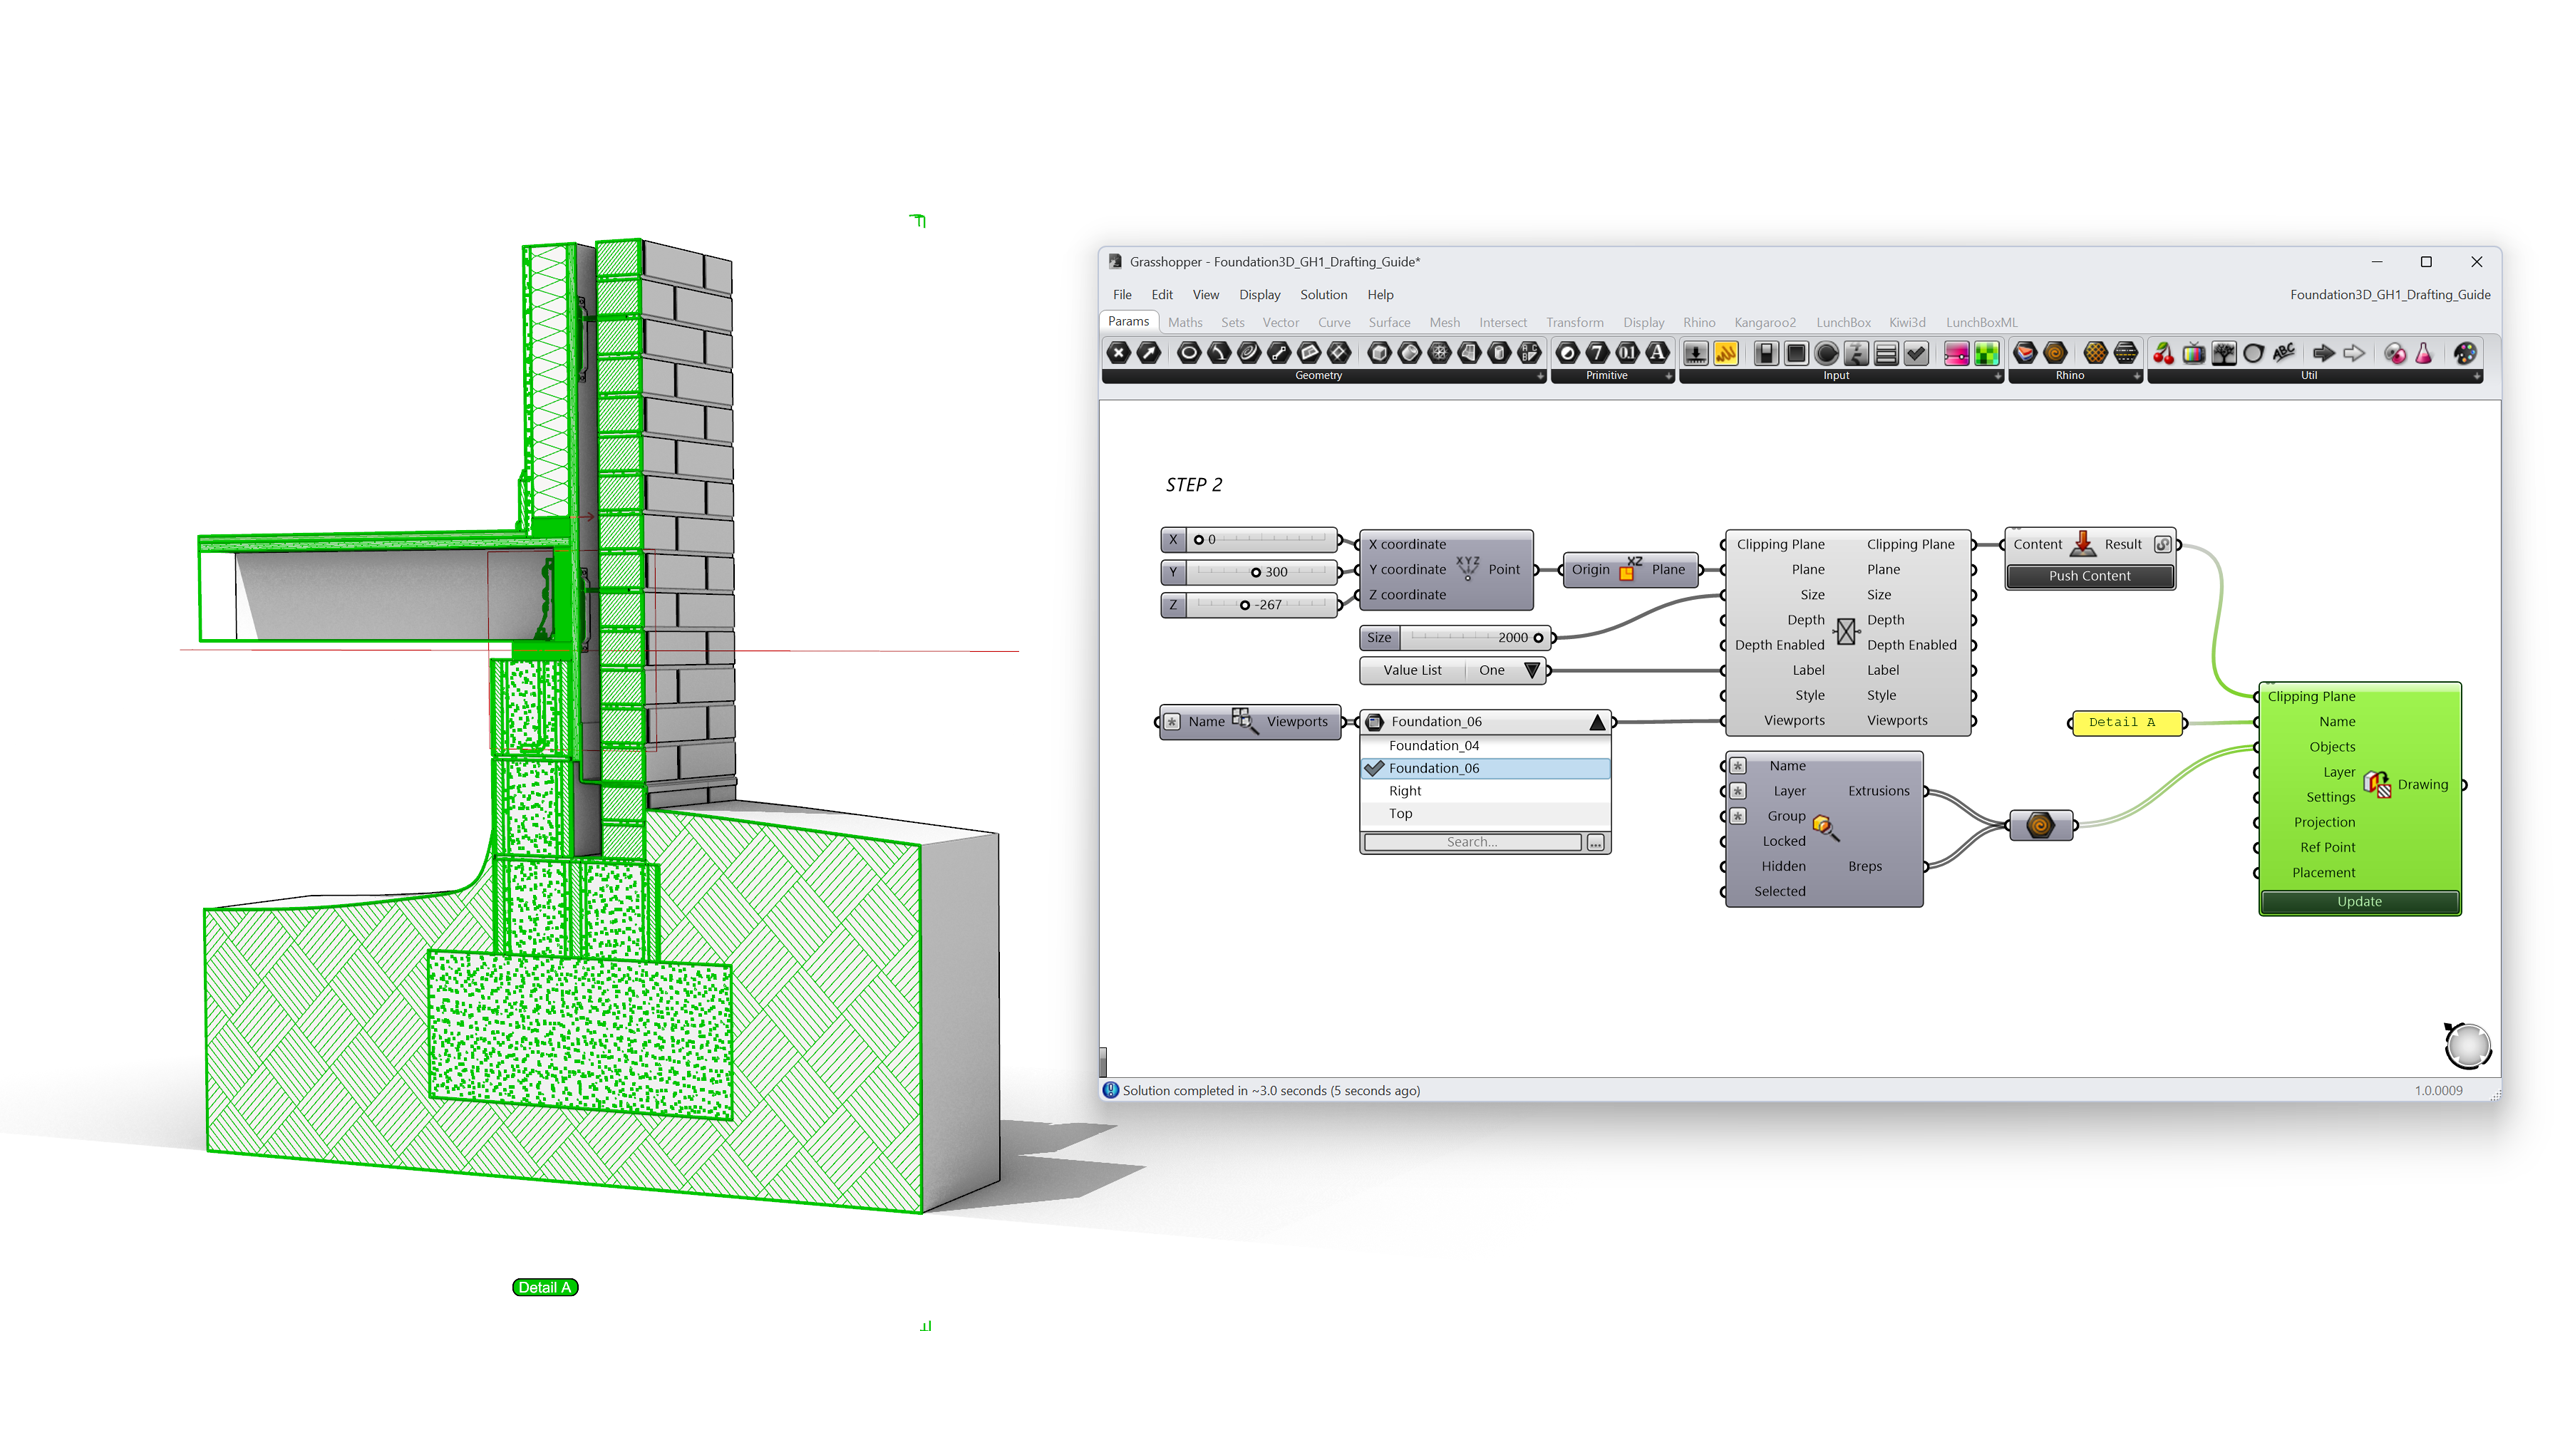
"Detail A"(for example), type the name directly into the Name input of Create Clipping Drawing.
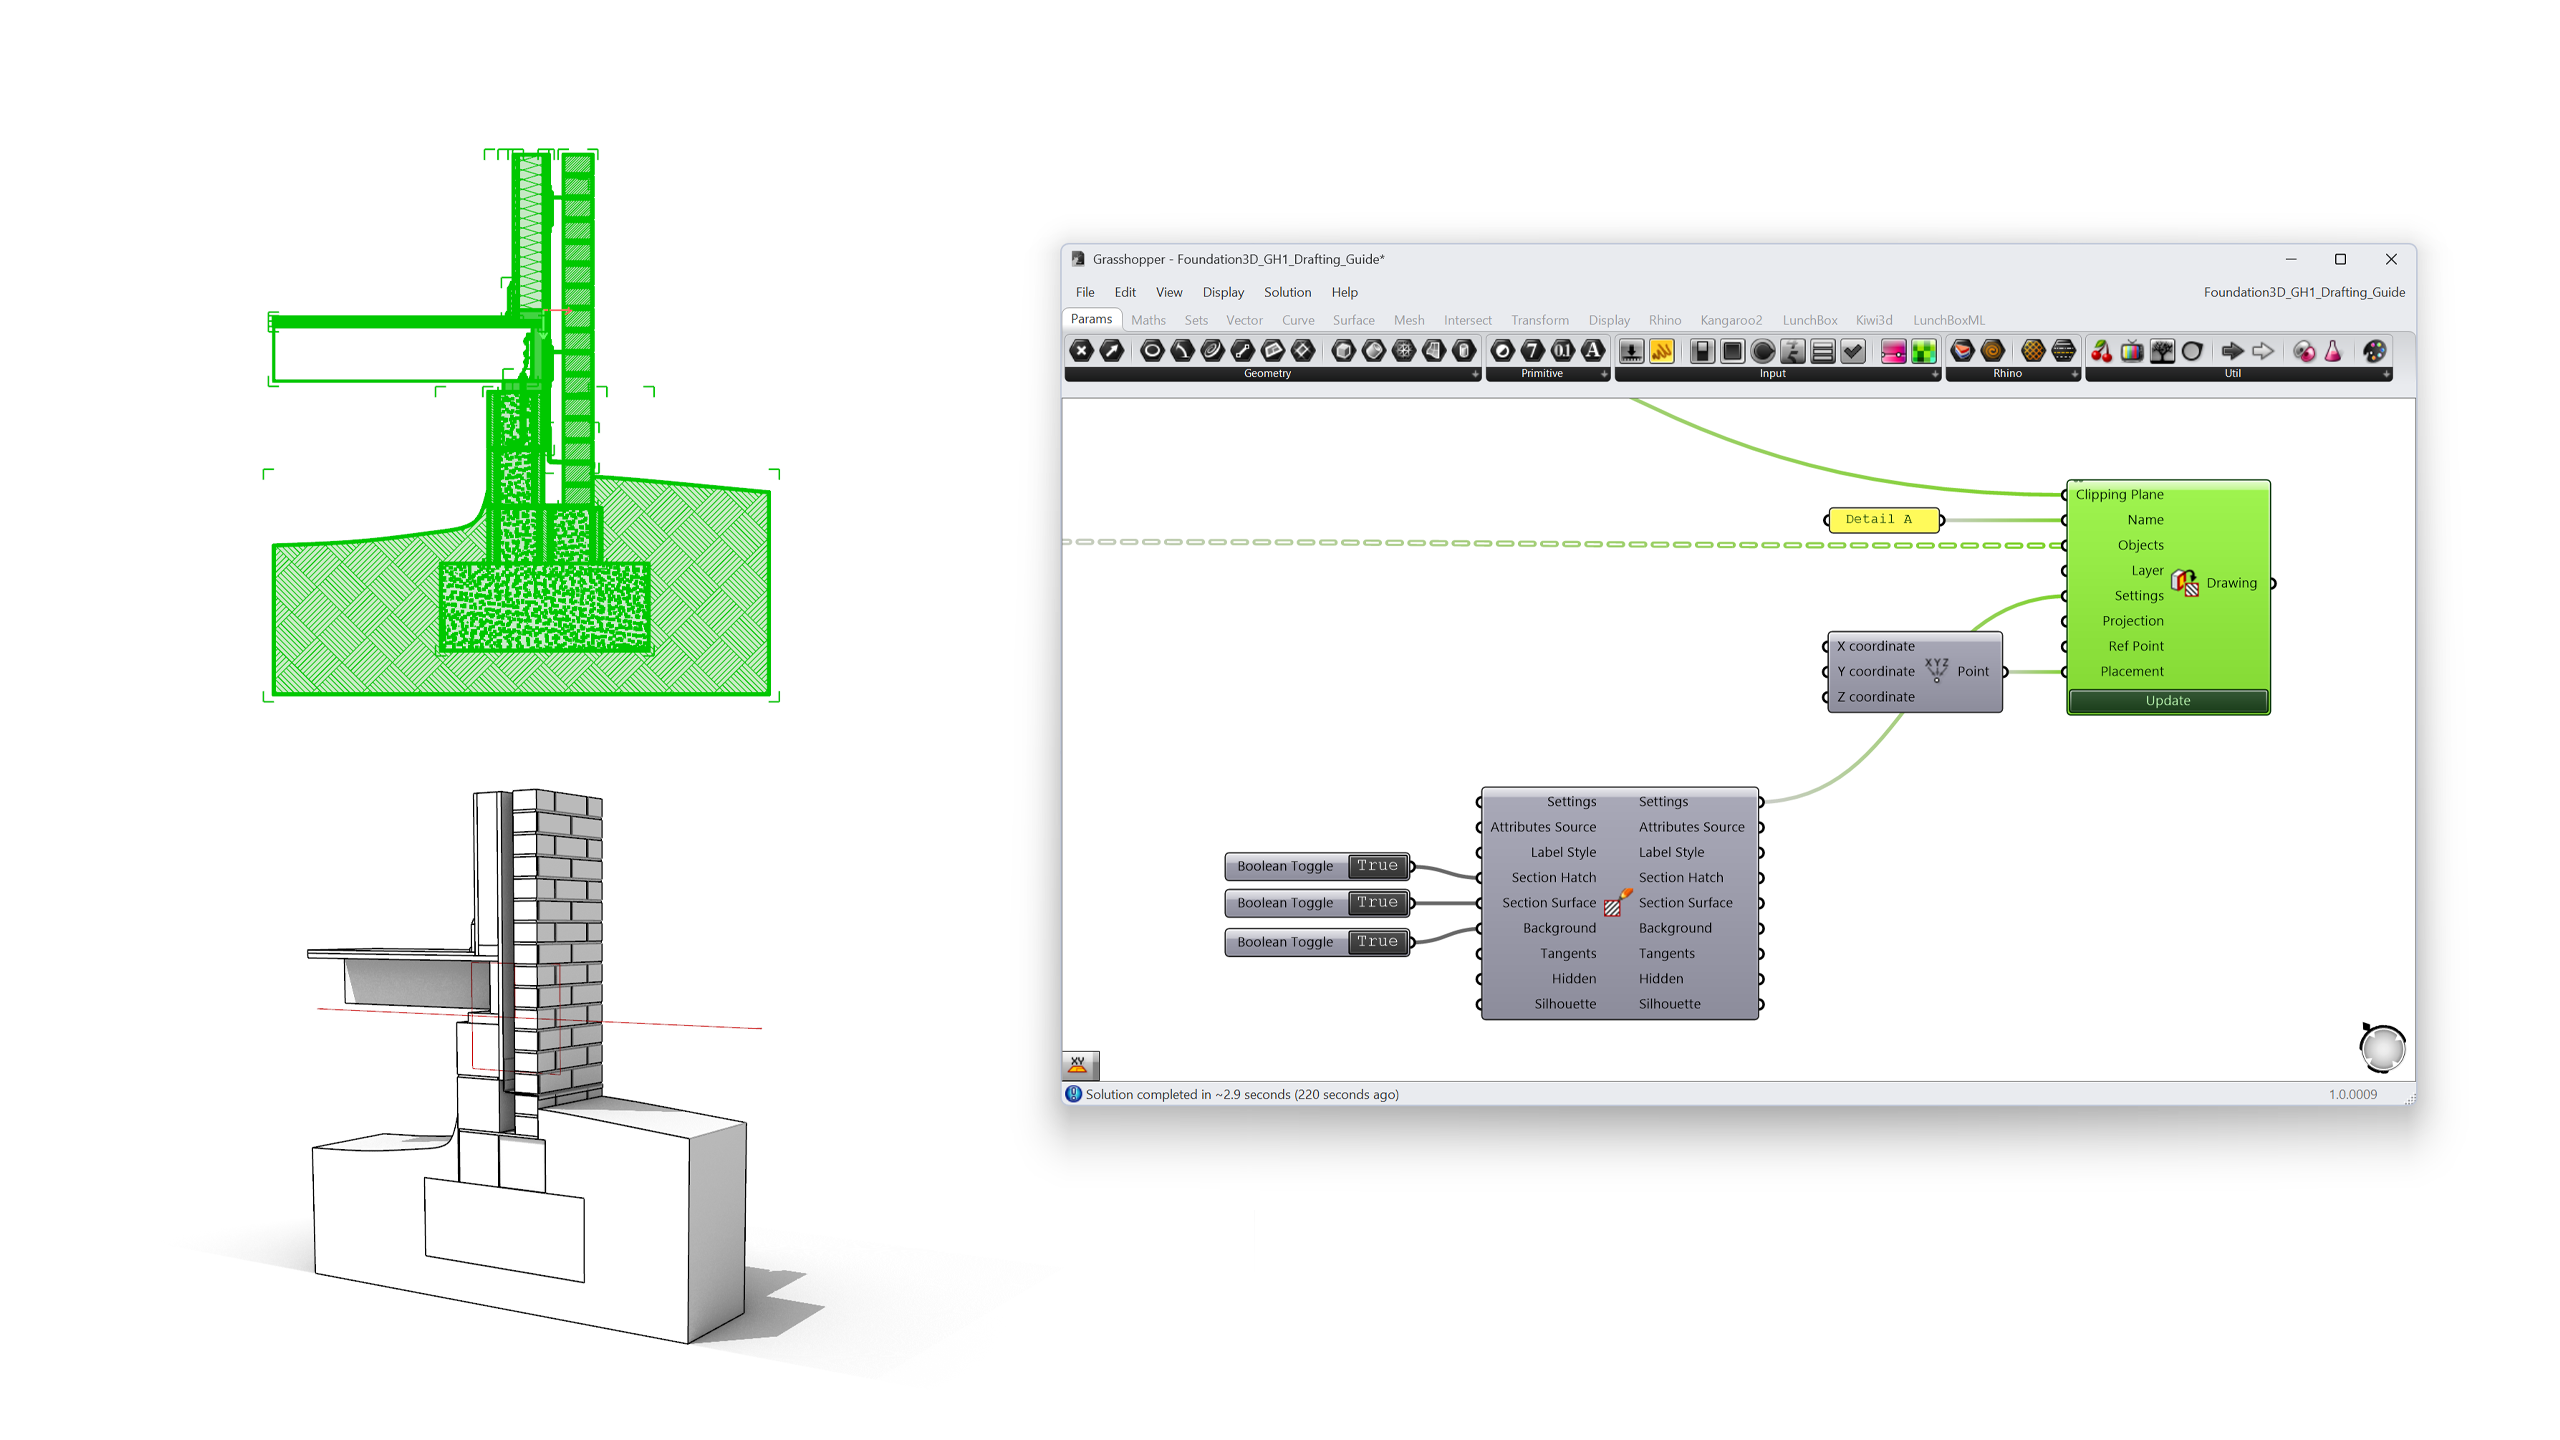
The drawing needs a name from one of two places: the clipping plane’s name, optionally set upstream with a Model Object component, or the Name input of Create Clipping Drawing component shown here. Without either, the component warns and no drawing is created. If both are set, the clipping plane’s name takes precedence over the Name input.
- Drag the Number Slider. The wall assembly clips live in the viewport. This is already a parametric section, before a single line has been drawn.
Control what gets clipped
In this section you will learn:
- how to control exactly which parts of a construction detail get cut, by picking the layers you care about in Grasshopper and feeding only that geometry into Create Clipping Drawing, using the Value Picker and
 Query Model Objects components.
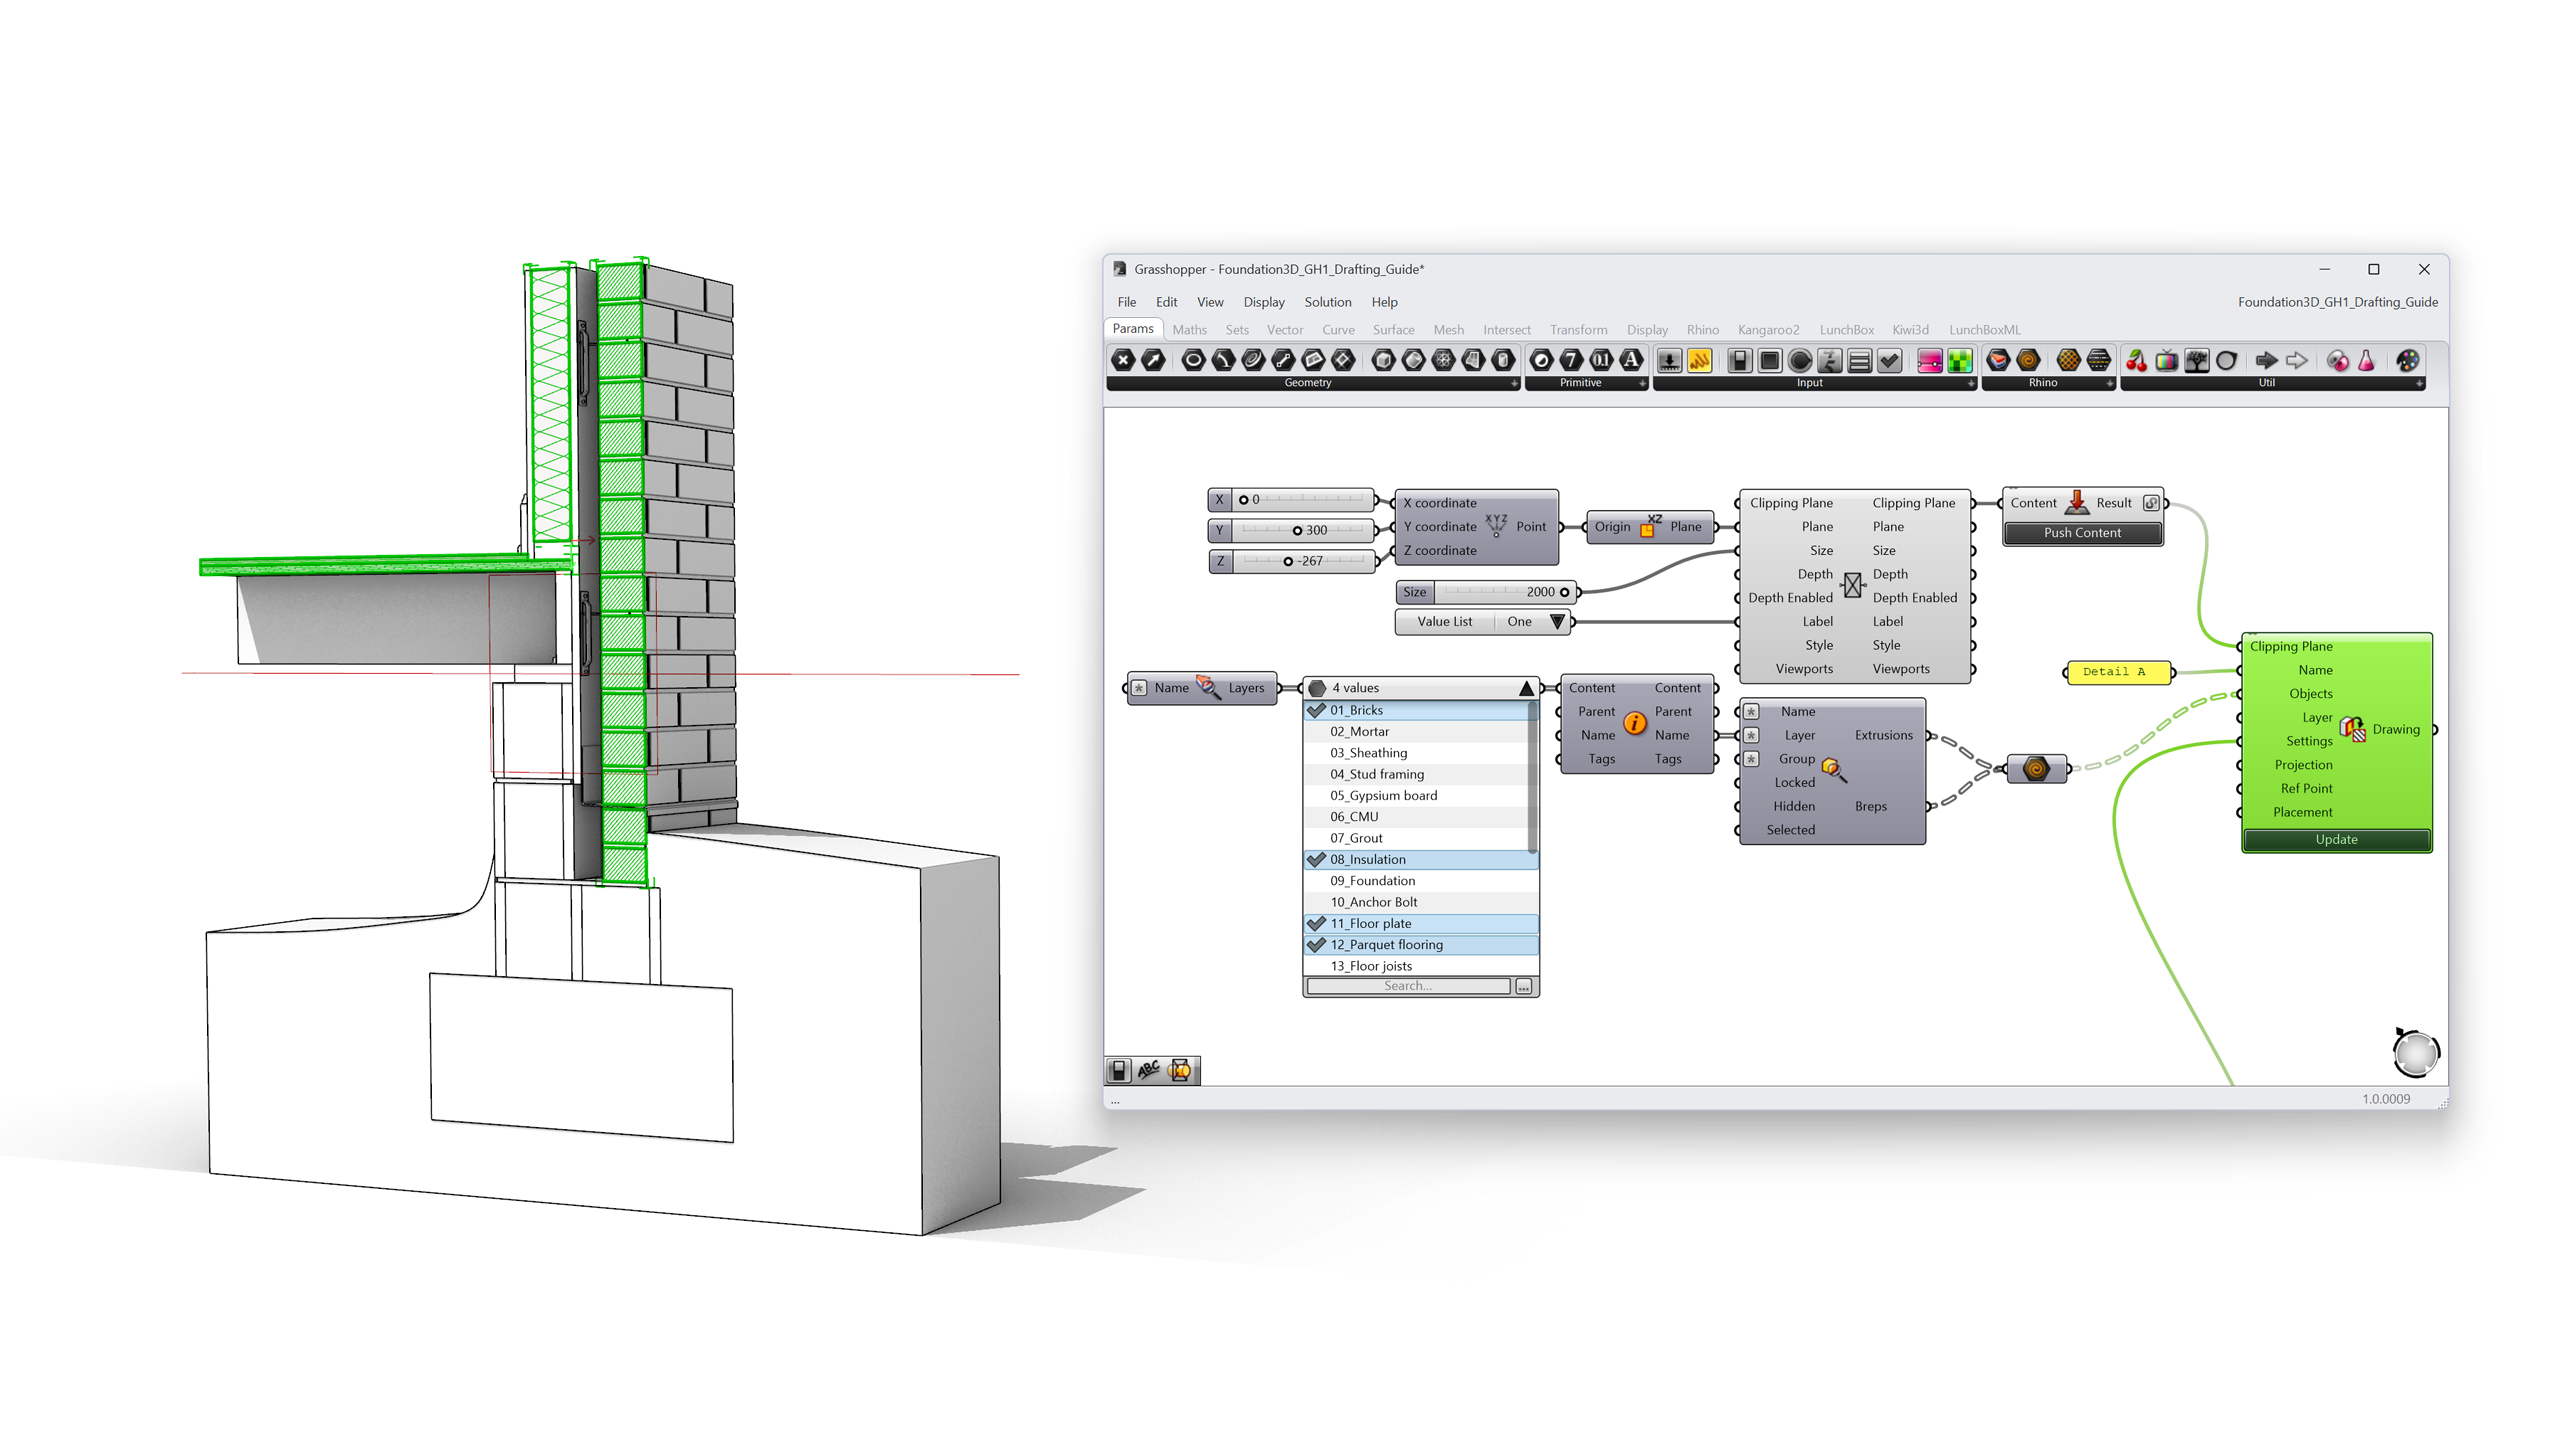
A construction detail often includes context you don’t want to cut. The simplest way to control that is to pick the layers you care about in Grasshopper and pass only that geometry into Create Clipping Drawing.
Three components do the job:
- The Value Picker on the output lets you tick only the layers you want to cut. For this example:
08_Insulation,11_Floor plate, and12_Parquet flooring. - Query Model Objects, with its Layer input driven by the Value Picker, returns the geometry on those layers. Its Extrusions and Breps outputs feed straight into the Objects input of the Create Clipping Drawing component.
- Tick a layer on or off in the Value Picker, press Update on the Create Clipping Drawing component, and the 2D clipping drawing is generated in Grasshopper
.
Extract the 2D Section Drawing
In this section, we’ll learn:
- What Create Clipping Drawing does and how it maps to Rhino’s
 ClippingDrawings
command.
- How to configure the output with
 Clipping Drawing Settings.
- How to control regeneration with the Update input.
Let’s get started!
- Download the Download Foundation3D-03.gh Grasshopper file.
- The Create Clipping Drawing component is the Grasshopper
equivalent of Rhino’s ClippingDrawings command. It extracts section curves, hatches*, and background geometry* into a 2D drawing stored as a block.
- Two components, Clipping Drawing Settings and Label Style, decide what the drawing contains. For the latter, new inputs let you include annotations in general, and more specifically dimensions, leaders, text entities, and annotation dots.
- Attributes Source: By Output Layers creates a clean, automatically structured layer tree under a root layer named after the clipping plane; By Source Layers keeps the original object attributes; By Input Objects combines both.
- Section Hatch / Section Surface include the material hatches and fills cut by the plane.
- Background, Tangents, Hidden, Silhouette control which edge types beyond the cut appear in the drawing. Section Hatch, Background, Tangents, Hidden, and Silhouette are all on by default, and Section Surface is off. For a cleaner construction detail, consider turning Hidden off.
- Wire the Clipping Drawing Settings component created above into Create Clipping Drawing component together with:
- Objects: the geometry to include. Unlike Objects Clipped, this input accepts plain Grasshopper geometry, so nothing needs to be baked.
- Layer: the root layer the block instance of the clipping drawing is assigned to. If left empty, the component places the block on a layer called Clipping Drawings by default.
- Projection: sets the view projection used to generate the drawing. Options: (0) Parallel, (1) Parallel Reflected, (2) Perspective. Parallel is the usual choice for construction details; use Perspective when you want a camera-based view.
- Ref Point: a reference point used when transforming the drawing from the clipping plane to the target placement plane. In practice it anchors the 2D output on the Placement plane, so if you want the drawing to land on a specific spot of a sheet, set Ref Point to the matching point on the clipping plane.
- Placement: a target plane for the 2D drawing. Leave it empty to draw the section in place on the clipping plane, or give it a plane next to the model to lay the drawing flat for a sheet.
- Update: drawing extraction can be heavy, so the component recalculates only when you press the Update button. Zoom into the component and click the + to expose Update as a Boolean input if you want automatic regeneration, which is useful with Grasshopper Player.
- Move the section slider, press Update, and the 2D detail regenerates: cut lines, hatches, and background edges, on structured layers. This is the moment the workflow becomes parametric documentation.
Create Material Hatch Patterns
In this section, learn how:
- Hatch patterns are represented in Grasshopper
.
- To build a line-based hatch pattern with
 Model Hatch Line and
 Model Hatch Pattern.
- To build a tile-based hatch pattern with
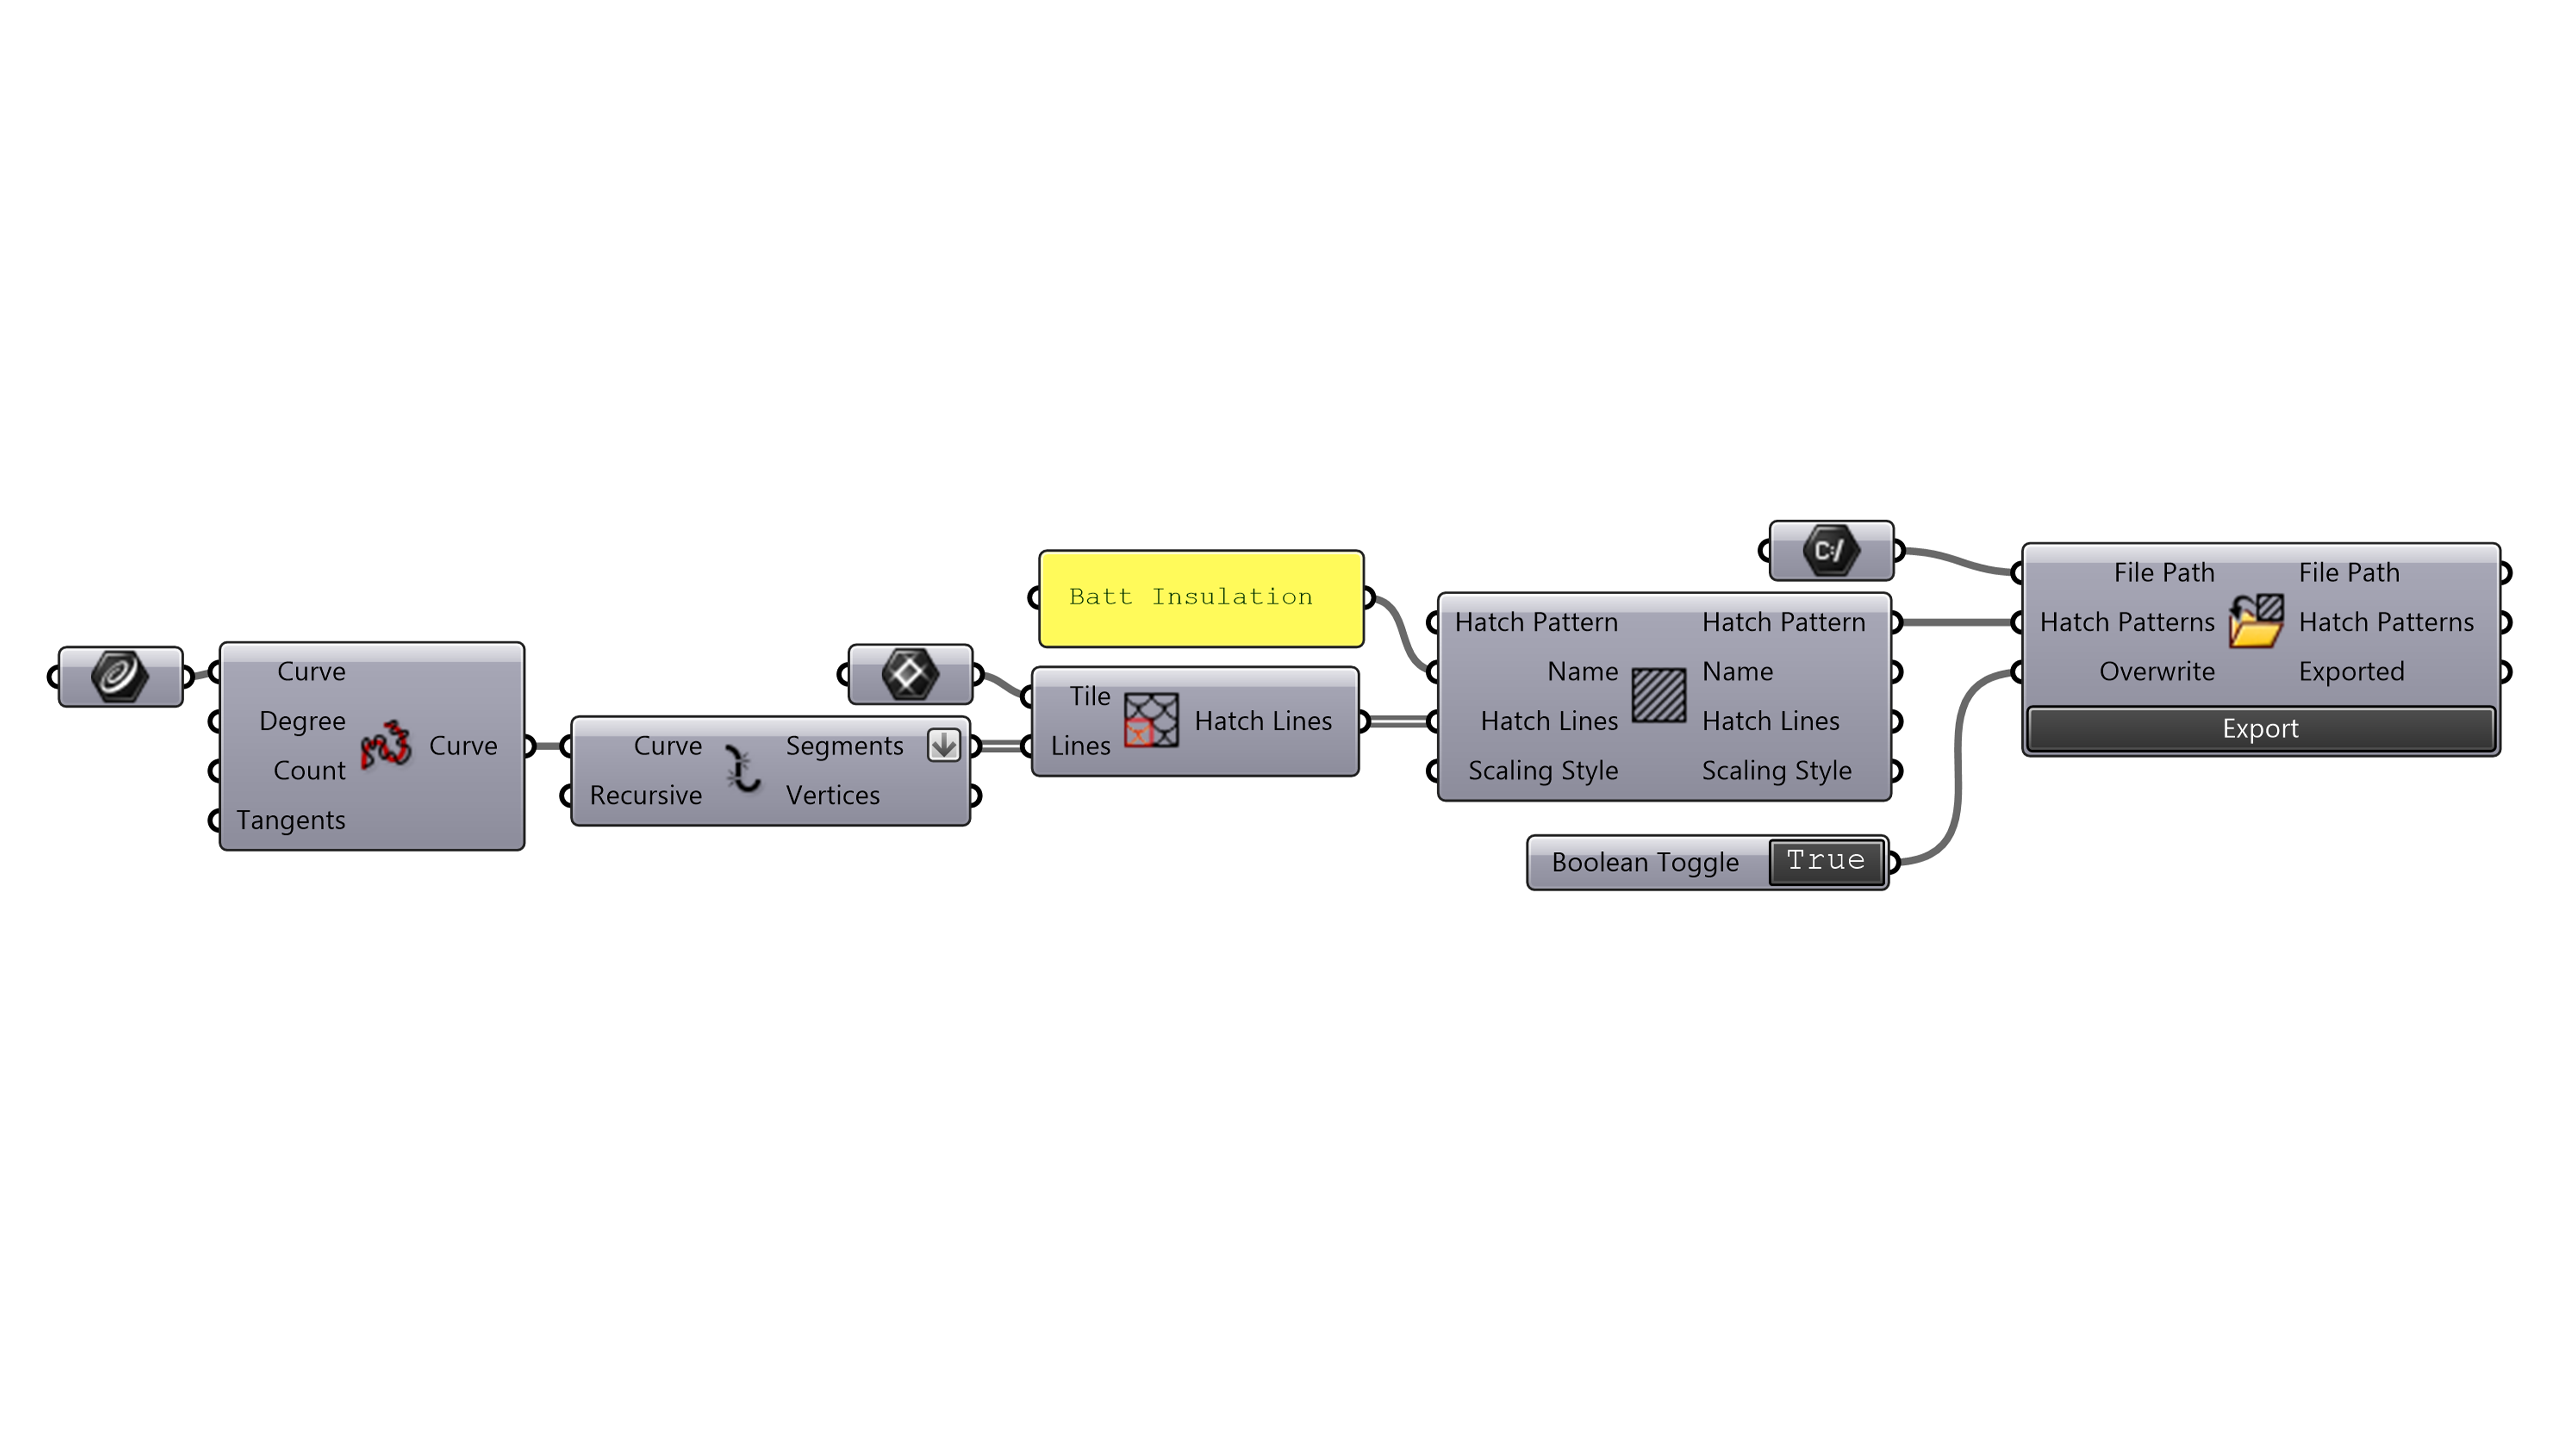
 Lines Pattern (brick, stone, batt).
- To save the pattern as a
.patfile or into the document.
Let’s get started!
- Download the Download Foundation3D-04.gh Grasshopper file.
- The extracted drawing picks up hatches from the section styles in the document. But what if the pattern you need doesn’t exist? Rigid insulation, for instance, is often drawn with a pattern that isn’t in the default library.
- Previously, custom patterns meant hand-editing
.patfiles in AutoCAD’s text syntax with no live preview. As in Rhino 8, hatch patterns are Grasshopper
data. Rhino 9 updates the component set, most notably by adding the Lines Pattern component, which makes tile-based patterns easier to build.
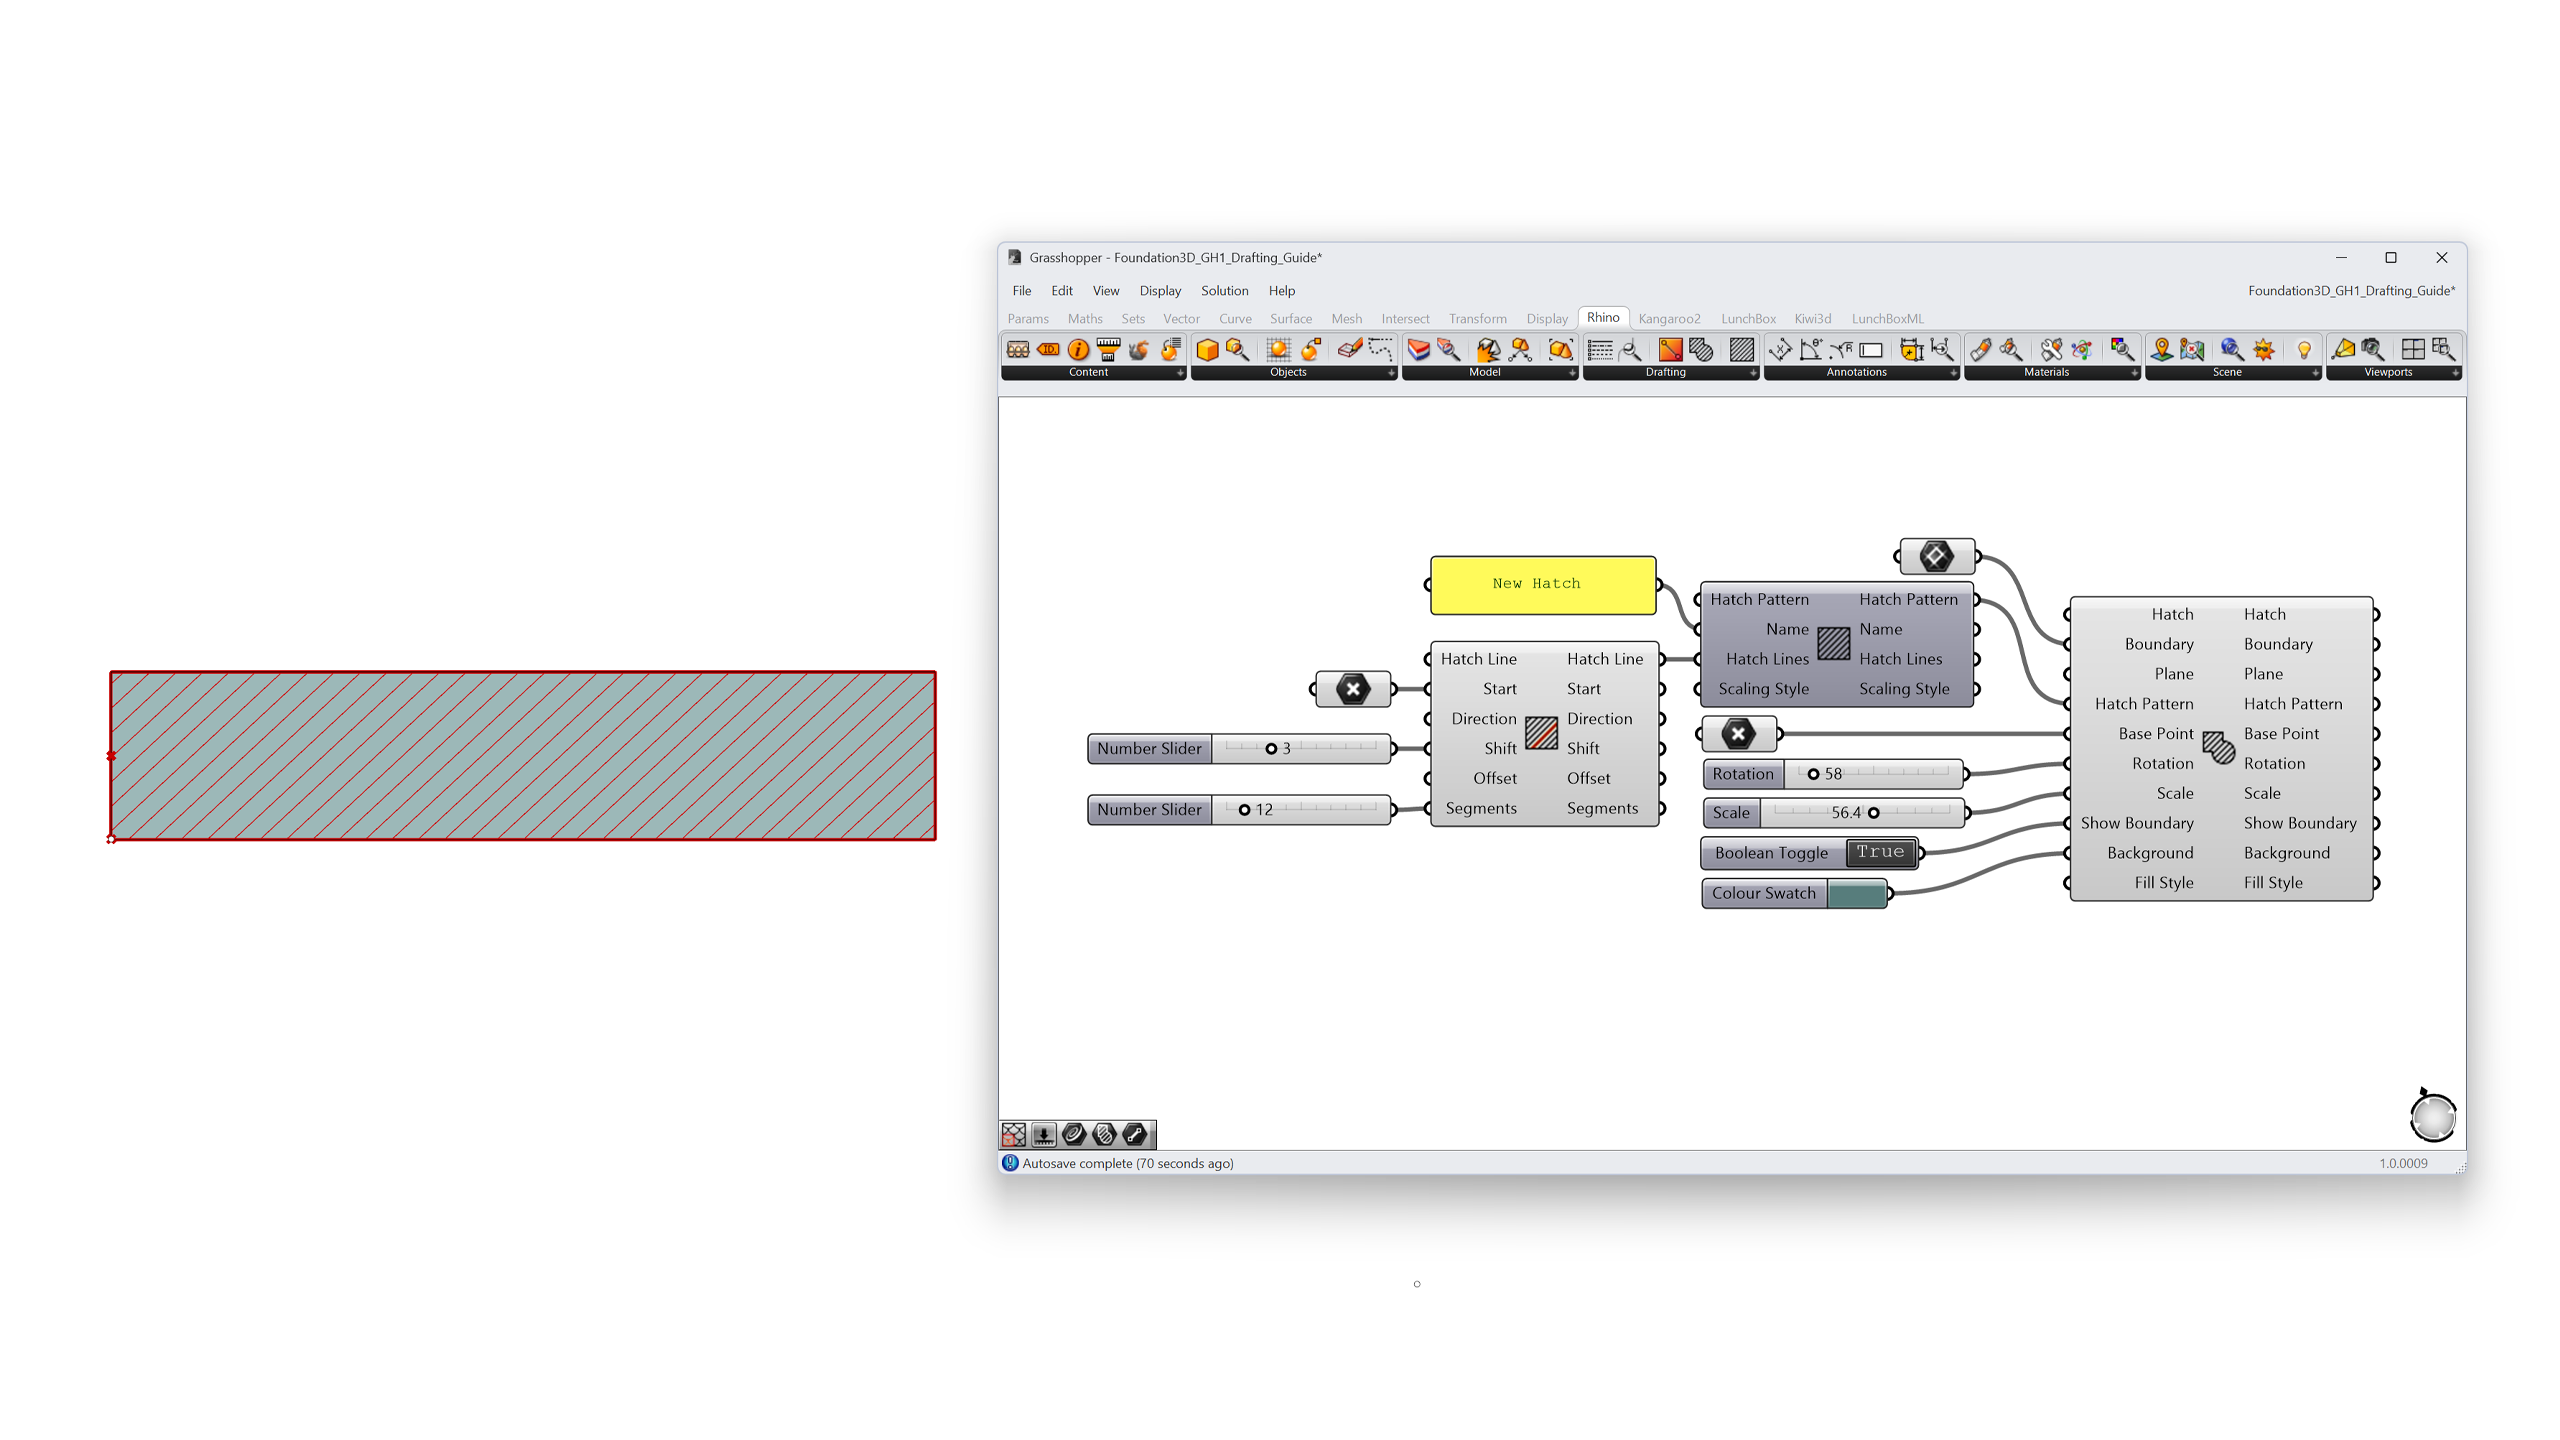
- Model Hatch Pattern is the pattern definition itself: name, description, units, scaling style (Drafting patterns scale with the plotted drawing; Model patterns have a fixed real-world scale, like actual brick coursing).
- Hatch Line is one family of parallel lines in a pattern: a start point, direction, offset between repetitions, and a segments list for dashes (positive values are solid, negative are gaps).
 Model Hatch is an instance of a pattern inside a boundary curve, ready to preview or bake.
- Build a new pattern from solid Hatch Lines, at a 45° direction, and feed it into a Model Hatch Pattern. Wire a rectangle into a Model Hatch to preview the result live while you tune the offsets with sliders.
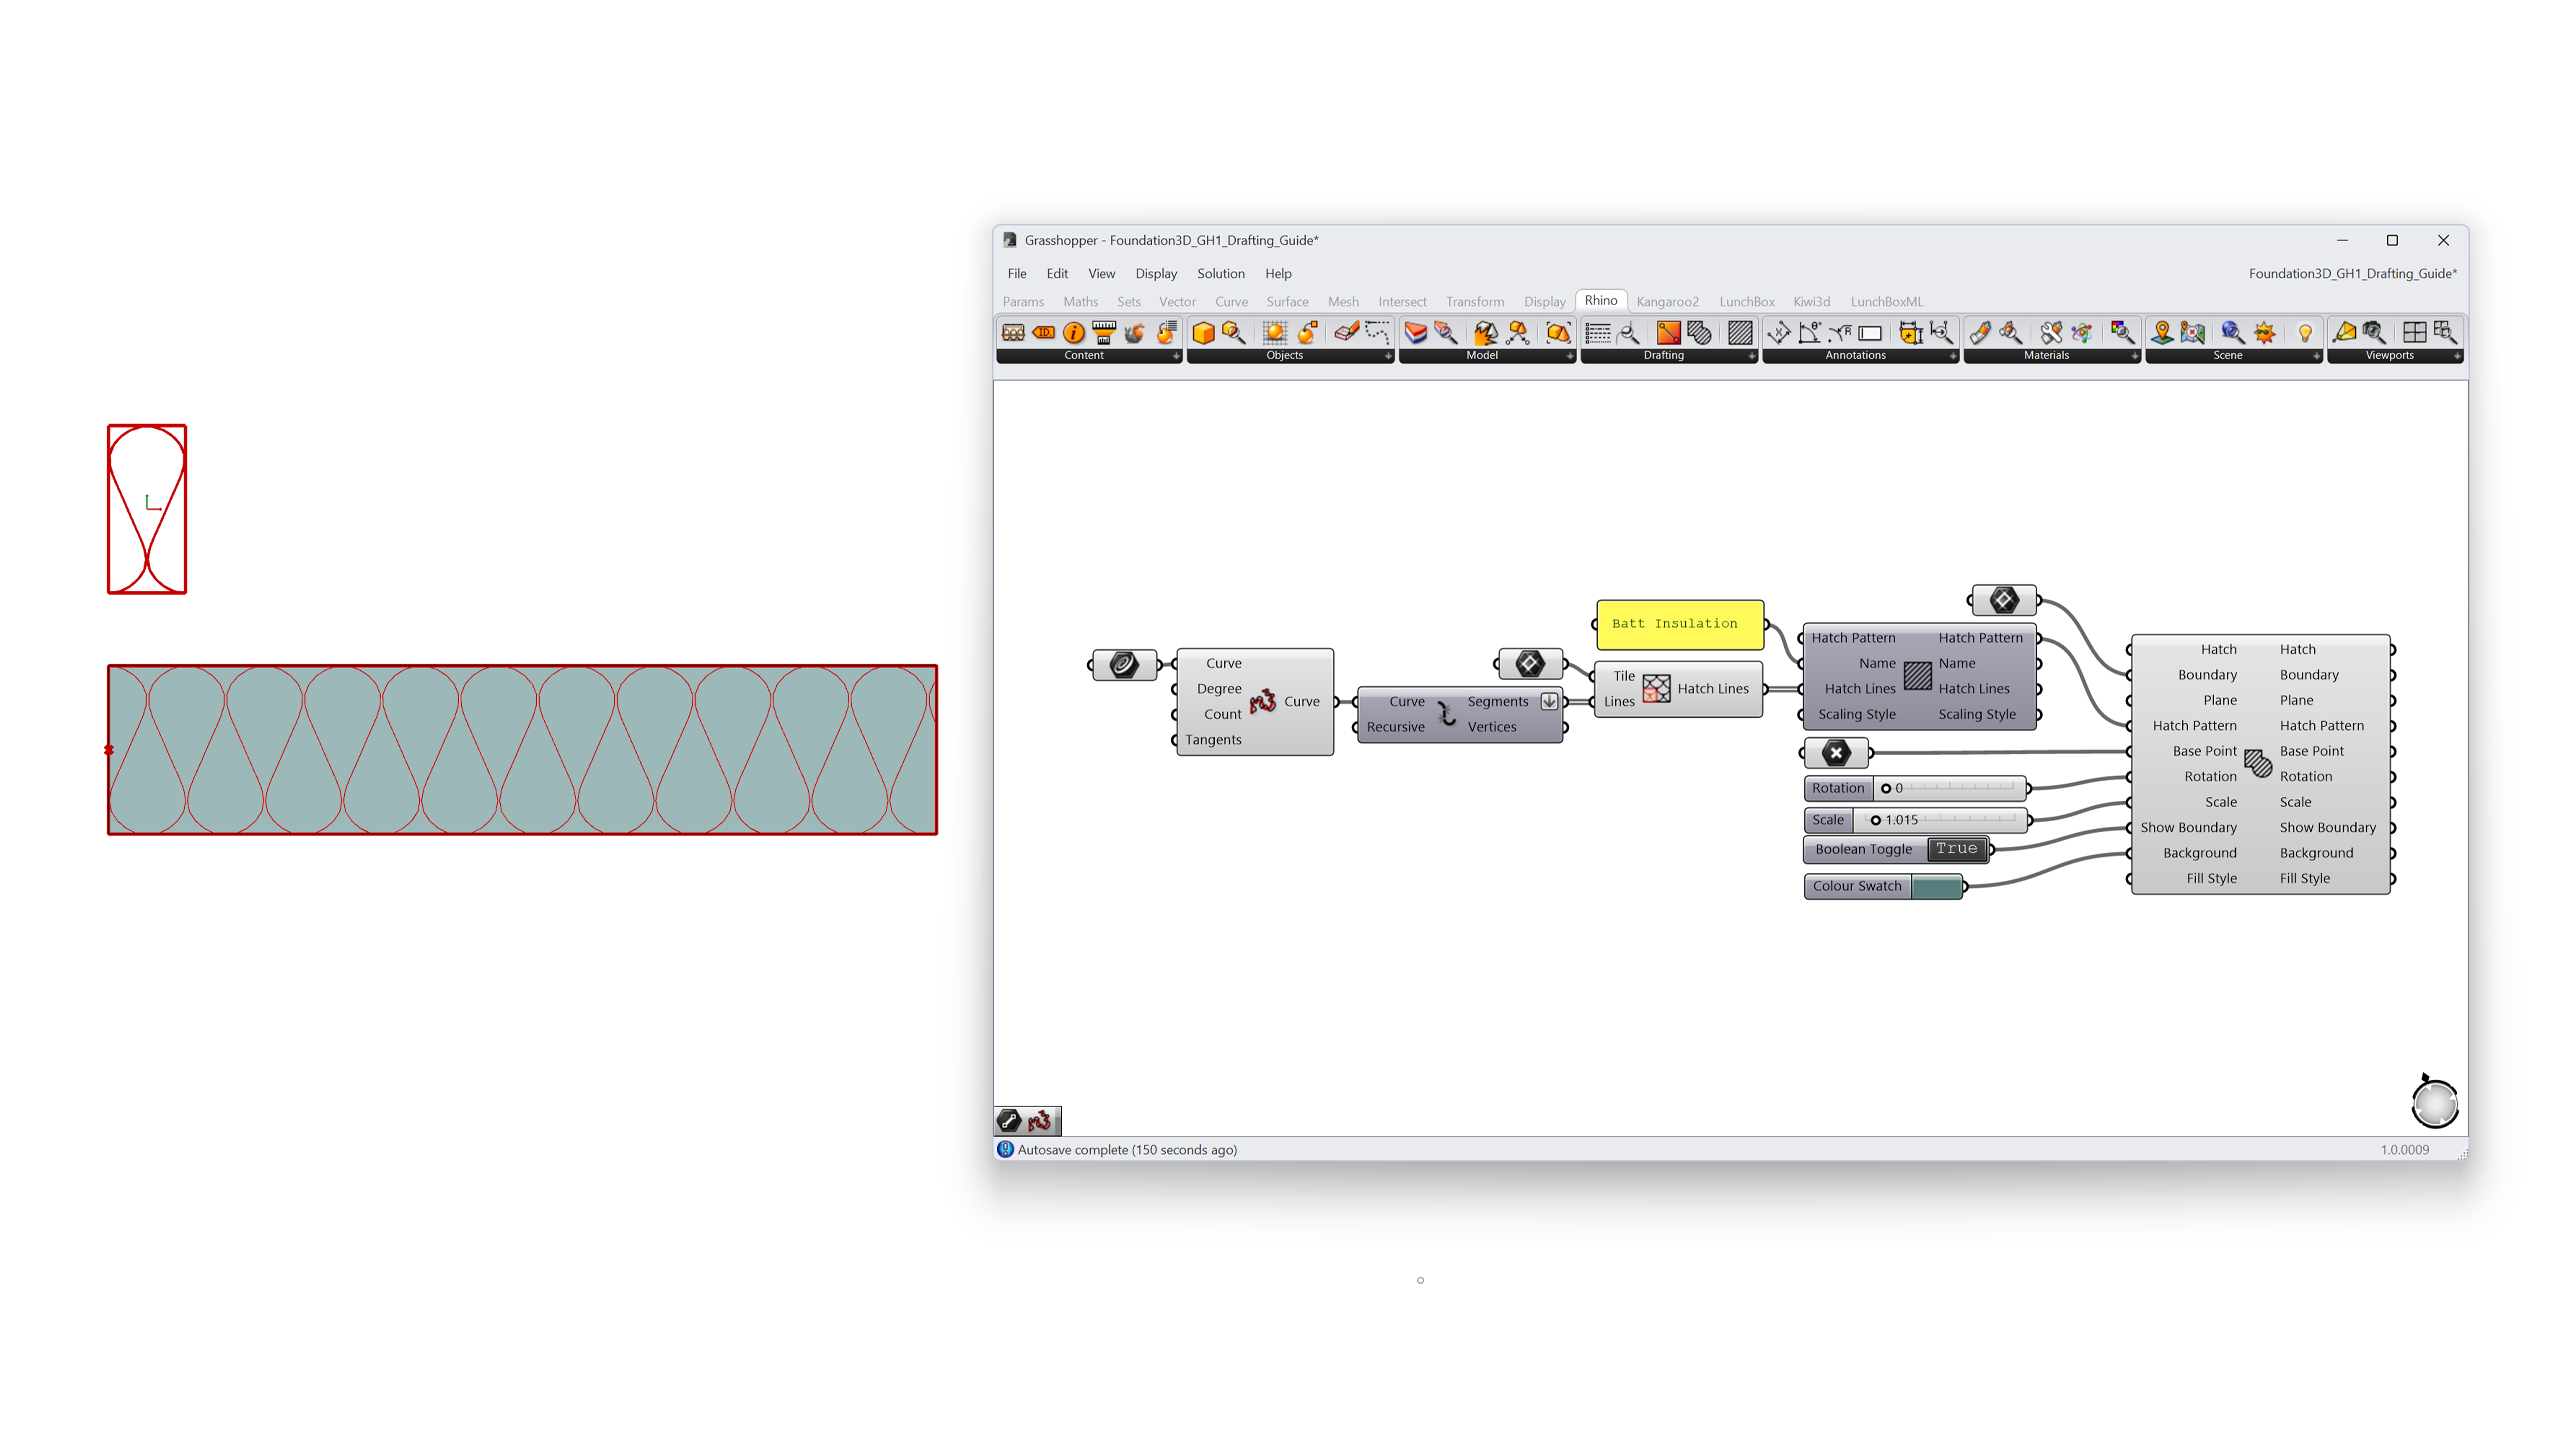
- For patterns that are easier to draw than to describe, such as brick bonds, stone patterns, or batt insulation, use the Lines Pattern component. It doesn’t produce a hatch on its own: it generates the hatch lines from the tile you draw. Pass those lines into Model Hatch Pattern to build the pattern, and then into Model Hatch to distribute the pattern across the boundary area.
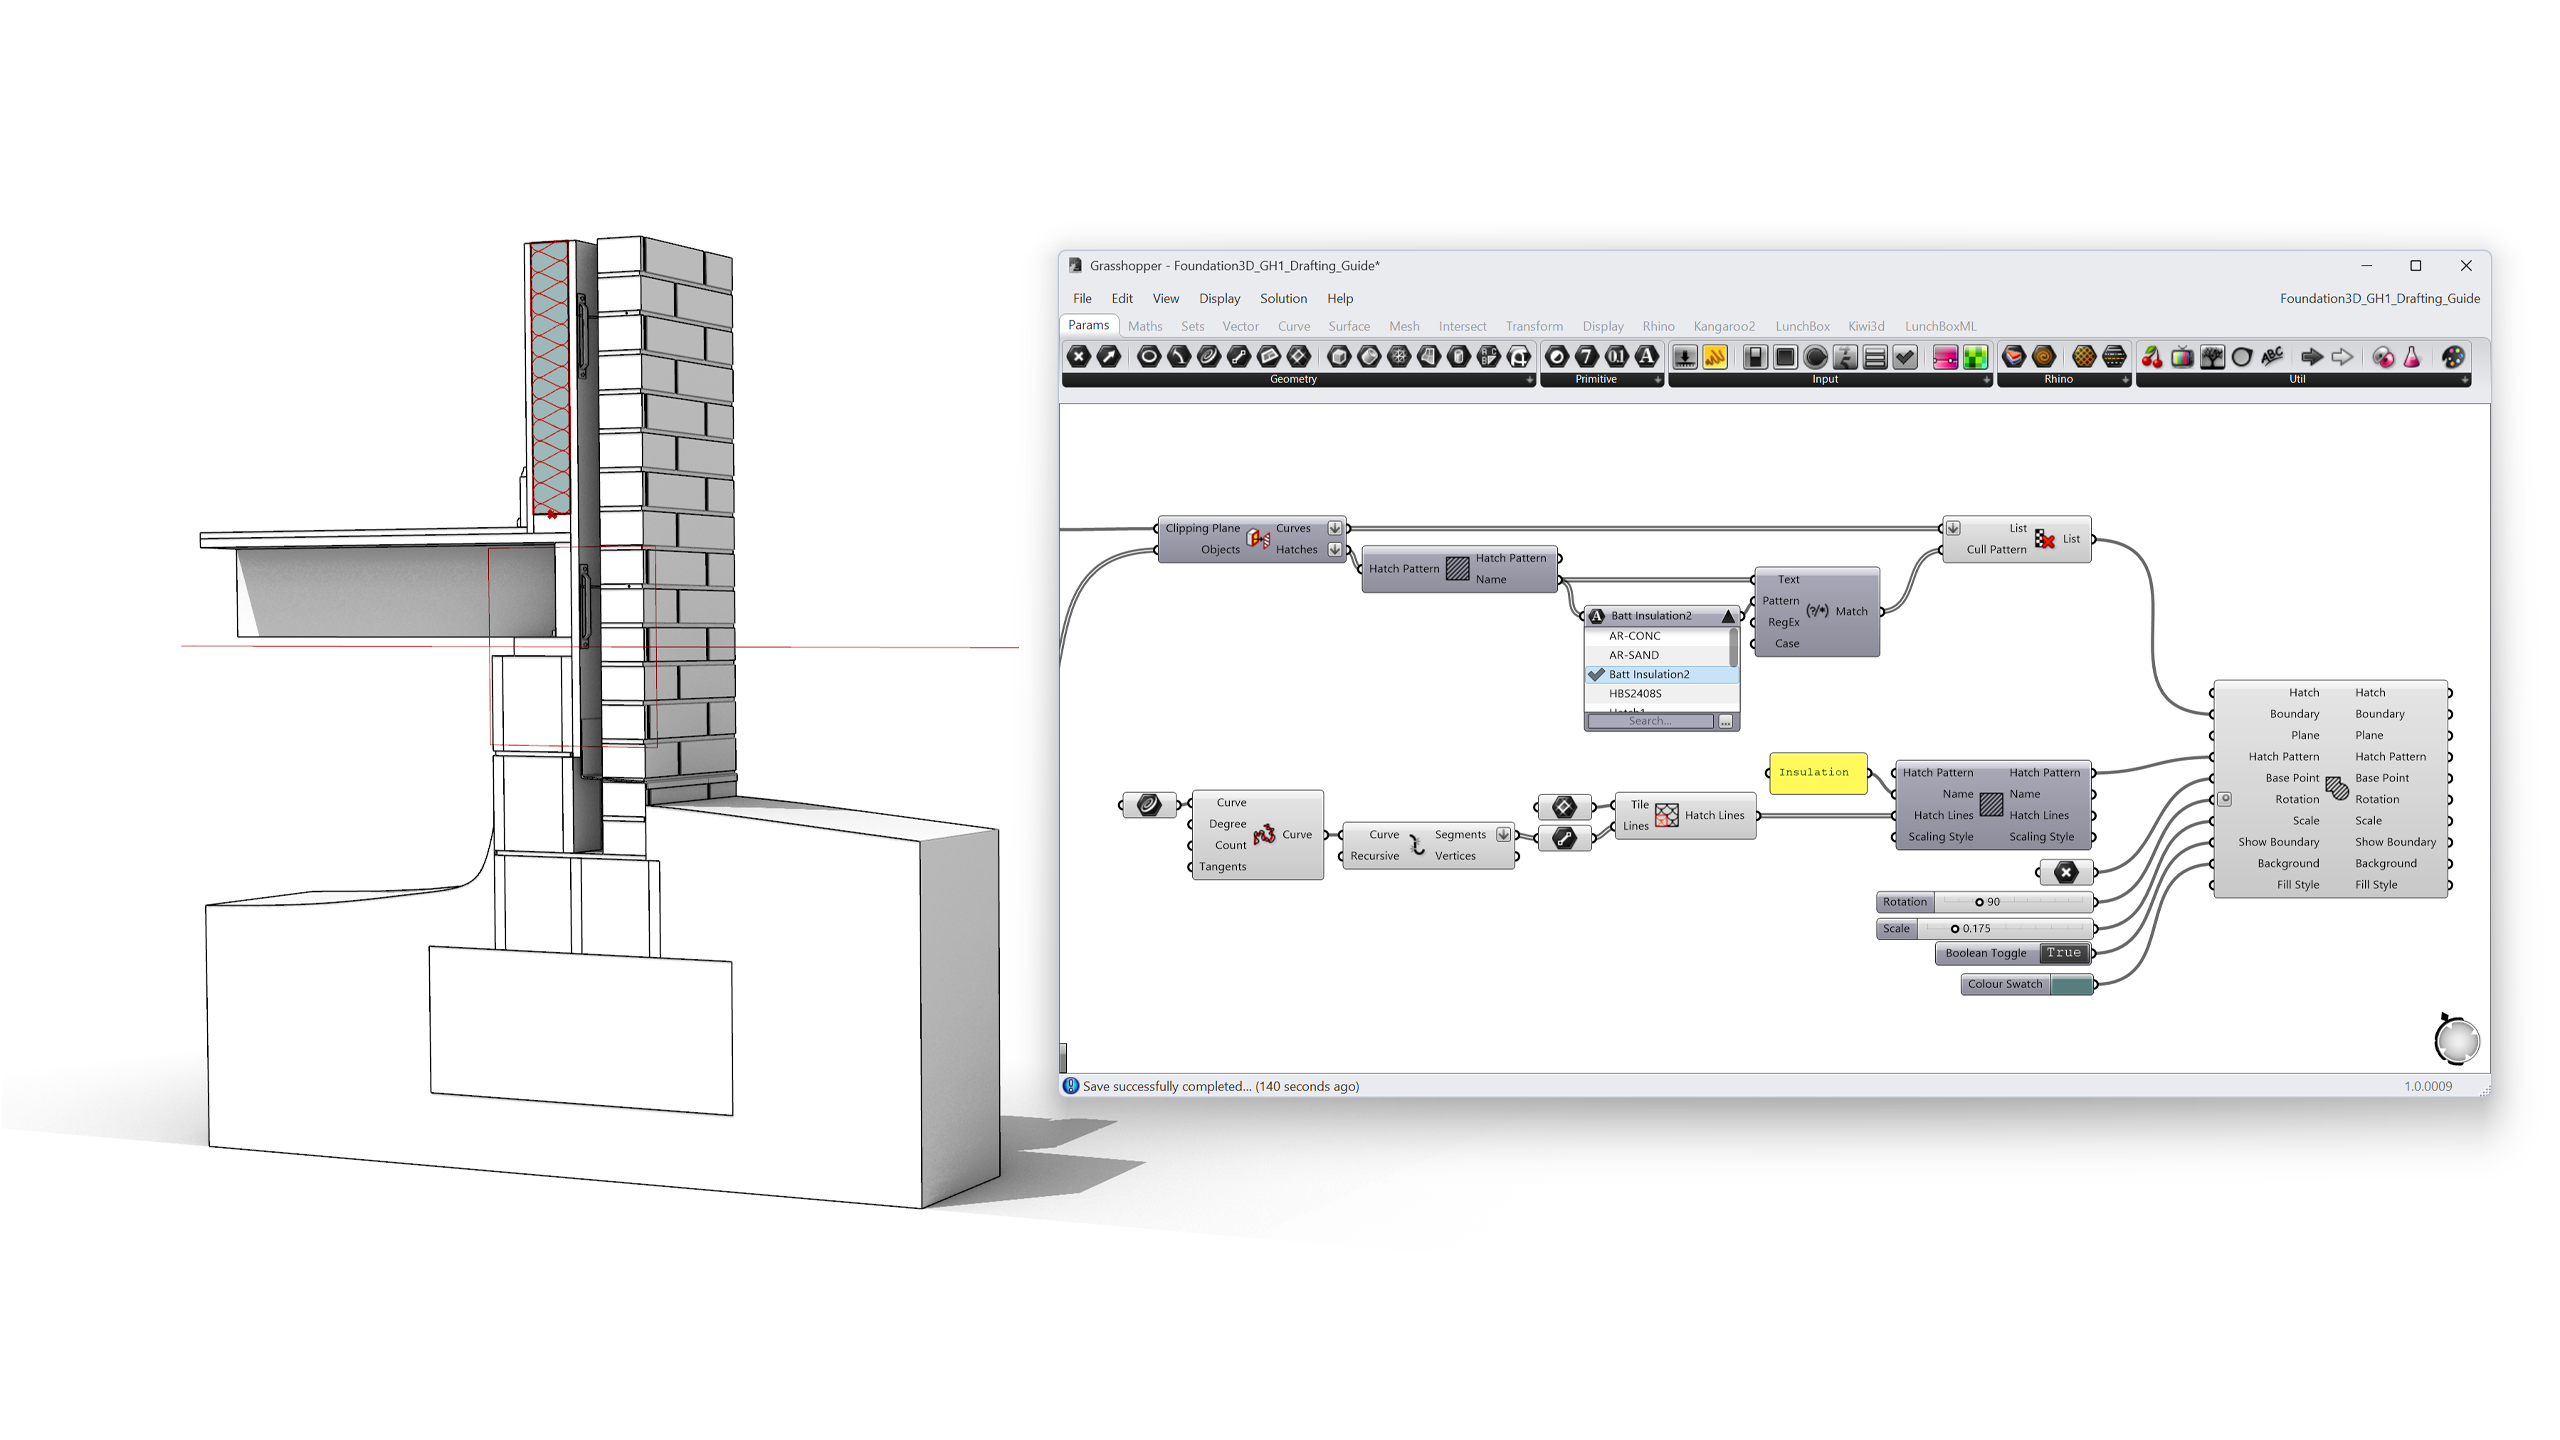
- You can then apply the new pattern to the
insulationlayer in your clipped section, rotating and scaling the tile to match the layer’s orientation and thickness.
When the pattern is right, save it beyond this file:
 Export Hatch Pattern writes a standard
.patfile (set Overwrite toTruewhen iterating) for use across Rhino and other CAD applications. Content Cache bakes the pattern into the document so section styles can reference it, which means your parametric section from Extract the 2D section drawing can now cut insulation with your pattern.
Browse Patterns with the Value Picker
In this section, we’ll learn:
- Why the Value Picker replaces long value lists for drafting workflows.
- How to load the default hatch pattern library.
- About search modes: Wildcards, Contains, Starts With, Ends With, Regular Expressions.
Let’s get started!
- Download the Download Foundation3D-05.gh Grasshopper file.
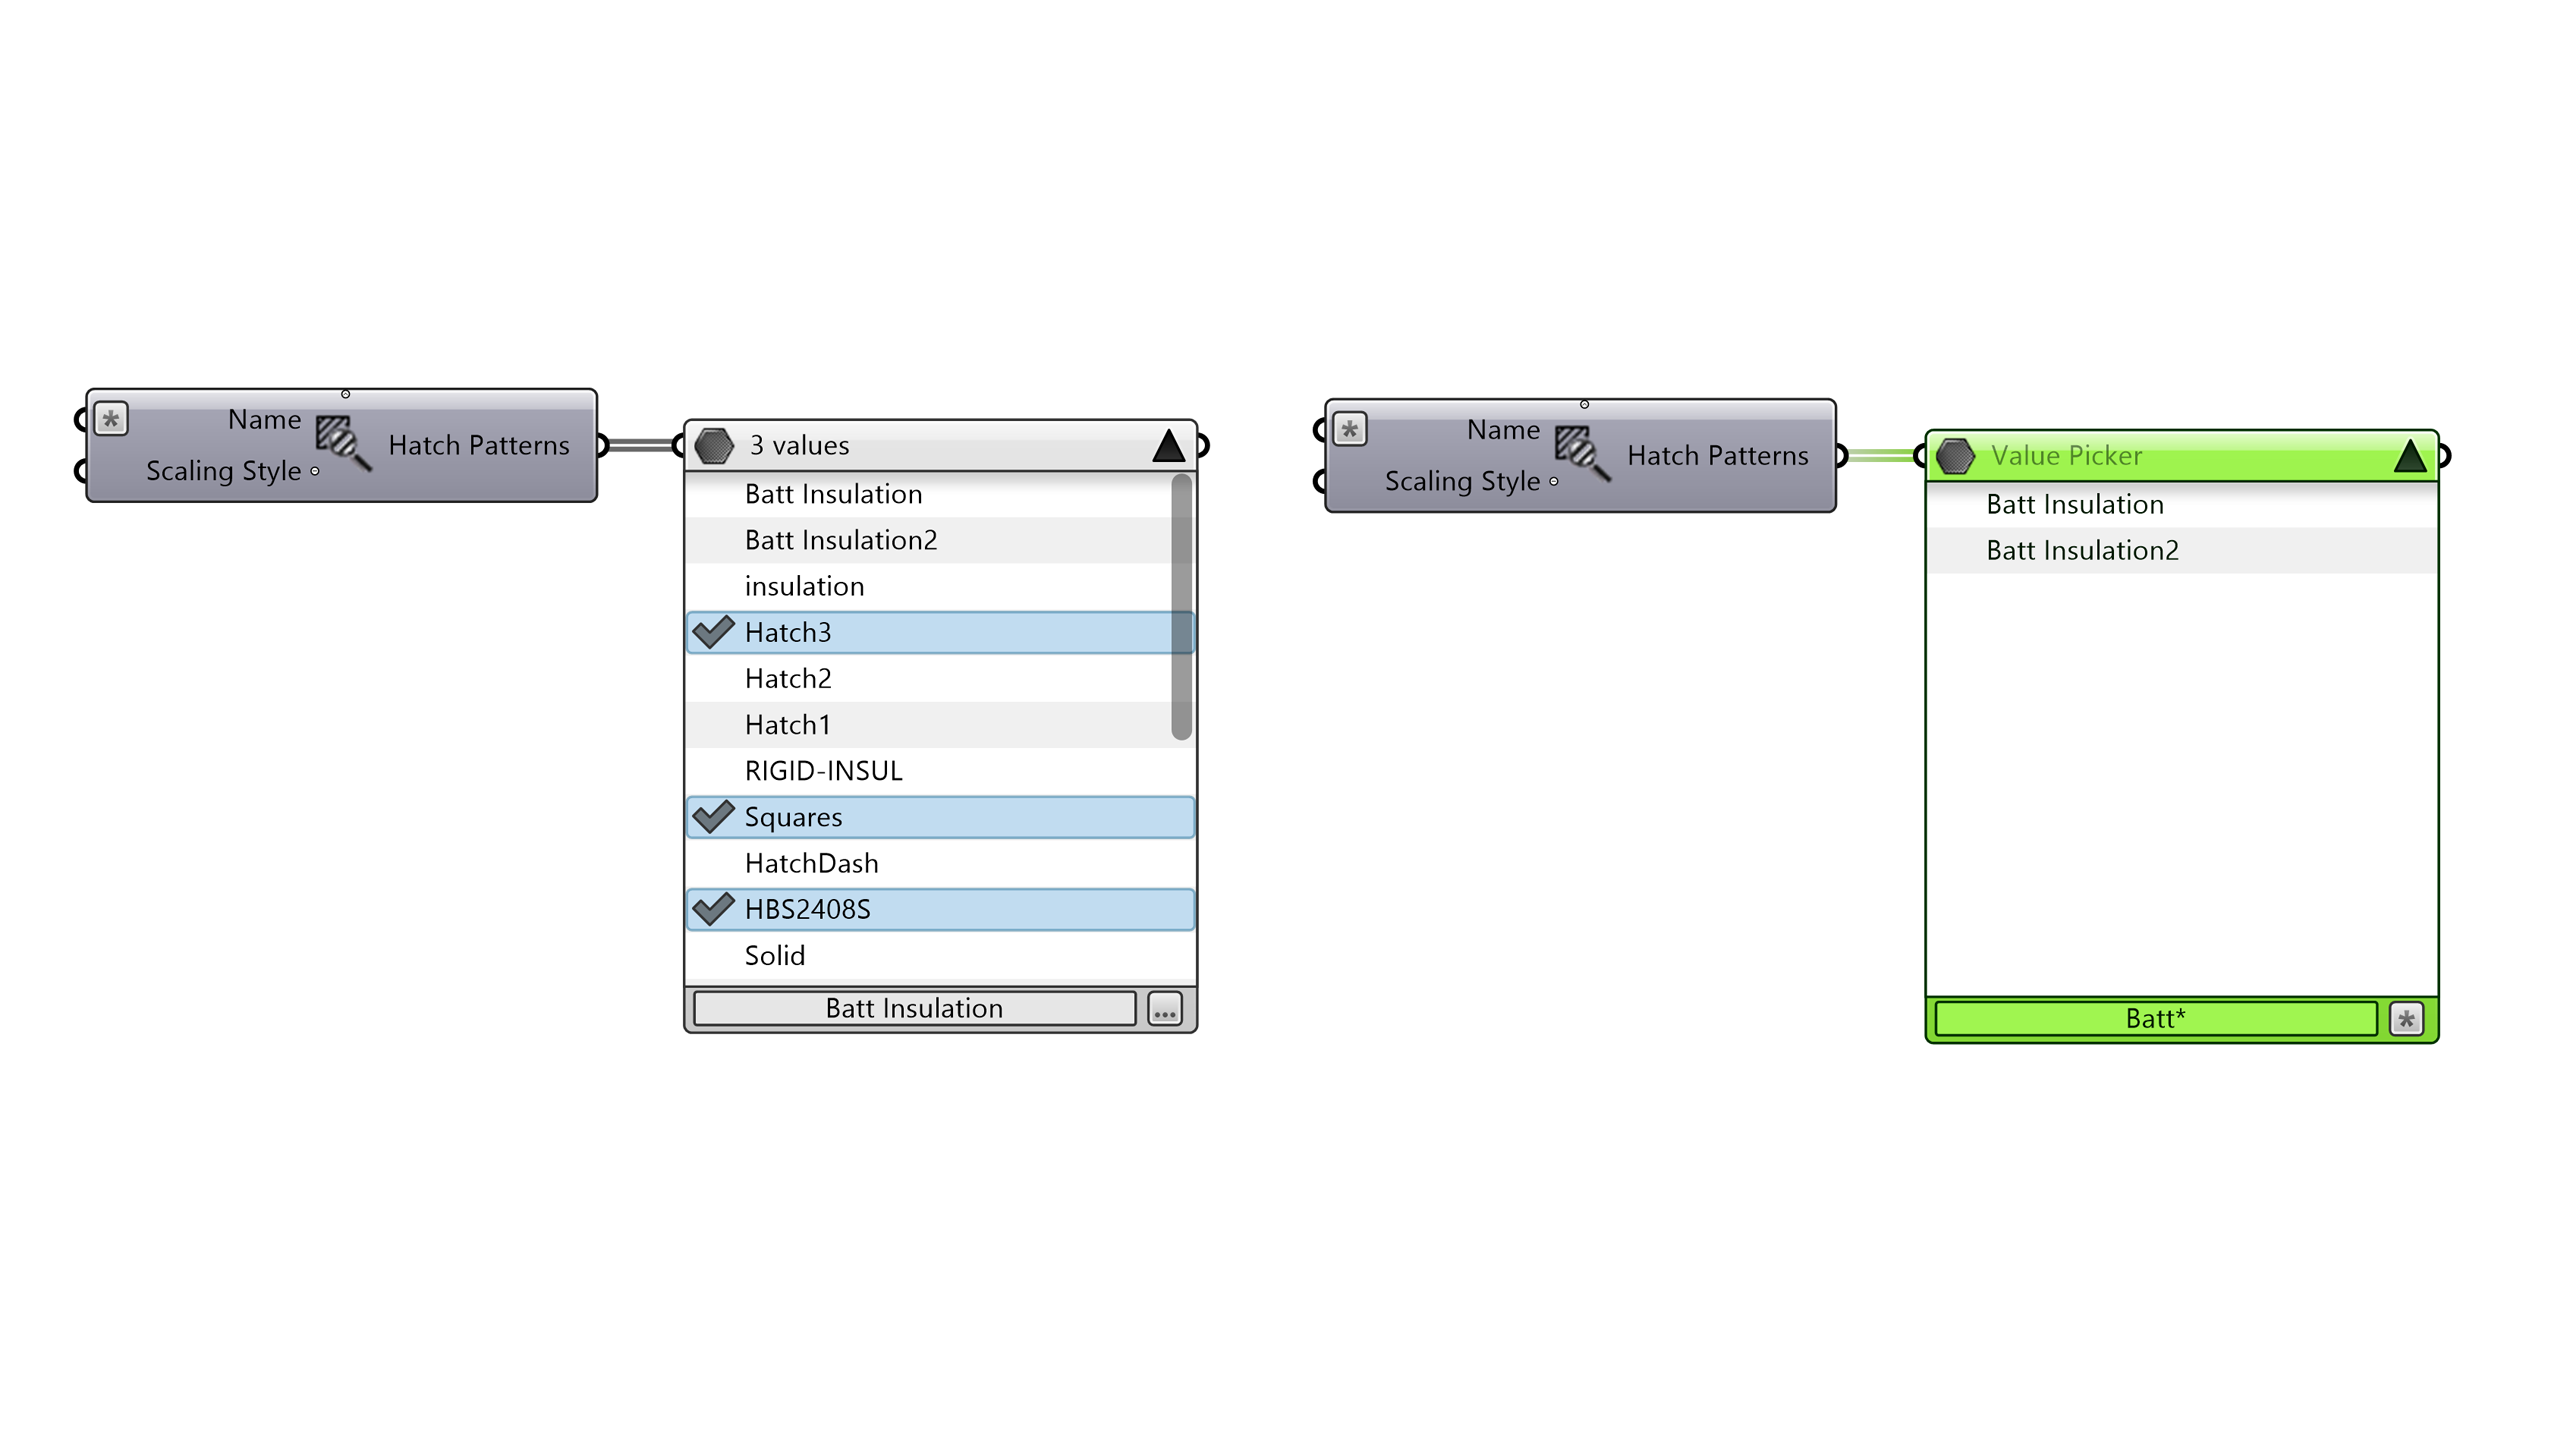
- A document quickly accumulates dozens of hatch patterns; Rhino 9 ships with 58 new defaults alone. Scrolling a value list doesn’t scale. The Value Picker (Params tab > Input) is built for exactly this: finding, filtering, and selecting from long lists of values.
- Wire a
 Query Model Hatch Patterns component into the Value Picker. The component reads the hatch patterns stored in the active Rhino document. Right-click it and choose Add Default Patterns to load Rhino’s 10 legacy default patterns into the document (this is the same set that Tools > Options > Hatches loads on first use). To work with a larger library, open Tools > Options > Hatches in Rhino and load the patterns you need there; they’ll immediately appear in the Value Picker. Then expand the Value Picker and:
- Type to search, with Wildcards (
Batt*), Contains, Starts With, Ends With, or full Regular Expressions. - Click to select; + Click for multiple values; + Click for a series.
- Type to search, with Wildcards (
The Value Picker isn’t limited to hatches. It handles numbers, text, and model objects (shown by object name) simultaneously, so the same technique works for picking layers, section styles, or parts from a catalog folder.
Inspect the Content with the Content Viewer
In this section, we’ll learn:
- Why non-geometry data is hard to inspect in Grasshopper
.
- How the Content Viewer draws hatches, materials, and other data on the canvas.
- About embedded viewport mode and its navigation shortcuts.
Let’s get started:
- Download the Download Foundation3D-06.gh Grasshopper file.
- How do you see a hatch pattern before applying it? Or check what a section style actually contains? Grasshopper previews geometry in the Rhino viewport, but drafting workflows are full of non-geometry data: patterns, linetypes, styles, colors, text.
- The Content Viewer (Params tab > Util) displays almost any Grasshopper
content graphically, directly on the canvas:
- Connect it to the Value Picker’s output: the selected hatch pattern draws itself in the viewer. Flip through patterns in the picker and preview each one instantly, a live pattern browser in two components.
- Connect it to any component output (curves, BREPs, materials, annotation styles) to isolate and inspect that data without the distraction of everything else previewed in the scene.
- Hold while using the mouse to navigate: drag with the left mouse button to pan, scroll the mouse wheel to zoom, and drag with the right mouse button to rotate.
- Connect it to the
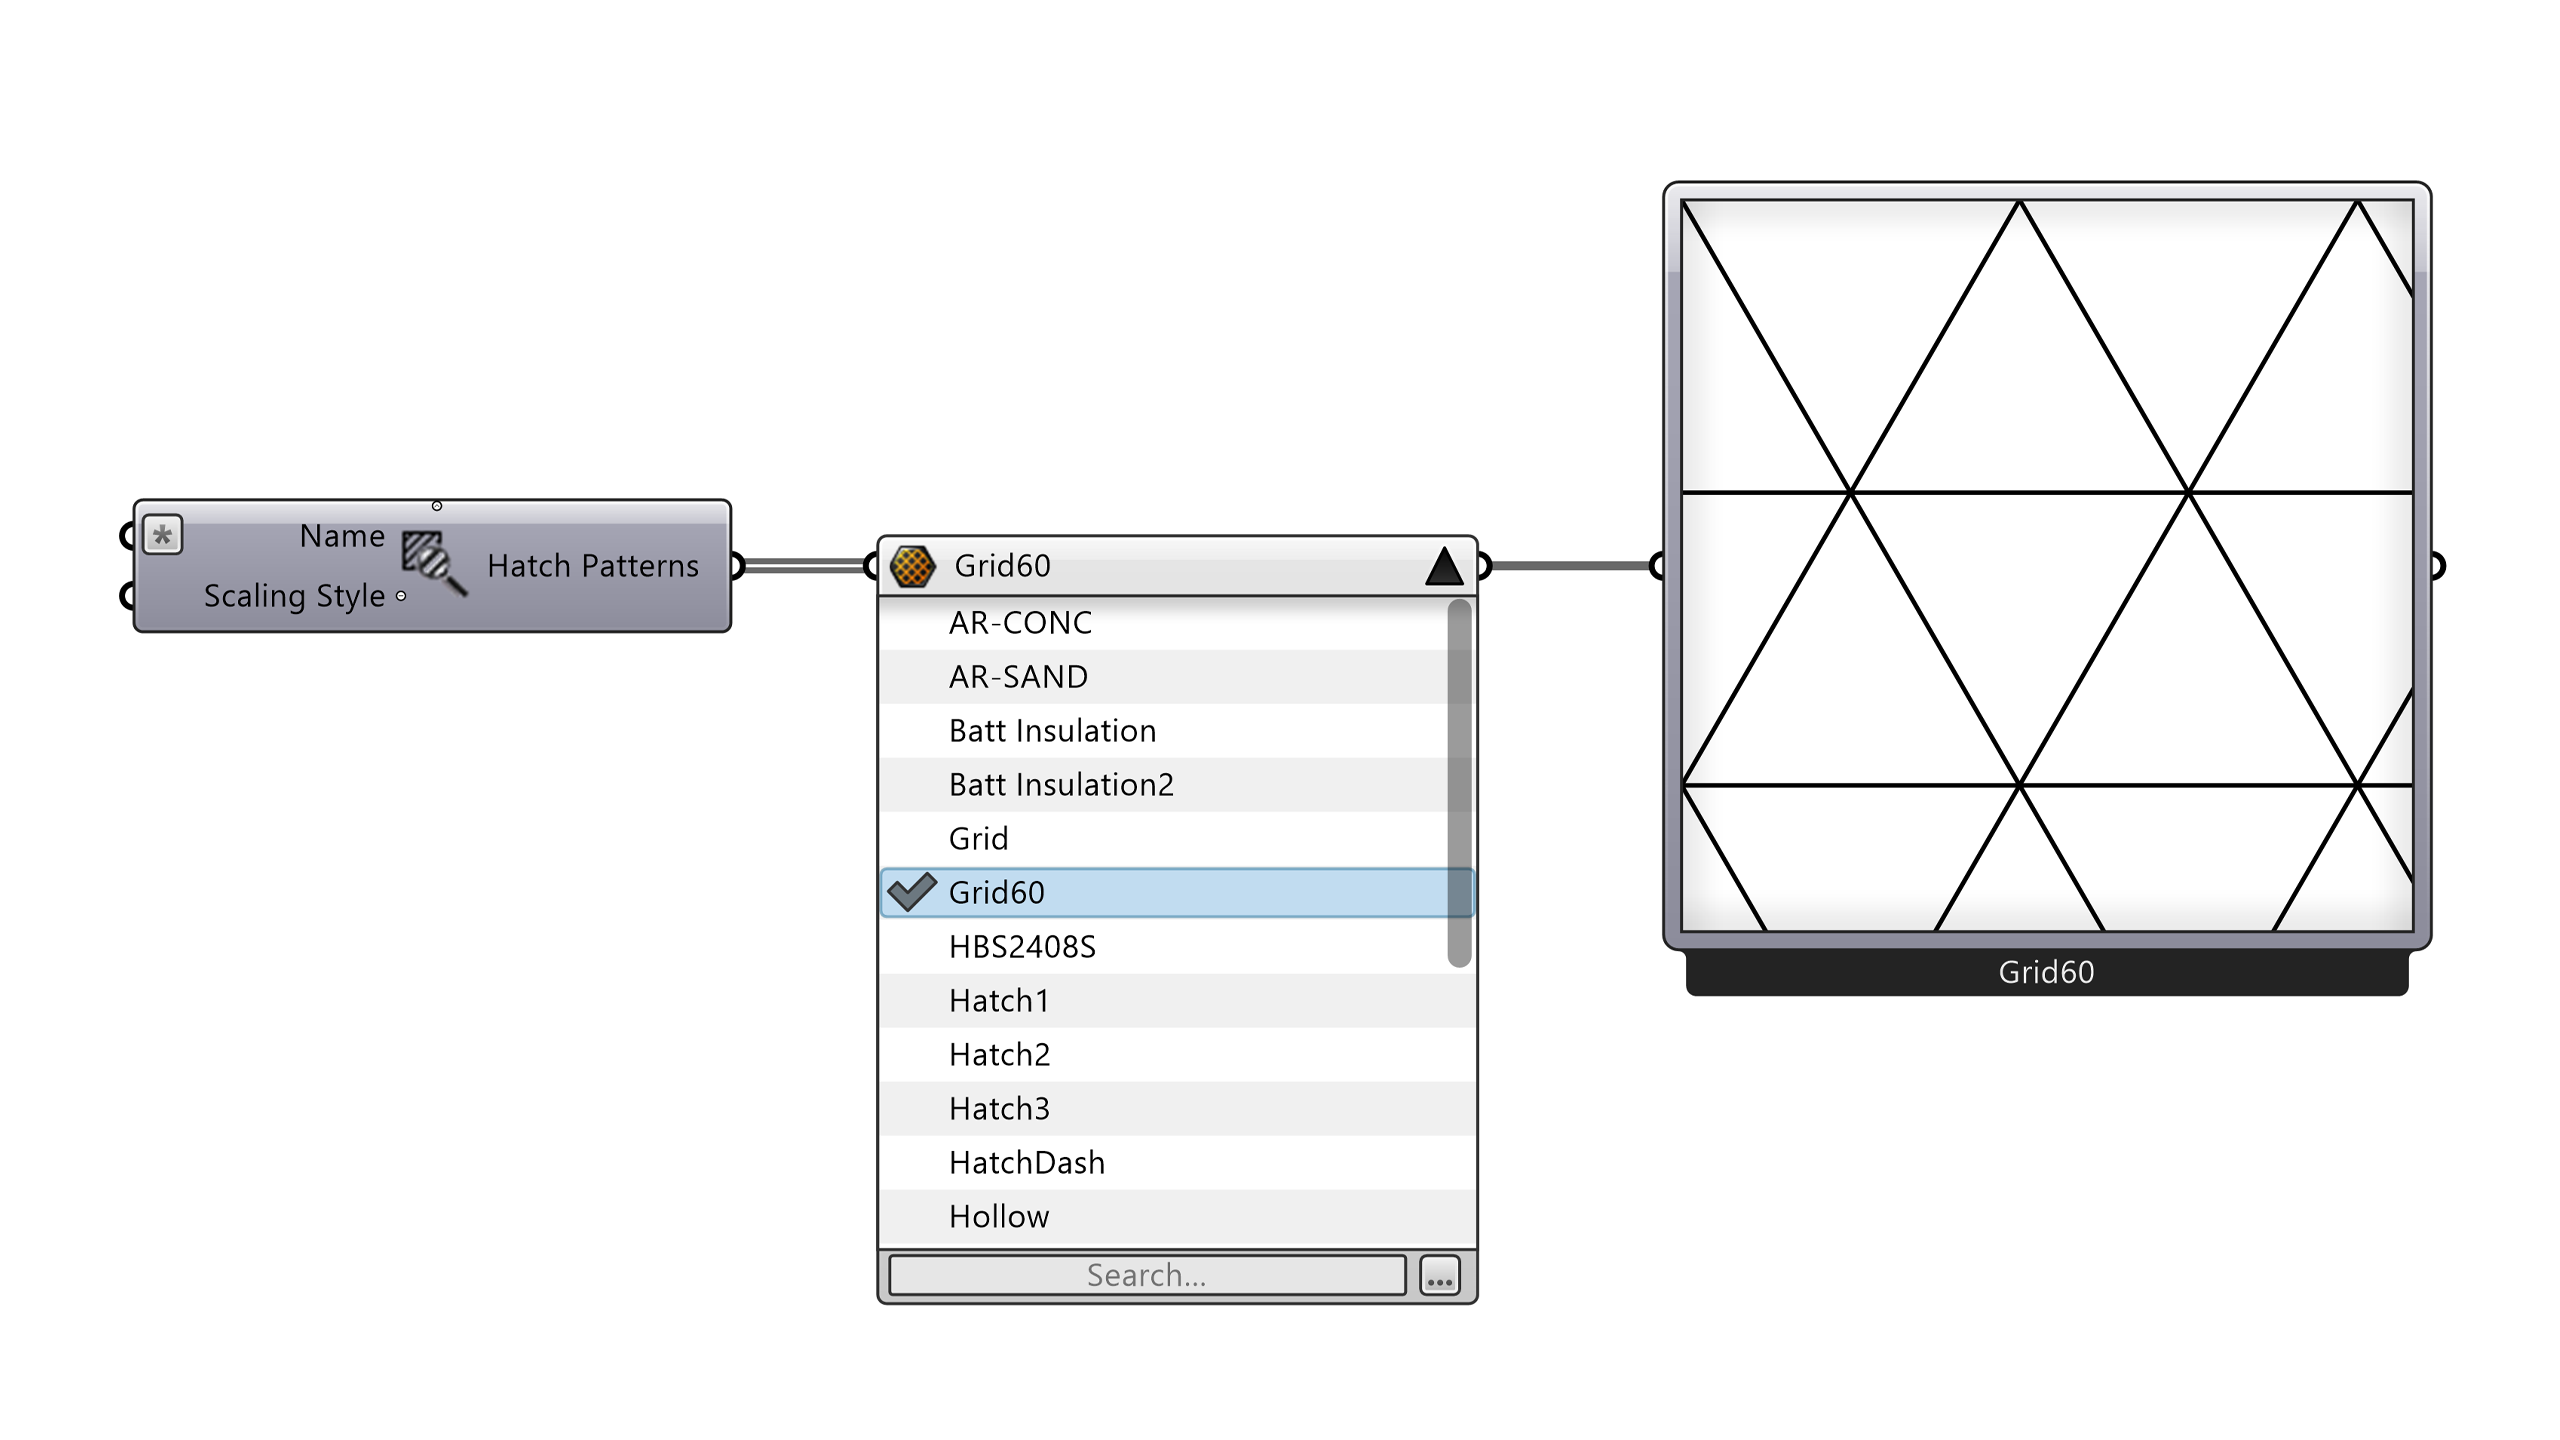
In this workflow the Content Viewer earns its place while designing the hatch pattern and letting you preview candidates before committing to one.
Put it All Together
The complete definition reads like the workflow itself:
- Number Slider into Model Clipping Plane: one parameter drives the section cut.
 Objects Clipped: context stays whole, the assembly is cut.
- Clipping Drawing Settings into Create Clipping Drawing: a structured 2D detail, extracted on demand.
- Model Hatch Line into Model Hatch Pattern into Export Hatch Pattern: custom material patterns, previewed live and saved as
.pat. - Query Model Hatch Patterns into Value Picker and/or Content Viewer: find, pick, and verify patterns without leaving the canvas.
- Content Cache: bake the results into the document when they’re ready for layouts.
Change the insulation thickness in the model, drag the section slider, press Update, and the drawing, hatches and layer structure follow. The detail is no longer a drawing you redo; it’s an output you regenerate.
Where to go next
- Drive multiple clipping planes from one definition to generate a full drawing set (plans, sections, details) in one pass.
- Use Grasshopper Player with the exposed Update input to turn this definition into a one-click MakeDetail command for your team.
- Combine with layouts: place the extracted drawing blocks on sheets at scale.
Downloads
Download Foundation3D.3dm
Download Foundation3D-01.gh
Download Foundation3D-02.gh
Download Foundation3D-03.gh
Download Foundation3D-04.gh
Download Foundation3D-05.gh
Download Foundation3D-06.gh

