Tweening
Tweening in Bongo 1.0 was a bit of a hit-and-miss affair - while we provided the ability to smoothly animate between object and view positions with very little additional work, the power to change the way the tweening was accomplished between keyframes was limited.
In Bongo 2.0, we now provide detailed controls to adjust the way objects are moved between keyframes. In addition to the Bongo 1.0 parameters - bias, continuity and tension, we now provide linear and snap keyframing, custom tangent control and other forms of spline interpolation. There’s also better easing.
Better still, using the Curve Editor, you can see exactly how your tweening parameters affect the path of an object or view - and you can edit it right there in the control.
What is tweening?
Tweening in animation (short for inbetweening) is about creating frames between keyframes. Tweening in general would be something like defining transitions between different states.
Example 1. Two ways to tween red color into yellow.
- Darken red until it becomes black and then lighten to dark yellow and further to yellow.
- Start with red and add yellow gradually to turn it into orange and then decrease red until only yellow is left.
In animation tweening happens with respect to time - or ticks. Keyframes specify the value of a parameter (in this example, the color) at a specifc tick and the tweening defines the value for the ticks in between the key frames.
Example 2. Tweening red into yellow during 4 seconds.
- Turn red gradually into orange during the first 2 seconds and then orange into yellow during the last 2 seconds.
- Let the color be red for the first 2 seconds. Then make it gradually orange within the next 2 seconds and then switch it straight to yellow.
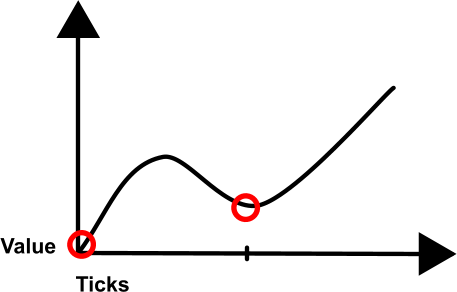
As seen in the example above tweening doesn’t have to be smooth. State can be stationary for a moment or there can be sudden discrete changes.
Tweening in Bongo
Bongo can tween both numbers and points. Tweening has no effect on keyframe ticks; only the ticks between them.
Tweening numbers
Bongo tweens numbers using Hermite spline interpolation. There are 3 different splines to choose from: Linear, Cardinal and Kochanek-Bartels. Splines produce smooth continuous tweening between numbers. The fourth tweening method ‘step’ produces a sudden discrete change from one number to another.
Number tweening can be visualized with a curve graph that shows the tweened value for each tick. Dots present values at keyframes ticks.
Linear
Produces a constant speed transition from one value to another. Halfway between the keyframes the result is halfway between the numbers.

Linear interpolation is good for animating objects that should move with constant speed, start moving suddenly without accelerating and stop without decelerating. Linear interpolation over a keyframe gives a sharp change in speed.
Cardinal spline
Cardinal spline interpolation gives control over impulsiveness of linear interpolation. Tension parameter adjusts the smoothness of the curve. Higher tension results in sharper turns over keyframe ticks. Decreasing tension smoothens the curve.
Highest tension is 1, it results in straight lines between keyframes and sharp turns over them. The curve looks like a tight fishing line. The smaller the tension is the straighter the curve crosses keyframes. Curve starts to look more like a loose hose. Lowest tension is -1, it often makes the curve look a bit over relaxed.
Kochanek-Bartels spline
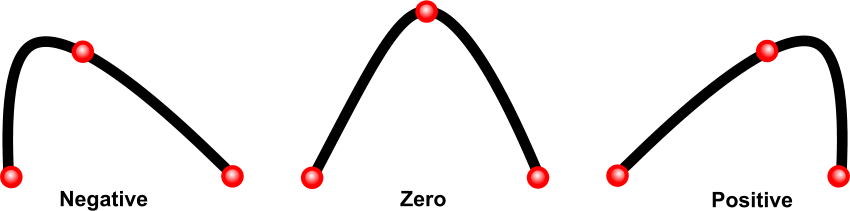
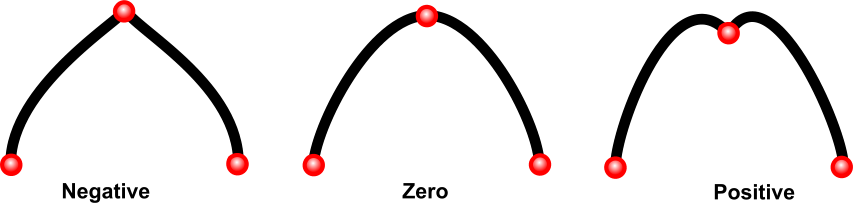
Kochanek-Bartels spline is a generalization of Cardinal spline. It gives two more parameters to adjust the curve, these are bias and continuity. Bias adjusts the position of the bend along the curve. Bias of zero keeps the bend centered at the keyframe. Negative bias moves the bend before and positive after the keyframe.
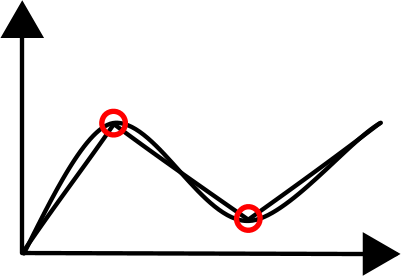
Continuity adjusts the tangential continuity of the curve over keyframes. Continuity of 0 makes the curve look smooth with even curvature. Negative continuity folds the curve over the keyframe point towards neighbouring keyframe points. Positive continuity folds the curve away from neighbouring key frames.
Easing
Easing levels the curve before keyframe. Easing can be used to stop motion smoothly and to keep objects still between identical keyframe points.
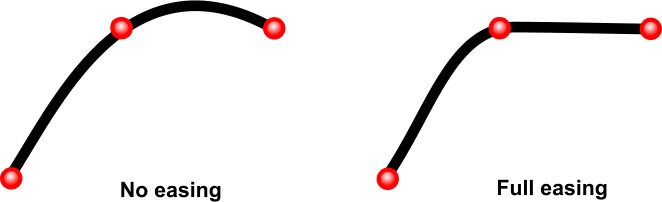
Easing can be controlled manually or it can be set to happen automatically when two keyframe points are aligned. When controlled manually easing is a value between 0 and 1. Easing of 0 means no easing at all and 1 means full easing.
Automatic easing works by detecting when neighbouring keyframe points are on the same level. Automatic easing is turned on by default.
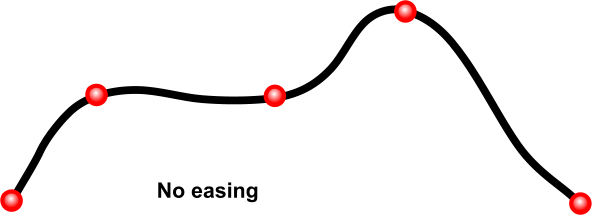
Same curve without easing, with auto-ease and manual full ease:
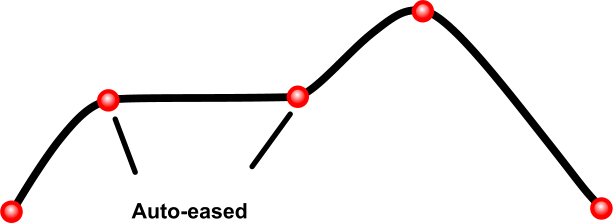
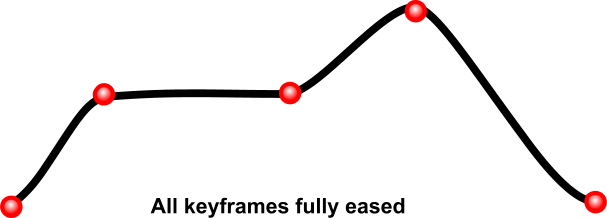
When easing is set to one the curve crosses keyframe horizontally.
Two tweening settings per keyframe
Each keyframe has two sets of tweening settings. First one is for the incoming curve and the second is for the outgoing curve. By default incoming settings are used for both incoming and outgoing curves.
Tweening between points
There are two ways of tweening vectors like position, rotation and scale. Rotation and scale are tweened component-wise as three separate numbers. Position can be tweened either component-wise or with 3d tweening.
Component-wise tweening
When tweening rotation angles and scaling factors component-wise tweening is used. This means that each component x, y and z are tweened as numbers - each forming its own curve. This type of tweening is used for position too when 3d tweening is switched off.
3d tweening
Another way to tween position is to use 3d tweening. Position is then tweened in two steps:
- Path curve is formed by tweening keyframe points component-wise.
- Travel curve is computed using distances between keyframe points along the path curve.
Path curve controls the route and travel curve controls the speed. 3d tweening is on by default.
Tweening FAQ
Having troubles seeing any difference between the tweening settings?
The most common reason is because there’s only two keyframes for the animated object/view. If you only have two keyframes Bongo is not able to smooth out the movement. See image below:
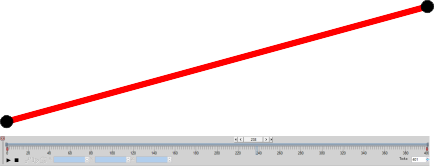
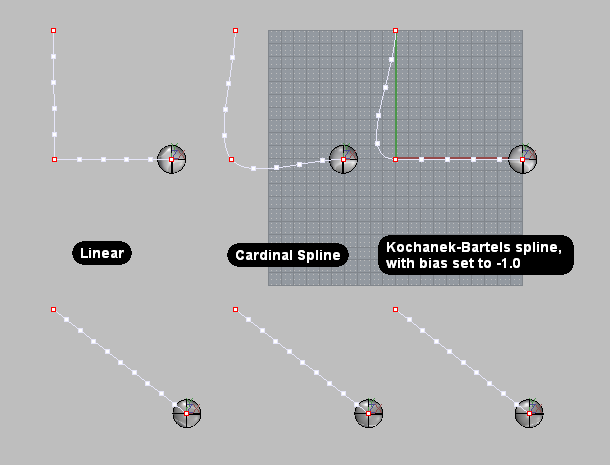
If you then add one keyframe, you can start to see a difference. In the image below the green line stands for Linear, while the violet line stands for Cardinal Spline.
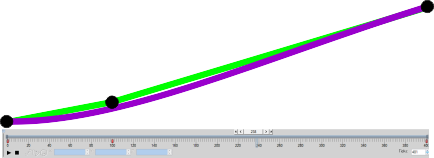
By changing the setting from Cardinal Spline to Linear the movement will be the same from beginning to the end, while the Cardinal Spline tries to smooth out the movement.
Here is a image showing how the different tweening settings affects the movement if you have two or more keyframes. The above the text animations have 3 keyframes while the below the text animations has only two: