This guide continues where the Bongo Basics 1: Simple View Animation guide ended.
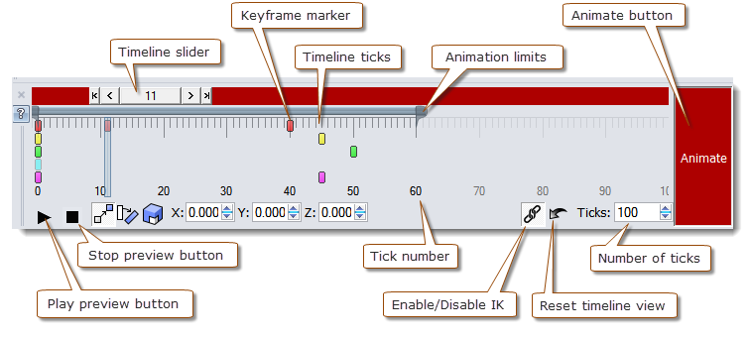
The graphic below shows the entire expanded timeline:

Timeline Window Navigation

Scroll the mouse wheel to zoom in or out in the Timeline window.
Drag the right mouse button in the Timeline window to move forward and backward through time.
To reset the view
- Click the Reset timeline view button to reset the Timeline window to the default view.
Timeline Slider
Moving the timeline slider changes the current time in the animation. The text on the slider displays the current tick number.
Click the arrows to the left and right of the slider to move the slider forward or backward one frame at a time.
Click and drag the slider to move back and forth through the animation. This is called scrubbing. The text on the slider displays the current tick number.
Set the current timeline slider position
- Drag the timeline slider to the desired tick number.
or
- Right-click on the Timeline and, from the menu, choose Set Timeline Slider Position.
- In the Set Timeline Slider Position dialog box, enter the tick number for the slider position.
Timeline Ticks
In Bongo, time is measured in ticks. The vertical marks represent each tick in the current animation. The blue current tick indicator points to the current tick.
When you render an animation to a video file, you can choose how long you want the animation to run. Since the number of ticks in a Bongo animation is not fixed to the number of images (frames) in a video file, you can easily change the frame rate and video length for various targets, for example, file distribution or the web.
Expand or contract the number of ticks in an area by inserting or deleting ticks.
Number of Ticks
To set the number of ticks displayed on the timeline:
- In the Ticks edit box, enter the number of ticks to display.
Insert Ticks
To insert ticks:
- Right-click on the Timeline where you want to insert ticks, and from the menu, select Insert at tick.
- In the Insert Ticks dialog box, enter the number of ticks to add at that location. Ticks will be inserted and all keyframes to the right of the ticks will be pushed to the right.
Delete Ticks
To delete ticks:
- Right-click on the Timeline where you want to delete ticks, and from the menu, select Delete at tick.
- In the Delete Ticks dialog box, enter the number of ticks to remove a that location. Ticks will be removed and all keyframes to the right of the ticks will be pulled to the left. Keyframes at the deleted ticks are deleted.
Timeline Length
To set the timeline length in seconds:
- On the timeline, in the Ticks edit box, set the number of ticks.
See also: Bongo: Document Options guide.
Animation Limits
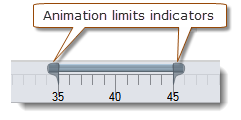
The blue bar and end markers show the animation limits: the tick where the animation starts and stops.

Set Start and Stop
To set the start and stop ticks for the animation:
- On the Timeline, drag the ends of the blue limits marker.
or
- Right-click a blue limits marker and, from the menu, select Edit.
- In the Bongo Animation Limits dialog box, enter the tick number for the start and stop positions of the animation.
or
- From the Bongo menu or toolbar, select Render Animation.
- In the Bongo Render Animation dialog box, set the Start tick and Stop tick numbers.
- Click the Apply button.
See also: Render the Animation guide.
Hide or Show Limits
To hide the limits markers:
- Right-click a blue limits marker and, from the menu, select Enable.
or
- Right-click the Timeline and, from the menu, select Hide Animation Limits.
To show the limits markers:
- Right-click the Timeline and, from the menu, select Show Animation Limits.
Keyframe Markers
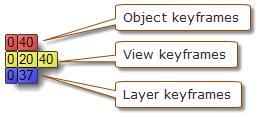
Keyframe markers indicate the location in time of recorded key frames. Keyframe markers are color-coded:

When you select objects or activate an animated viewport, Bongo displays the keyframe markers for all of the selected objects along the timeline. For unselected objects and non-current viewports, Bongo displays ghosted keyframe markers.
Keyframe Colors

Red - Objects
Yellow - View
Green - Document
Blue - Layer
Cyan - Light
Magenta - Render Content
Window select multiple keyframes to edit them in the Keyframe Editor and Curve Editor.
Scaling Keyframes
The BongoScaleKeyframes command changes the distance between selected keyframes so they are closer or farther apart.
Before scaling:

After scaling:

To Re-space Keyframes
- At the Choose option prompt, select the keyframe type.
- Select or type the appropriate object, view, light, layer, document property, or render content (material, texture, or environment).
- At the Origin tick prompt, type the tick number the keyframes will be scaled around.
- At the Scaling factor prompt type the amount to scale the keyframes.
- At the Scaling direction prompt, choose the direction for the scaling.
Direction Options
Left: Scales the keyframes toward the beginning of the timeline.
Right: Scales the keyframes toward the end of the timeline.
Both: Scales the keyframes in both directions from the Origin tick.
Animation Preview Controls
The Play and Stop buttons control the animation preview.
To start the animation preview
- On the Timeline, click the Play button.
or
- Right-click on the Timeline and, from the menu, select Play. The Play button changes to a Pause button.
To pause the animation preview
- On the Timeline, click the Pause button. The timeline slider and the animated objects stop at the current tick.
To resume the preview
- On the Timeline, click the Play button.
To stop the animation preview
- On the Timeline, click the Stop button.
or
- Right-click on the Timeline and, from the menu, select Stop. The timeline slider resets to zero.
To set properties for the preview
- From the Rhino File menu, select Properties.
- In the Document Properties dialog box, select the Bongo page, under Animation preview change the settings.
See also: Bongo Document Options guide.
Transformation Controls
The transformation controls fine tune the animated motion, rotation, or scale of selected objects at specified keyframes.
The transformation controls are activated when one or more objects are selected and the Animate button is activated.
 Switch to Position Mode
Position mode changes the location of the object at the tick. You will be able to see the change to the object in the viewport.
To change an object’s position:
- Select an object.
- Click the Animate button.
- Move the Timeline Slider to the tick where you want a keyframe to be placed.
- On the Timeline, click the Switch to Position Mode button.
- Edit the x, y, or z-coordinate values.
 Switch to Rotation Mode
Rotation mode changes the rotation angle of the object at the tick.
To rotate an object around its pivot:
- Select an object.
- Click the Animate button.
- Move the Timeline Slider to the tick where you want a keyframe to be placed.
- On the Timeline, click the Switch to Rotation Mode button.
- Edit the x, y, or z-rotation angle values.
 Switch to Scale Mode
Scale mode changes the scale of the object at the tick.
To scale an object about its pivot:
- Select an object.
- Click the Animate button.
- Move the Timeline Slider to the tick where you want a keyframe to be placed.
- On the Timeline, click the Switch to Scale Mode button.
- Edit the x, y, or z-scale values.
See also: the Bongo Basics 1: Simple Object Animation guide.
Enable/Disable IK
 Turns inverse kinematics (IK) on and off. This setting is on by default. It can be annoying to make many changes to an IK system while waiting for the IK to re-calculate itself. You might want to use this button to turn it off while you experiment with several settings.
See also: the Bongo: Inverse Kinematics guide.
Reset Timeline View
 Restores the timeline view and resets the slider to 0.
Timeline Context Menu
 The menu changes depending on whether objects are selected, animated are active, whether those objects are animated, and so on.
To view the timeline context menu:
- Right-click the Timeline.
Compact Mode
Shrinks the Timeline window to display only the timeline, slider, and keyframe markers. The preview and transformation controls are hidden. The preview controls can still be accessed from the context menu.

Collapse Keyframes
Makes keyframe markers shorter so the timeline takes up less vertical space.

Timeline ticks
Sets the number of ticks shown on the timeline.
Insert at tick
Inserts ticks.
Delete at tick
Deletes ticks.
Play
Plays or pauses the animation preview.
Stop
Stops the animation preview.
Set timeline slider position
Sets the current position of the timeline slider.
Reset
Restores the timeline window to its default view and resets the slider to 0.
Show curve editor
Displays the Curve Editor.
Show object looping marks
Controls display of object looping markers for all objects.
Show animation limits
Controls display of animation limits marker.
Add keyframe
Adds a Keyframe at the tick closest to where the you clicked.
Show tick numbers
Controls the display of the number of ticks shown on the timeline.
Smooth scrubbing
By default, the objects and views are tweened smoothly between the ticks while scrubbing the timeline slider. Turning smooth scrubbing off causes the tweening to move only when exactly on a tick.
Next Steps
Please continue with the Bongo: Animation Manager guide.

