Introduction
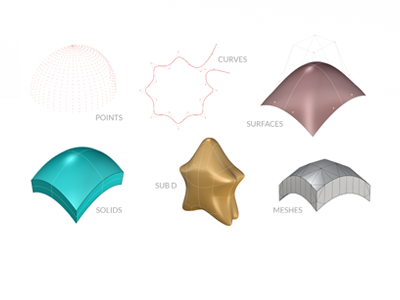
The fundamental geometric object types in Rhino are point and point cloud; NURBS curve, surface, extrusion, and polysurface; subdivision surface (SubD); and polygon mesh. This chapter goes into some detail to explain the mathematical basis for modeling objects in Rhino. Essentially, the objects described in this guide are the objects Rhino can read (open), create, edit, display, and write (save).
Geometry Types
In this context, geometry types are different ways of defining 3D shapes in a CAD modeler using different mathematical representations. Different modelers support various geometry types. There are two main advantages of supporting many different geometry types:
- Different needs: Each geometry has its advantages and is easier to use to create specific shapes or use downstream for other purposes such as digital sculpting or manufacturing.
- Communicating with other programs: Importing or saving files from and to other applications supporting only a specific geometry type.
The geometry types supported in Rhino are:
- Point and point cloud.
- NURBS geometry: curve, surface, extrusion, and polysurface.
- Subdivision surface (SubD).
- Polygon mesh.
Rhino can convert objects between its different geometry types. Some of these conversions are automatic, inexpensive, and exact, while others require more work or approximations.
Points

Point
objects mark a single point in 3D space. They are the simplest objects in Rhino. Points can be placed anywhere in space. They are defined by an X, Y and Z coordinate. They are most often used as placeholders, or they can become the control points of NURBS, mesh, or SubD geometry. Use the  Point
command to create Points in Rhino.
Points can be grouped in a  PointCloud
to facilitate working with a large number of them.
NURBS geometry
NURBS (non-uniform rational B‑splines) are mathematical representations that can accurately model any shape from a simple 2D line, circle, arc, or box to the most complex 3D freeform organic surface or solid. Because of their flexibility and accuracy, NURBS models can be used in any process, from illustration and animation to manufacturing.
NURBS geometry is an industry standard for designers working in 3D where forms are free and flowing. Designers, drafters, architects, engineers, and more use NURBS geometry in Rhino to create freeform shapes in industries such as architecture, automotive, medical and sports equipment, footwear, and jewelry.
Elements of a NURBS
Three elemental pieces of information are needed to define an instance of NURBS geometry, like a NURBS curve or surface:
- Degree
- Control Points
- Knots
Degree
NURBS
functions are rational polynomials. The degree of the
NURBS
is the degree of the polynomial.
A polynomial function is a function like f(x): x ↦ 3x³ – 2x + 1. The degree of the polynomial is the largest power of the variable. For example, the degree of 3x³ – 2x + 1 is 3; the degree of –x⁵ + x² is 5, and so on.
From a
NURBS
modeling point of view, a higher degree means more control points, and more complex shapes. A single-span curve of degree n can have at most n - 1 “bends”.
For example:
-
A line has degree 1. It has two control points. It has zero bends.

-
A parabola, hyperbola, and arc (conic section curves) all have degree 2. They have three control points. They have one bend.

-
A “cubic Bézier” curve means a single-span non-rational curve of degree 3. If you arrange its control points in a zigzag shape, you can get two bends.

Control Points

Control points influence the shape of a curve or surface. A control point is defined by its location for all curves, and also its weight for rational curves. You can make subtle changes in the curve or surface shape by moving the location of its control points. Rhino offers many tools for editing control points. Some of the later tutorials show control point manipulation.
When you move control points, the curve or surface changes and Rhino smoothly redraws it. Rhino’s transform commands, such as  Move
,
 Copy
,
 Rotate
and
 Scale
can manipulate individual or multiple points.
Knots
In NURBS objects, knots define the mathematical parametrization of the object. In single-span objects, knots only define the extents of the domain where the mathematical function describing the object is defined. With multiple spans, knots also define where the spans begin and end.
Curves (NURBS)

A Rhino curve is similar to a piece of wire. It can be straight or wiggled, and it can be open or closed. A polycurve has several curve segments joined together end to end.
For example, you can create NURBS curves from their control points using the  Curve
command, or NURBS curves that pass through specified points using the
 InterpCrv
command.
Surfaces (NURBS)

A surface is like a rectangular, stretchy rubber sheet with no thickness. The NURBS form can represent simple shapes, such as planes and cylinders, as well as free-form, sculptured surfaces. Surfaces can be open or closed. When closed, they can also represent the boundary of a solid , and the volume of that solid can be computed.
There are essentially two ways of creating surfaces in Rhino: starting from a primitive such as  Cone
or
 Sphere
, or starting from existing curves.
Anatomy of a Surface
Let’s talk about the visible elements of a surface. An essential part of a surface is its Control Points structure. To visualize Control Points, select the object and press the key.
-
Control Points define the shape of a NURBS curve or surface. Most of the time, the control points don’t touch the surface. They are arranged in a grid-like pattern that holds the surface in place. Moving these control points around will change the shape of the object.
-
Isoparametric curves are a network of visible lines that go through the surface to help us understand its flow and shape in space. Commonly called isocurves. These curves help you visualize the shape of the surface. Isoparametric curves cannot be manipulated, or modified directly to edit the surface. They are merely a visual aid that allows you to see the surface on the screen. When a surface is selected, its boundary and some of its isocurves are highlighted.
-
Edge curves delimit the surface boundaries. You’ll recognize them because they are displayed slightly darker than the isocurves. In a polysurface , they define the outer boundary of each surface patch that composes the polysurface.
-
A surface seam is defined when the surface wraps around on itself and two edges on opposite sides are overlaid exactly on top of each other. Seam edges touch the surface on both sides, contrary to boundary edges that only touch the surface on one side. They can be found in surfaces of revolution, or in the extrusion of a closed curve.
Properties of a Surface
Surface Directions

A
NURBS
surface has a bi-directional, 4-sided nature: most have 4 distinct boundary edges. You’ll also notice this by how their
Control Point
are organized in a bi-directional grid, and how their
Isocurves
are oriented along 2 main directions, running from one boundary edge to the opposite boundary edge. We commonly call these two directions U and V. You can query these directions at any point of the surface with the  Dir
command.
Open vs Closed Surfaces


Open Surface
Closed Surface
A surface can be open or closed. An open surface is a thin piece of geometry representing a shape, with no thickness. In most cases, the surface will represent an exterior boundary of the actual object, like a piece of flexible paper that wraps it perfectly. You can see open surfaces from both their frontside, and their backside (in blue - image left). A closed surface separates the world in two regions: its inside and its outside (image right). Closed surfaces still have no thickness, and are void objects, but we can compute the volume of this void inside them. They are like the skin of an inflated balloon. To see the inside of a closed surface, place the camera inside the surface.
Untrimmed vs Trimmed Surfaces


Untrimmed Surface
Trimmed Surface
Untrimmed surfaces are surfaces where all edges are the native mathematical (or natural) boundary edges of the surface. An untrimmed surface, except for singularities (edges collapsed to a point) and seams, will always have four edges. There are a couple of advantages to working with untrimmed surfaces:
- Control point editing: the control point polygon matches the surface shape.
- Working with certain commands: commands like
 MatchSrf
or
 MergeSrf
only accept untrimmed edges.
Trimmed surfaces are created when you  Trim
or
 Split
a surface with a curve or another surface. Some commands, such as
 PlanarSrf
, can create trimmed surfaces directly.
The shape of a surface is still defined by a set of
Control Points
arranged in a rectangular pattern, even if the visible part of the trimmed surface is not rectangular.
Since it is important to know if a surface is trimmed, the  Properties
command lists its trimmed or untrimmed state.
A trimmed surface may extend beyond its trimmed edges, but you will not see these parts of the underlying surface. The trims define these parts as not being part of the object, so they are not drawn. Every trimmed surface retains information about its underlying surface geometry. You can remove the trimming boundary to recover the “native” or “natural” edges using the  Untrim
command.
If you have a trimming curve that runs across a surface, the trimming curve itself does not have any real relationship to the control point structure of the surface. You can see this if you select a trimmed surface and turn its control points on (select it and press ). You will see the control points for the whole underlying surface.
Singularity
A singularity is an edge that is collapsed into a single point. Often surfaces formed by revolving a curve around an axis have singularities at the revolve axis. Think of the poles of a sphere.

Polysurfaces (NURBS)
A Polysurface consists of two or more surfaces that are joined together along their trimmed or untrimmed edges. Like surfaces, polysurfaces can be open or closed. A closed polysurface encloses a volume of space and defines a solid.

The  SolidPtOn
command turns on grip points that act like control points for polysurfaces. However, editing these points should be limited to simple modifications to keep the object’s structure intact.
Solids
A closed surface or polysurface defines the boundary of a volume, and by extension the volume inside it. We call this a solid . Rhino can create single-surface solids, polysurface solids, extrusion solids, mesh solids, and SubD solids.
A single surface can wrap around and join itself. Example commands include Sphere
,  Torus
and
 Ellipsoid
.
Control Points
can be displayed on single-surface solids and moved to change the surface.

Some Rhino commands create polysurface solids.  Pyramid
, Cone
and
 TruncatedCone
are examples of commands that create polysurface solids.

SubD Geometry
Rhino SubD Objects are high-precision Catmull-Clark subdivision surfaces designed to model and edit complex organic shapes quickly. SubDs in Rhino are composed of vertices, edges, and faces. You can push or pull on these to shape the object. Think of SubD as clay material.
Commands such as  SubDBox
and
 LoftSubD
create SubD objects, while commands like
 ExpandSubDEdges
and
 Bridge
modify them.

SubD objects in Rhino support powerful symmetry features that NURBS objects do not have. For example, use the  Reflect
command to create and modify a SubD object where one part of the object is a mirrored version of the other.
Mesh Geometry
A mesh is a collection of vertices, edges, and polygonal faces that define the shape of a polyhedral object. Just like NURBS , meshes can be open or closed (solid).

Many programs use polygon meshes to represent geometry for rendering, animation, digital manufacturing, visualization, and finite element analysis. The  Mesh
command translates
NURBS
geometry into polygon meshes, and provides options to control the density of the mesh. This also called meshing or tesselating the surface.
 ExtractRenderMesh
command.
 FlatShade
command, you can display meshes (including meshes used to display other objects) with a shading model that considers only one constant normal per face. In flat shading, the mesh appears even more jagged and the angles between faces are more obvious.
Rhino can read and write many mesh format files. To create mesh objects, use commands such as  MeshSphere
,
 MeshBox
,
 MeshCylinder
. In addition, Rhino has commands that allow you to work with meshes, like
 AlignVertices
,
 FillMeshHole
, or
 MeshBooleanUnion
.
 ShrinkWrap
,
 QuadRemesh
,
 SubD
, and
 ToNURBS
that can help. Learn more in the Reverse Engineering tutorials…
Extrusions
Rhino can use a more efficient representation for extrusion surfaces, called
Lightweight Extrusions
. Lightweight extrusions are surfaces defined using a planar profile curve (NURBS), a direction of extrusion, and a length of extrusion. Compare this to the grid of control points needed for a
NURBS
surface: extrusions use less computer memory. The  Box
,
 Cylinder
,
 Tube
and
 ExtrudeCrv
commands create extrusion objects. Extrusion objects can be closed (with planar caps at the top and bottom), or open.

If necessary, these objects will be converted to polysurfaces by some commands to add additional information for editing. Use the  PointsOn
command or press
to turn on Extrusion points.

