The editing operations in this section break objects apart, cut holes in them, and put them back together. Some of these commands join curves to curves, or surfaces to surfaces or polysurfaces, and break a composite curve or polysurface into its components.
The commands: Join, Explode, Trim, and Split apply to curves, surfaces, and polysurfaces.
 Join
Join
The Join command connects curves or surfaces together into one object.
Join turns lines that touch end to end into polylines, curves that touch end to end into polycurves, and surfaces and polysurfaces that touch on an edge into polysurfaces or solids.
When a curve is selected first, surface edges or mesh edges can be joined with the curve to create a polyline or polycurve.
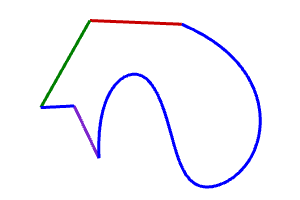
Join curves into a polycurve
-
Open the tutorial model Join Curves.3dm
(Help menu > Learn Rhino > Tutorials and Samples > User’s Guide > Join Curves)
-
Select all of the curves using a window or crossing.
The command history displays 5 curves added to selection.
The Object Type in the Properties panel shows 5 open curves.
-
On the Edit menu, click Join.
Optional: Press F1 to review the Help topic for the Join command.
The command history displays 5 curves joined into one closed curve.
The Object Type in the Properties panel shows closed curve.
Join surfaces into a polysurface
-
Open the tutorial model Join Surfaces.3dm.
(Help menu > Learn Rhino > Tutorials and Samples > User’s Guide > Join Surfaces)
-
Select both of the surfaces using a window or crossing.
The command history displays 2 surfaces added to selection.
The Object Type in the Properties panel shows 2 surfaces.
-
On the Edit menu, click Join.
The command history displays 2 surfaces or polysurfaces joined into one open polysurface.
The Object Type in the Properties panel shows open polysurface.
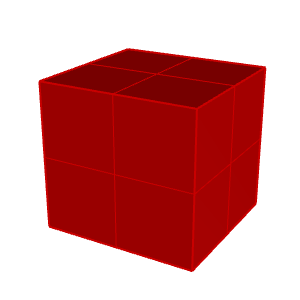
Join surfaces into a solid polysurface
-
Open the tutorial model Join Solid.3dm.
(Help menu > Learn Rhino > Tutorials and Samples > User’s Guide > Join Solid)
-
Select all of the surfaces using a window or crossing.
The command history displays 6 surfaces added to selection
The Object Type in the Properties panel shows 6 surfaces.

-
On the Edit menu, click Join.
The command history displays 6 surfaces or polysurfaces joined into one closed polysurface.
The Object Type in the Properties panel shows closed solid polysurface.
 Explode
The Explode command removes the connection between joined curves and polysurfaces. Explode works on any object that can be reduced to its component parts.
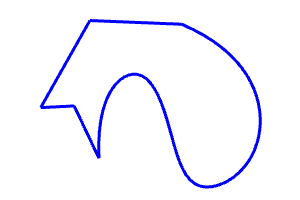
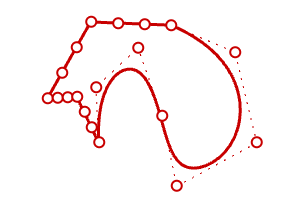
Explode a polycurve into individual curves
-
Open the tutorial model Explode Curves.3dm.
(Help menu > Learn Rhino > Tutorials and Samples > User’s Guide > Explode Curves)
-
Select the curve.
The command history displays 1 curve added to selection.
The Object Type in the Properties panel shows closed curve.
-
On the Edit menu, click Explode.
Optional: Press F1 to review the Help topic for the Explode command.
The command history displays Exploded a curve into 5 segments.
The Object Type in the Properties panel shows 5 open curves.
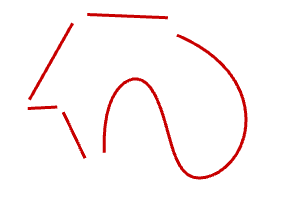
Note: For the illustration, the ScalePositions command was used to separate the individual curves. The Explode command does not move the curves.
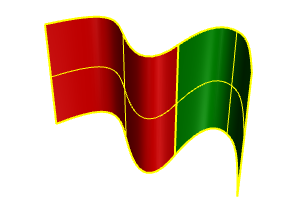
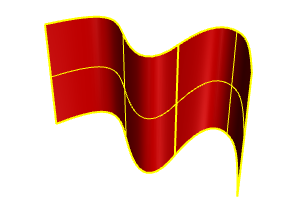
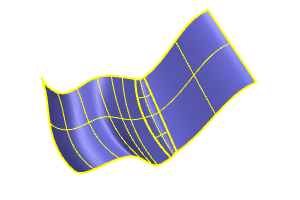
Explode a polysurface into individual surfaces
-
Open the tutorial model Explode Polysurface.3dm.
(Help menu > Learn Rhino > Tutorials and Samples > User’s Guide > Explode Polysurface)
-
Select the polysurface.
The command history displays 1 polysurface added to selection.
The Object Type in the Properties panel shows open polysurface.
-
On the Edit menu, click Explode.
The command history displays Exploded a polysurface into 3 surfaces..
The Object Type in the Properties panel shows varies.
Three surfaces were created, two surfaces and a trimmed surface. Select each surface individually to check the object type.
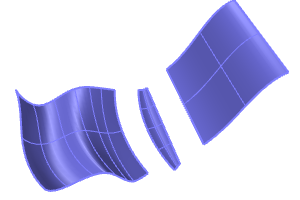
Note: For the illustration, the ScalePositions command was used to separate the individual surfaces. The Explode command does not move the exploded surfaces.
Trimming and Splitting
The Trim and Split commands are similar. They both cut objects with other objects. When you trim an object, you select the parts to remove and they are deleted. When you split an object, no parts are deleted.
 Trim
Trim
The Trim command cuts and deletes selected portions of an object at the intersection with another object used as a cutter.
Trim curves
-
Open the tutorial model Trim Curves.3dm.
(Help menu > Learn Rhino > Tutorials and Samples > User’s Guide > Trim Curves)
-
On the Edit menu, click Trim.
Optional: Press F1 to review the Help topic for the Trim command.
-
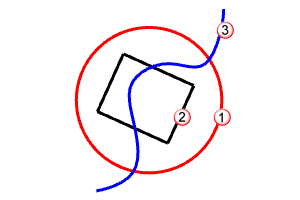
At the Select cutting objects prompt, select the blue curve (1) as illustrated below, and press Enter.
-
At the Select object to trim prompt, select the right side of the red circle (2) and the black rectangle (3), and press Enter.
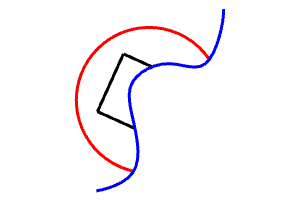
The circle and the rectangle are trimmed by the blue curve.
Trim surfaces
-
Open the tutorial model Trim Surfaces.3dm.
(Help menu > Learn Rhino > Tutorials and Samples > User’s Guide > Trim Surfaces)
-
On the Edit menu, click Trim.
-
At the Select cutting objects prompt, select the red surface as illustrated below, and press Enter.
-
At the Select object to trim prompt, select the right side of the red circle and the black rectangle, and press Enter.
 Split
Split
The Split command divides objects into parts using other objects at the intersection with another object used as a cutter.
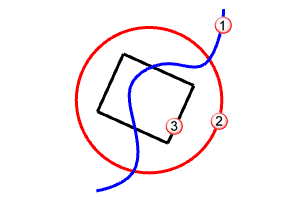
Split curves
-
Open the tutorial model Split Curves.3dm.
(Help menu > Learn Rhino > Tutorials and Samples > User’s Guide > Split Curves)
-
On the Edit menu, click Split.
Optional: Press F1 to review the Help topic for the Split command.
-
At the Select object to split… prompt, select the red circle (1) and the black rectangle (2), and press Enter.
-
At the Select cutting objects prompt, select the blue curve (3) as illustrated below, and press Enter.
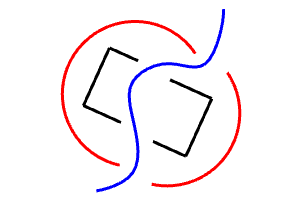
The red circle and the black rectangle are split by the blue curve.
Note: For the illustration, the individual curves were moved. The Split command does not move the split objects.
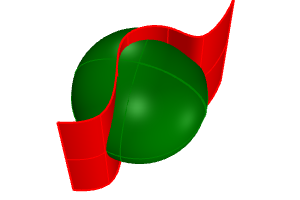
Split surfaces
-
Open the tutorial model Split Surfaces.3dm.
(Help menu > Learn Rhino > Tutorials and Samples > User’s Guide > Split Surfaces)
-
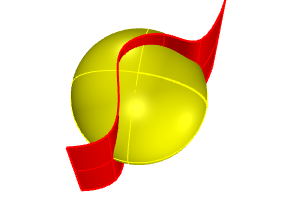
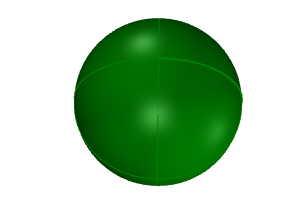
Select the green sphere.
Note: This is an example of pre-picking input for a command. You can select the input for the first prompt of most commands.
-
On the Edit menu, click Split.
-
At the Select cutting objects prompt, select the red surface, and press Enter.

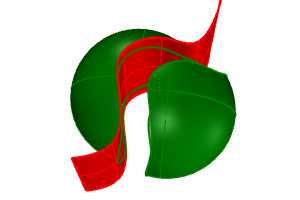
The sphere is split by the red surface.
Note: For the illustration, the split surface was moved. The Split command does not move the split objects.
 Untrim
The Untrim command removes trim curves from a surface restoring the underlying untrimmed object.
Untrim surfaces
-
Open the tutorial model Untrim Surfaces.3dm.
(Help menu > Learn Rhino > Tutorials and Samples > User’s Guide > Untrim Surfaces)
-
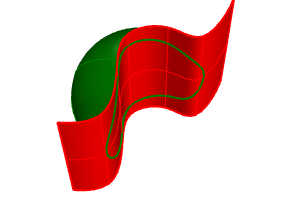
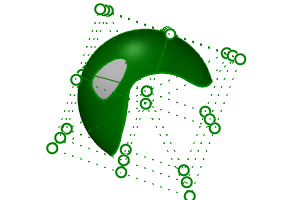
Press F10 to turn on the control points for the green surface.
The control point array shows that this surface is actually a trimmed sphere. When the trim curves are removed, the surface fills in to reform the original sphere.
-
On the Edit menu, click Untrim.
Optional: Press F1 to review the Help topic for the Untrimcommand.
-
At the Select edge to untrim… prompt, select the edge of the hole (1) as illustrated below.
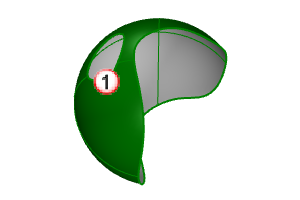
The hole edge is deleted causing the hole to be removed.
-
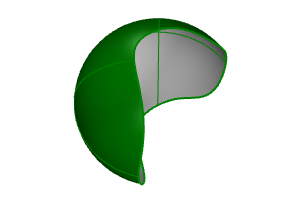
At the next Select edge to untrim… prompt, select the edge of the surface (2) as illustrated below.
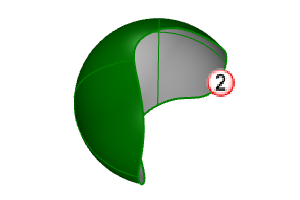
The edge is deleted causing the sphere to return to its full untrimmed state.
Rhinoceros 6 for Windows © 2010-2018 Robert McNeel & Associates. 28-Nov-2019
