This guide discusses customizing Rhino’s interface with the following tools:
The toolbar layout
The toolbar layout is the arrangement of toolbars containing command buttons on the screen. The toolbar layout is stored in a file with the .rui extension that you can open and save. Rui files contain command macros, icons in three sizes, as well as tooltips and button text. Rhino comes with a default toolbar file and automatically saves the active toolbar layout before closing unless the .rui file is read-only. You can create your own custom toolbar files and save them for later use.

You can have more than one toolbar file open at a time. This allows greater flexibility to display toolbars for particular tasks.
Rhino’s customization tools make it easy to create and modify toolbars and buttons. Adding to the flexibility is the ability to combine commands into macros to accomplish tasks that are more complex. In addition to toolbar customization, it is possible to set up command aliases and shortcut keys to accomplish tasks in Rhino.
Exercise 2-1 Customizing Rhino’s Interface
In this exercise, we will create buttons, toolbars, macros, aliases, and shortcut keys that will be available to use throughout the class.
Create a custom toolbar collection
There are times that the standard commands and buttons do not do exactly what you want. For example, Zoom Extents will look at all of the objects in a model and then zoom to the extents of these objects. In this exercise, we will open a model that has several objects including some light objects.
Let us say we want to use Zoom Extents to zoom to the objects, but we do not want the command to consider the light objects. In this exercise, we will make a new toolbar with a button that will Zoom Extents while ignoring any light objects in the model.
-
Open the model ZoomLights.3dm.
-
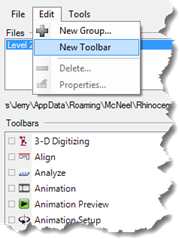
On the Tools menu, click Toolbar Layout.
-
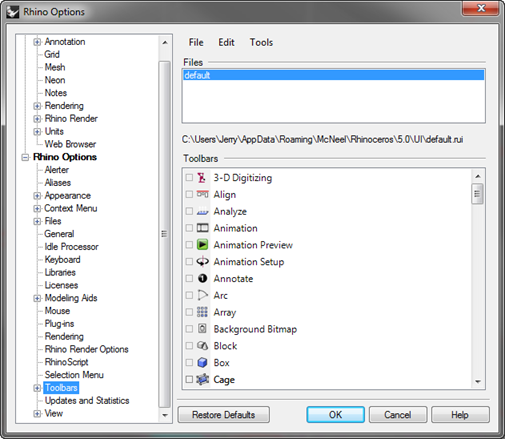
In Rhino Options dialog box, on the Toolbars page, choose the default toolbar file.
-
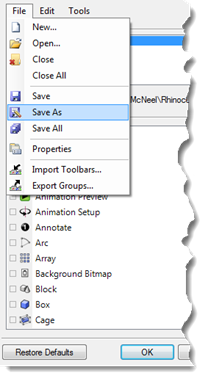
On the Toolbars page, click the File menu, click Save As.
-
In the File name box, type Level 2 Training, and click Save.
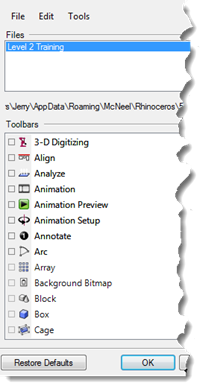
A copy of the current default toolbar file is saved with the new name.
Toolbar files are saved with a .rui extension. You will use this new toolbar file to do some customization.
In the Rhino Options dialog box, on the Toolbars page, all the open toolbar files are listed along with a list of all the individual toolbars for the selected toolbar file.
Check boxes show the current state of the toolbars. A checked box indicates that the toolbar is displayed.
Create a new toolbar
-
On the Toolbars page, on the Edit menu, click New Toolbar.
-
In the Toolbar Properties dialog box, in the Text box, type Zoom, and click OK.
A new toolbar appears with a single button.

-
In the Rhino Options dialog box, click OK.
Use the title bar of a floating toolbar
- **Right-click **
 the title bar of the new toolbar you created.
A pop-up list of toolbar options and commands displays.
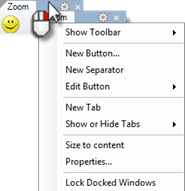
Edit the new button
-
Hold down the Shift key and right-click the smiley face button in the new toolbar.
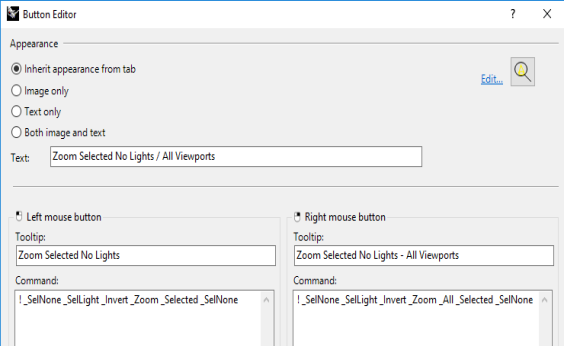
The Button Editor dialog box appears with fields for commands for the left and right mouse buttons, as well as for the tooltips. -
In the Button Editor dialog box, click Image only.
-
In the Text box, type Zoom No Lights.
-
For the
 Left mouse button Tooltip, type Zoom Extents except lights.
 -
For the
Right mouse button Tooltip, type Zoom Extents except lights all viewports. -
In the Left mouse button Command box, type
! _SelNone _SelLight _Invert _Zoom _Selected _SelNone. -
In the Right mouse button Command box, type
! _SelNone _SelLight _Invert _Zoom _All _Selected _SelNone.
Note: You will find these macros in a Level 2 materials folder in text file Macros.txt.
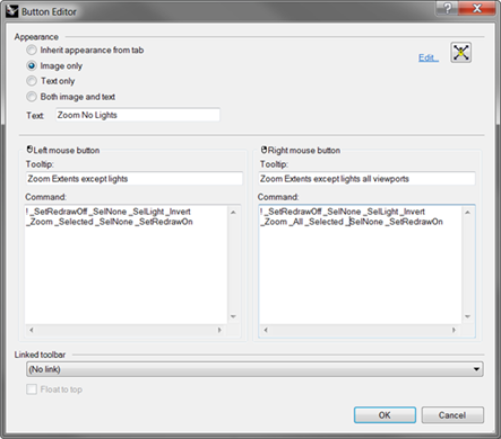
Debug the new button
Combine above macro with SetRedrawOff/SetRedrawOn. This will make the macro run without flashing and without too much info being reported to command history.
Your macro will work regardless of adding SetRedrawOff/SetRedrawOn. However, this is good practice to make your macro work more elegantly.
- In the Left mouse button Command box, type
! _SetRedrawOff _SelNone _SelLight _Invert _Zoom _Selected _SelNone _SetRedrawOn. - In the Right mouse button Command box, type
! _SetRedrawOff _SelNone _SelLight _Invert _Zoom _All _Selected _SelNone _SetRedrawOn.
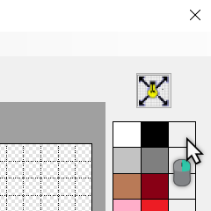
Change the button bitmap image
- In the Button Editor dialog box, click Edit next to the button icon in the upper right to open the Bitmap Editor.
The bitmap editor is a simple paint program that allows editing of the icon bitmap. It includes a Grab function for capturing icon-sized pieces of the screen, and an import file function. - In the Edit Bitmap dialog box, from theFile menu, click Import Bitmap to Fit, and select the ZoomNoLights_32.bmp.
You can import any bitmap image. If the bitmap is too large, it will be scaled to fit as it is imported.
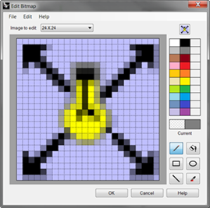
- In the Edit Bitmap dialog box, make any changes to the picture, and click OK.
Double-click on the color swatches to the right of the standard color bar to access the Select Color dialog box for more color choices.
- In the Select Color dialog box, click OK.
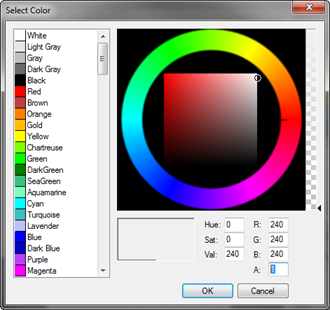
Change the bitmap image to use an alpha channel
Notice that the new button’s background color does not match the background color of the other buttons. We will change the image background using an alpha channel, so that it matches the Windows 3D Objects color like the other buttons.
-
Hold down the Shift key and right-click the ZoomNoLights button.
-
In the Button Editor dialog box, click Edit to open the Bitmap Editor.
-
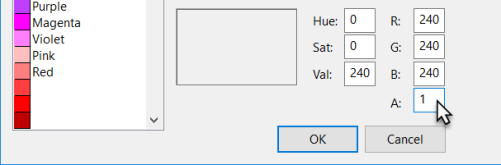
Double-click the upper right color swatch to the right of the black color.
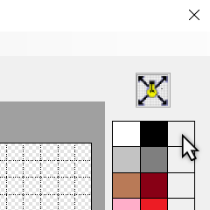
-
Change the alpha color number, labeled A, for the button color from 255 to 1.
This will make the current paint color transparent.
-
Right-click over the new alpha color to set the alpha color to the right mouse click.
-
Change to the Fill tool, and then right-click in the background area of the button image.
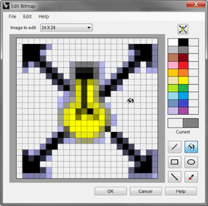
-
In the Edit Bitmap dialog box, click OK.
-
In the Button Editor dialog box, click OK.
The color matches the Windows 3D Objects color.
Use the new button
- Click the ZoomNoLights button.
- Use the button to zoom the model two ways.
Notice that Zoom Extents ignores the lights.
Rules for commands in buttons
You can enter the commands or command combinations in the appropriate boxes, using these rules:
|
Item
|
Sample
|
Description
Space
|
!_Line
|
A space is interpreted as Enter.
Commands do not have spaces, but you must leave a space between commands.
| |
" "
| |
If your command string refers to a file, toolbar, layer, object name, or directory for which the path includes spaces, the path, toolbar name, or directory location must be enclosed in double-quotes.
| |
! (Exclamation mark)
|
!-_circle
|
An ! (exclamation mark) followed by a space is interpreted as Cancel. Generally, it is best to begin a button command with an exclamation mark (!) if you want to cancel any other command that may be running when you click the button.
| |
’ (apostrophe)
| |
View manipulation commands like Zoom can be run in the middle of other commands. For example, you can zoom and pan while picking curves for a loft. An ‘(apostrophe) prior to the command name indicates that the next command is a nest able command.
| |
_ (underscore)
| |
An underscore (_) runs a command as an English command name.
Rhino can be localized in many languages. The non-English versions will have commands, prompts, command options, dialog boxes, menus, etc., translated into their respective languages. English commands will not work in these versions. For macros written in English to work on all computers (regardless of the language of Rhino), the macros need to force Rhino to interpret all commands as English command names, by using the underscore.
| |
-
(Hyphen)
|
-_Sweep2
|
Commands with dialog boxes can be run at the command-line with command-line options. To suppress the dialog box and use command-line options, prefix the command name with a hyphen (-).
| |
Pause
| |
User input and screen picks are allowed in a macro by putting the **Pause **command in the macro. Commands that use dialog boxes, such as Revolve, do not accept input to the dialog boxes from macros. Use the hyphen form of the command (-Revolve) to suppress the dialog box and control it entirely from a macro.
|
Note: These rules also apply to scripts run using the **ReadCommandFile **command and pasting text at the command prompt. More sophisticated scripting is possible with the Rhino Script plug-in, but quite a lot can be done with the basic commands and macro rules.
Some very useful commands for macros are SelLast, SelPrev, SelName, Group, SetGroupName, SelGroup, Invert, SelAll, SelNone, ReadCommandFile, and SetWorkingDirectory.
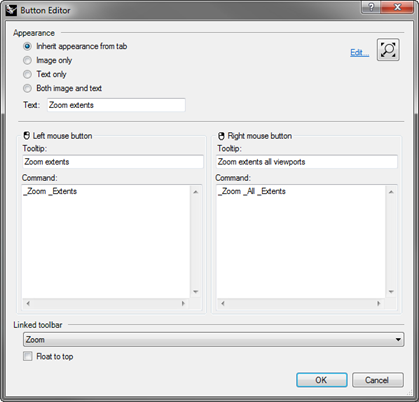
Link a toolbar to a button
- Hold the Shift key + ****Right-click the Zoom Extents button in the Standard toolbar.
- In the Button Editor dialog box, click in the Linked toolbar area, select Zoom from the list, and click OK.
Now the Zoom Extents button has a small black triangle in the lower right corner indicating it has a linked toolbar. - Click and hold the Zoom Extents button to fly out your newly-created single button toolbar.
If you close the Zoom toolbar you just created, you can always re-open it using the linked button. - Try the new linked button.
Add a command to an existing button
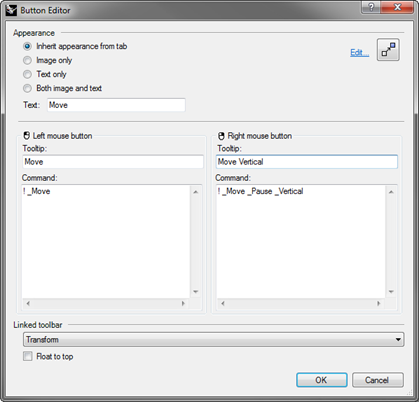
- Hold the Shift key, and on the Main toolbar, right-click the Move button .
- In the Button Editor dialog box, in the Right mouse button Command edit box, type
! _Move _Vertical
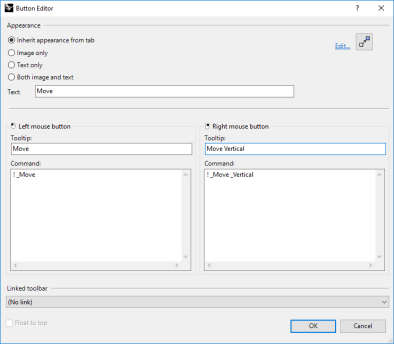
- In the Button Editor dialog box, in the Right mouse button Tooltip edit box, type Move Vertical.
This button lets you move objects vertical to the current construction plane. We will use this command several times during the class. - Select one of the objects in the model and right-click the Move button.
- Move the selected object vertically to the construction plane.
- Try it again. However, do not preselect an object in your rmodel.
- Right-click the Move button.
- The command echos this in the command-line:
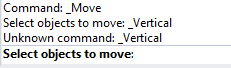
There are no objects selected, but the macro inputs “vertical” at the “select objects” prompt. That will not work. You need to pause the command so you can pick the objects. - In the Button Editor dialog box, in the **Right mouse button Command **edit box, update the macro to include a pause after the **Move **command and before the vertical option
! _Move _Pause _Vertical - Test with both pre-select and object selection in the command.
Add a new button to the Properties toolbar
Next, you will make a new command button in the **Properties **toolbar.
- The left mouse button will change the color property of an object with the Color Picker.
- The right mouse button will change the color property with the RGB value.
Prepare for writing these macros by going through the commands in Rhino that will be required to change the color of an object with the scriptable version of the **Properties **command, -Properties.
Take notes in a text file and prepare a list of options that are required for the macros.
-
In Options, off the **Toolbar **page, select the Default RUI file, and under the Toolbar area scroll to Properties. Click the check box to open the **Properties **toolbar.
-
Click the Ok button on the **Options **dialog. The **Properties **toolbar will appear.

-
On the title bar of the**Properties **toolbar, pick the gear and from the menu click New Button.

-
In the **Button Editor **dialog, in the Text field, type Change Color by Object.
-
In the Left mouse button Tooltip, type **Color Picker **and in the Right mouse button Tooltip, type RGB
-
In the Left mouse button Command, type:
! -_Properties _Pause _Object _Color _Object _ColorPicker _Enter _Enter -
In the Right mouse button Command, type:
! -_Properties _Pause _Object _Color _Object _Pause _Enter _Enter
Note: You will find these macros in a Level 2 materials folder in text file Macros.txt.

-
In the upper right corner of the **Button Editor **dialog, click Edit.
-
In the Edit Bitmap dialog box, use the tools to design a button that would be representative of these macros. Here is one suggestion:

-
Click Ok to close the **Edit Bitmap **dialog and your button will update.

-
Test the button macros.
Command aliases
The same commands and macros that are available for buttons are also available for command aliases. Command aliases are like using shorthand in Rhino. They are commands and macros that are activated whenever commands are allowed, but are often used as a keyboard shortcut.
Use aliases for command sequences that you use often or frequently.
Note: When making aliases, use keys that are close to each other or repeat the same character 2 or 3 times, so they will be easy to use.
For the next few sections in this chapter, you will find a text file in the folder containing your Level 2 materials called Macros.txt. If you need to trouble shoot your macros, you can open it and compare the content to your entries.
Make a command alias
- Open the model Aliases.3dm.
- On the Tools menu, click Options.
- In the Rhino Options dialog box, on the Aliases page, you can add aliases and command strings or macros.
- Click New to make a new alias.
We will make aliases to mirror selected objects vertically and horizontally across the origin of the active construction plane. These are handy when making symmetrical objects built centered on the origin.
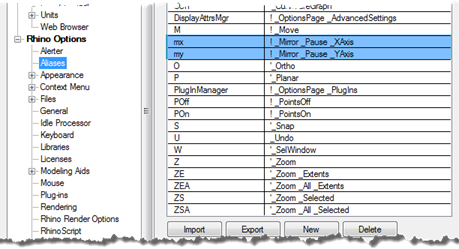
- In the Alias column, type mx.
- In the Command Macro column, type ! _Mirror _Pause _XAxis
The alias is in the left column and the command string or macro is in the right column. The same rules apply here as with the buttons.
Aliases can be used within other aliases’ macros or button macros. - To make another new alias, click the New button.
- In the Alias column, type my.
- In the Command Macro column, type**
! _Mirror _Pause _YAxis**
Try the new aliases
- Select some geometry, and type mx or my, and press Enter.
If no objects are pre-selected, the Pause in the script prompts you to select objects, and press Enter to complete the selection set.
Macro editor
When making macros that are more complicated, it is good practice to use Rhino’s built-in macro editor. Macros can be edited and run directly from the editor. This allows you to quickly test whether command options and syntax are correct.
- In the following example we will make a mirror macro that allows you to mirror across the construction plane. We will use the Macro Editor to build and test the macro before we add it to the Alias list.
Use the macro editor
- On the Tools menu, click Command, and then click Macro Editor.
- In the Macro Editor type**
! _Mirror _Pause _3Point 0 1,0,0 0,1,0**.

- To test the macro, click the Run icon in the Macro Editor.

- If the macro runs as expected, select the text, and copy it to the clipboard.
- Open the Options dialog box, and on the Alias page, and make a new alias mc.
- Paste the text from the Macro Editor into the Alias command column.
- Select some geometry, and test the new alias.
- Type mc, and press Enter.
Export and import Rhino options
There are times when you might want to copy all or some of the options from one computer to another. An example might be a desktop computer and a laptop computer. This is especially true for aliases, keyboard shortcuts, and display modes. Rhino has commands that Export options to a file as well as Import options from a file.
Export options
- On the Tools menu, click Export Options.
- In the Save As dialog box, for the File Name, type Level2_Options.
The current options are saved to a file.
Import options
- Delete one of the aliases you previously made.
- On the Tools menu, click Import Options.
- In the Import Options dialog box, select the file you just saved.
- For the Options to import, click Aliases, Appearance, or any other options you wish to import.
- Check to see if the alias you deleted is back.
Shortcut keys
The same commands, command strings, and macros that you can use for buttons and aliases are also available for keyboard shortcuts. Shortcuts are commands and macros that are activated by certain combinations of function keys, Ctrl, Alt, and alphanumeric keys.
Make a shortcut key
-
On the Tools menu, click Options.
-
In the Rhino Options dialog box, on the Keyboard page, you can add command strings or macros.
-
To make a new shortcut, click the Command macro column next to F4.
-
For the shortcut, type _DisableOsnap _Toggle.
This shortcut will make it easy to toggle the state of running object snaps. -
To make a new shortcut for the **What **command, click the Command macro column next to F5.

-
For the shortcut, type !_What command.
-
Pick **Ok **to close the the dialog box. Test the F4 and F5 keys.
Preselect an object to test the **What **command on F5.
There are several shortcut keys that already have commands assigned. The same rules apply here as with the buttons and aliases.
Plug-ins
Plug-ins are programs that extend the functionality of Rhino.
Plug-in classifications include:
Included plug-ins
Shipped and installed with Rhino. Some of these plug-ins are loaded, for example Rhino Render, Render Development Kit, Rhino Toolbars and Menus, BoxEdit, etc. Others are installed, but not loaded. Most of these plug-ins are Import/Export plug-ins. They are generally enabled and will get loaded when they are used for the first time.
McNeel plug-ins
Flamingo nXt, Penguin, Brazil (rendering) and Bongo (animation) are McNeel products that are available for purchase.
Third-party plug-ins
These are programs and utilities that are developed by third-party developers. Some of these are free, but most are available for purchase. A few of the programs are stand-alone applications that work with Rhino, but are not plug-ins.
Generally, they add some specific capability to Rhino. For example RhinoCam is a CAM application, VRay is a rendering application, RhinoGold is jewelry design software, VisualARQ is for building architectural models, etc. All of these are developed by experts in their specific industries. For more information about these programs visit the Food4Rhino website.
Load a plug-in
For this example we have included a plug-in from the Rhino 5.0 labs page for you to install and use.
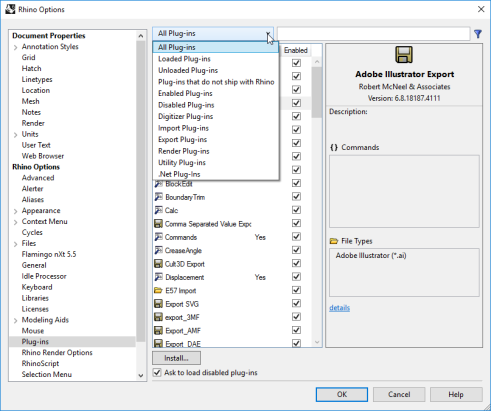
- On the Tools menu, click Options.
- Click Plug-ins.
A list of currently loaded and available plug-ins is displayed. - On the Plug-ins page, click Install.
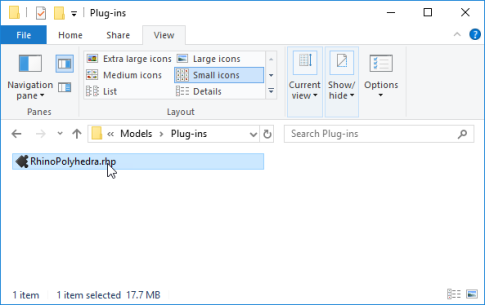
- In the Load Plug-In dialog box, navigate to the Level 2/Models/Plug-ins folder, then rhinopolyhedra.rhp.
**Note **: With an account on Food4Rhino, you may also download the **Rhinopolyhedra.rhi **plug-in. The rhi is a Rhino installer file that will need to be double-clicked and installed outside of Rhino.
Load a plug-in using drag and drop
For the initial load, you may also drag and drop the **rhinopolyhedra.rhp **from File Explorer. This will only work if you have not registered **Rhinopolyhedra **in a previous session.
- Open a Windows Explorer window.
- Navigate to the Level 2/Models/Plug-ins folder or any folder that has a **.rhp **plug-in that you want to install.
- Click and hold on the plug-in file rhinopolyhedra.rhp, then drag it and drop it into the open Rhino application window.
Run the command
- To run the command in Rhino, type Polyhedron on the command-line.
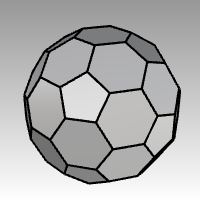
- In the Polyhedron dialog, select one of the polyhedrons from the list, such as Dual Geodesic Icosahedron Pattern 2.
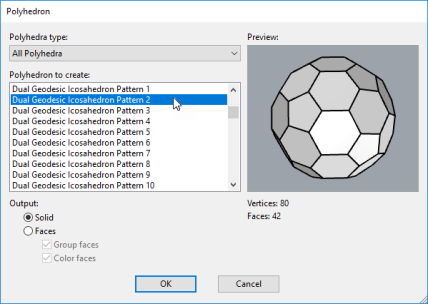
- Click a center point and a radius point to complete the polyhedron.
Scripting
Rhinoceros supports scripting using **RhinoScript **and Rhino.Python.
To script Rhino, you must have some programming skills. Fortunately, scripting is easy to learn and there are materials available to help you get started.
You will find more details on the Developer Wiki.
In addition, Rhino installs with Help for both scripting tools. See the **EditScript **and **EditPythonScript **commands for details.
We will not cover how to write a script in this class, but we will learn how to run a script and apply it to a button.
The following script will list information about the current model.
Load a RhinoScript
- On the Tools menu, click RhinoScript, then click Load.
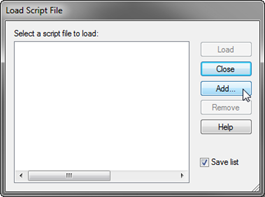
- In the Load Script File dialog box, click Add.
- In the Open dialog box, select CurrentModelInfo.rvb, then click Open.
Note: You may get the following message, “Cannot find the script file CurrentModelInfo.rvb.”
If that happens you will need to include the full path to the folder where the script file is located or add a search path in the Files section of Rhino Options. - In the Load Script File dialog box, highlight CurrentModelInfo.rvb, then click Load.
- Save the current model.
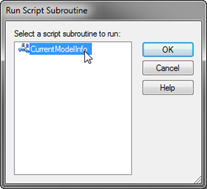
If you do not have a saved version of the model, no information is possible. - On the Tools menu, click RhinoScript, then click Run.
- In the Run Script Subroutine dialog box, click CurrentModelInfo and then click OK.
A dialog box describing the current information about this model displays.

Edit the script file
- On the Tools menu, click RhinoScript, then click Edit.
- In the Rhino Script Editor window, from the File menu, click Open.
- In the Open dialog box, select CurrentModelInfo.rvb, and click Open.
We will not be editing script files in this class. This exercise is to show how to access the editing feature if needed. - Close the Rhino Script Editor window.
Make a button that will load or run a script
- On the Tools menu, click Toolbar Layout.
- In the Toolbars dialog box, check the File toolbar, and then close the dialog box.
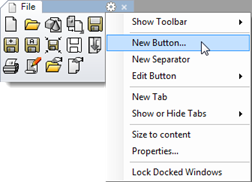
- Right-click the title bar of the File toolbar.
- On the pop-up menu that appears, click New Button command.
- In the Button Editor dialog box, in the Left mouse button Tooltip box, type Current model information.
- In the Right mouse button Tooltip box, type Load current model information.
- In the Text box, type Model Info.
- In the Left mouse button Command box, type**
! -_RunScript (CurrentModelInfo)** - In the Right mouse button Command box, type**
! -_LoadScript “CurrentModelInfo.rvb”**

Add a custom bitmap
- In the Button Editor dialog box, click Edit.
- In the Edit Bitmap dialog box, from the File menu, click Import Bitmap.
- Choose CurrentModelInfo.bmp file, and click Open.
- In the Button Editor dialog box, click OK.
- Try the new button.
Template files
A template is a Rhino model file you can use to store basic settings. Templates include all the information that is stored in a Rhino 3DM file: objects, blocks, layouts, grid settings, viewport layout, layers, units, tolerances, render settings, dimension settings, notes, and any setting in document properties.
You can use the default templates that are installed with Rhino or save your own templates to base future models on. You will likely want to have templates with specific characteristics needed for particular types of model building.
The standard templates that come with Rhino have different viewport layouts or unit settings, but no geometry, and default settings for everything else. Different projects may require other settings to be changed. You can have templates with different settings for anything that can be saved in a model file, including render mesh, angle tolerance, named layers, lights, and standard pre-built geometry and notes.
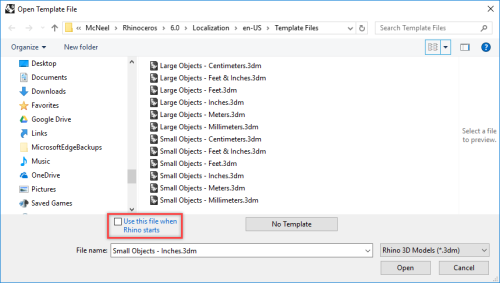
If you include notes in your template, they will show in the Open Template File dialog box.
The New command begins a new model with a template (optional). It will use the default template unless you change it to one of the other templates or to any other Rhino model file.
To change the template that opens by default when Rhino starts up, choose New and select the template file you would like to open when Rhino starts, then check the Use this file when Rhino starts box.
Exercise 2-2 Create a template
- Start a new model.
- As the template, select the Small Objects - Inches.3dm.
- On the Render menu, click Current Renderer, and then click Rhino Render.
Set the document properties
- On the File menu, click Properties.
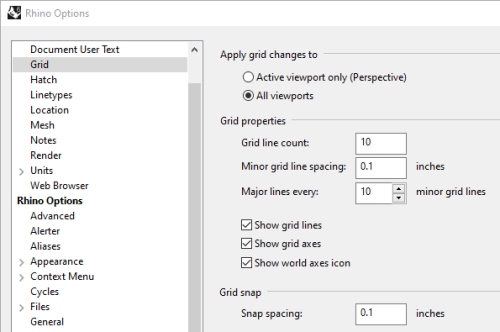
- In the Document Properties dialog box, on the Grid page set the following:
Grid line count to 10
Minor grid line spacing to 0.1 inches
Major lines every to 10 minor grid lines
Snap spacing to 0.1.
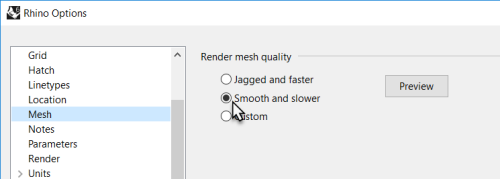
- On the Mesh page change the setting to Smooth & slower.
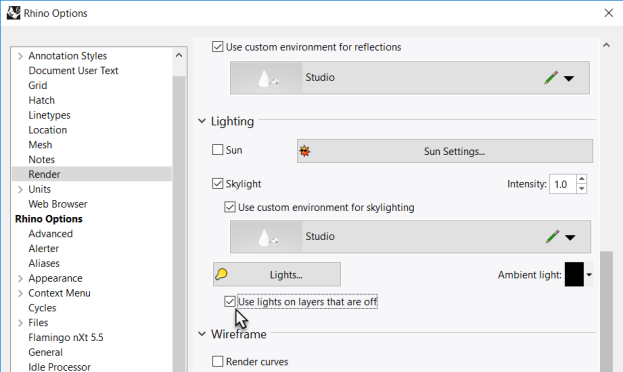
- On the Render page, scroll down to the **Lighting **section. Check Use lights on layers that are off.
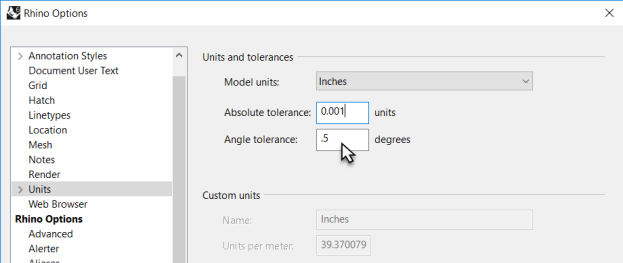
- On the Units page, change the Angle tolerance to 0.5, click OK.
The end tangent normals will be determined by this setting.
Set up the layers
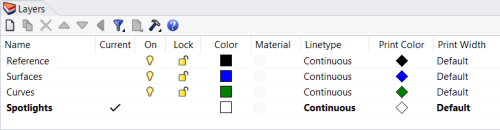
- Open the Layers panel. Make the following changes:
Rename Layer 05 to Spotlights
Rename Layer 04 to Curves
Rename Layer 03 to Surfaces
Rename Default to Reference. - Make the Spotlights layer current.
- Delete the unused layers: Layer 01 and Layer 02.
- Set up a spotlight so that it points at the origin and is approximately 45 degrees in the Top viewport and tilted 45 degrees in the Front viewport.
- Use the my alias to mirror the light to make a second one.
- To make the Curves layer the only visible layer, from the Edit menu, click Layers then click One Layer On.
- Select the Curves layer.
Save notes
- On the Panel menu, click Notes.
- Type the details about this template in the Notes panel.
- On the File menu, click Save As Template.
- Name the template Small Objects – Decimal Inches - 0.001.3dm.
This file with all of its settings is now available any time you start a new model.
Set a default template
- On the File menu, click New.
- Select the template you want to use as the default template.
- In the Open Template File dialog box, check the Use this file when Rhino starts check box.
You should make custom templates for the kind of modeling that you do regularly to save set up time.