Getting Started with Rhino.Inside.Revit
What is Rhino.Inside.Revit
Rhino.Inside is a new technology developed by Robert McNeel & Associates that allows embedding Rhino into other applications. Rhino.Inside is being embedded into many applications from a wide variety of disciplines.
Rhino.Inside.Revit is one of the Rhino.Inside’s most exciting projects. It is an addon for Autodesk Revit® that allows Rhino to be loaded into the memory of Revit just like other Revit add-ons.
Rhino.Inside.Revit brings the power of Rhino and Grasshopper to the Autodesk Revit® environment
Installation
Download Rhino.Inside.Revit and Rhino from the links below
 Download Rhino.Inside.Revit Beta
Download Rhino 7,8 or 9
Download Rhino.Inside.Revit Beta
Download Rhino 7,8 or 9
The Rhino.Inside.Revit installer is also available on Food4Rhino Website
Revit 2018-2027 is required to install Rhino.Inside.Revit.
Let’s install Rhino first
- Run the installer and go through the setup process until Rhino is fully installed
- Run Rhino and make sure it is licensed and runs with no issues
Now let’s install Rhino.Inside.Revit
- Run the installer and go through the setup process until Rhino.Inside.Revit is fully installed
Now that we have installed both dependencies, we can proceed to loading Rhino.Inside.Revit
Loading Rhino.Inside.Revit
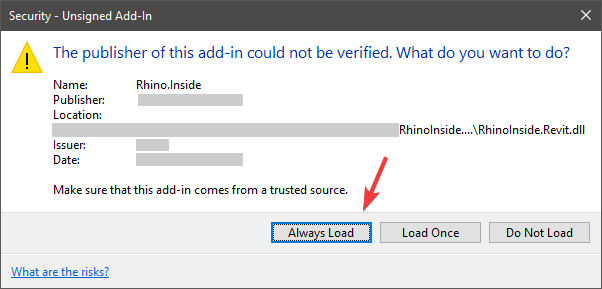
Launch Autodesk Revit®. You will be prompted to confirm loading Rhino.Inside.Revit. Make sure to press Always Load to skip this dialog in the future.
After load is complete, note the new Rhino.Inside tab in the Revit UI
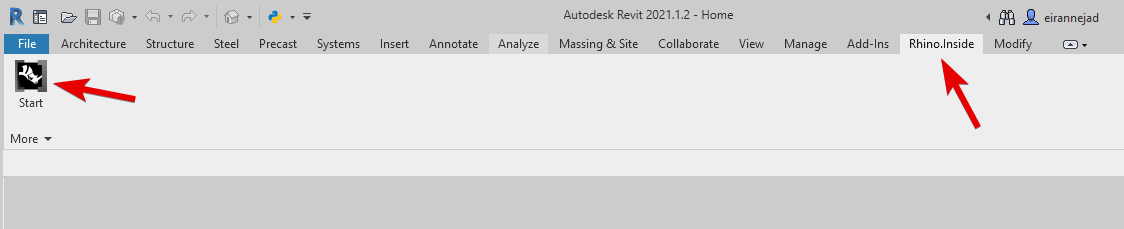
Click on the Start button to start loading Rhino.Inside.Revit. The addon, attempts to load Rhino inside Revit’s memory and make sure it is licensed. Once the load process is completed, new Rhinoceros and Grasshopper panels will be added to the toolbar.

The new toolbar contains many new buttons that give you access to
- Rhino itself
- Python IDE (with access to Revit API)
- Grasshopper (with custom Revit components)
See Rhino.Inside.Revit Interface for a complete list of buttons in the Rhinoceros tab
If you encountered any errors, please consult the Known Issues page for a list of already known issues and their temporary workarounds.
Grasshopper inside Revit
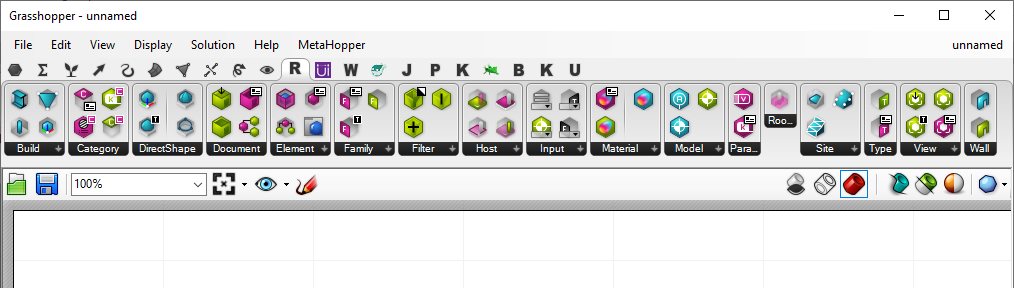
Arguably one of the most important features of Rhino.Inside.Revit is Grasshopper. Open it by clicking on the Grasshopper button in the new Rhinoceros tab. Note the extra Revit tab in Grasshopper window, with many Revit-aware components:
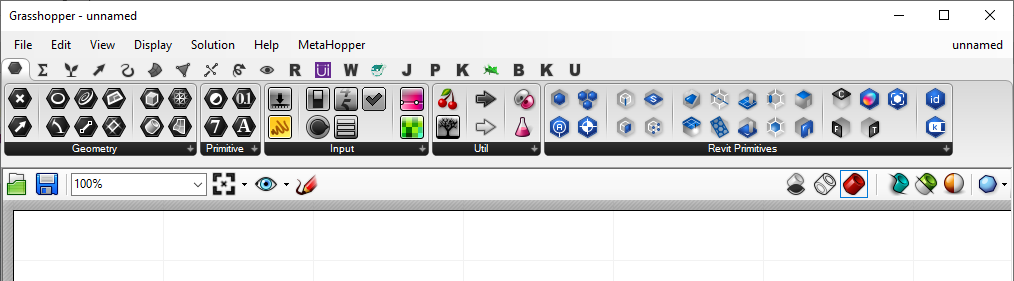
There is also a Revit Primitives panel on the default Params tab:
The Revit-aware component icons help identifying the action that the component performs. As shown below, the base color shows the type of action (Query, Analyze, Modify, Create). There are a series of badges applied to icons as well, that show Type, Identity, or other aspects of the data that the component is designed to work with:
![]()
See Basic Interactions Guide for more info on Revit-aware components.
Extracting Revit Geometry
To get started, let’s create a simple definition in Grasshopper to extract geometry of a Revit element. Grasshopper is by far one of the most exciting add-ons for Rhino and as part of the Rhino.Inside.Revit project has the potential to improve the design and documentation in Autodesk Revit® dramatically.
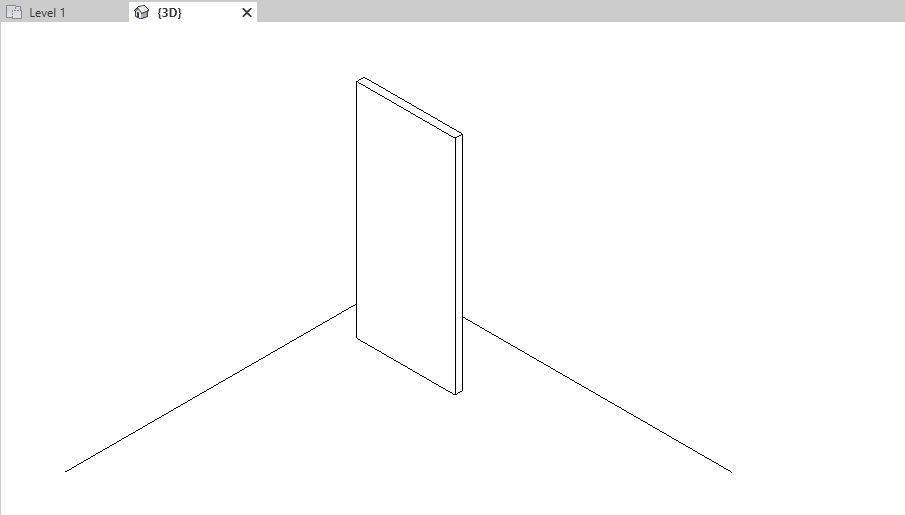
Open a simple Revit model and draw a single wall
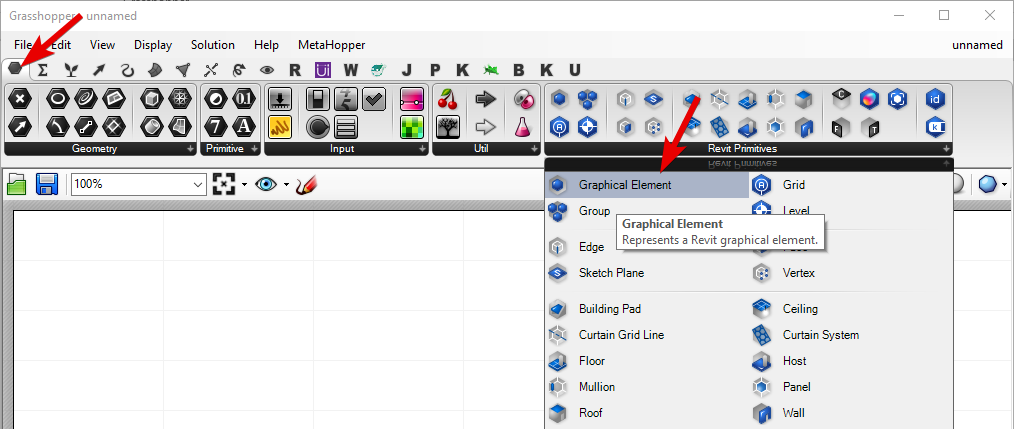
From the Params > Revit panel, add a
 Graphical Element
parameter
Graphical Element
parameter
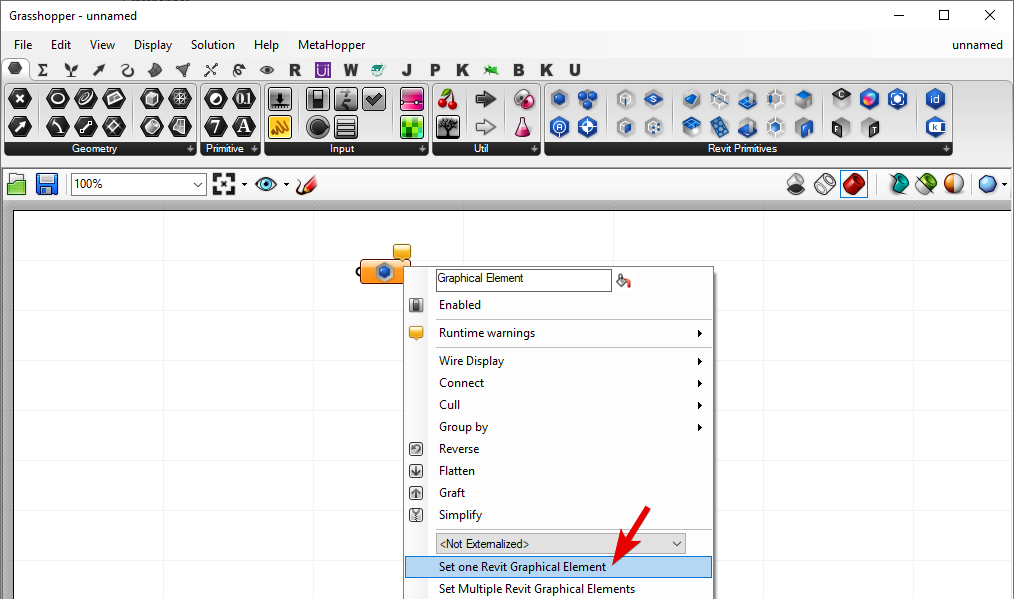
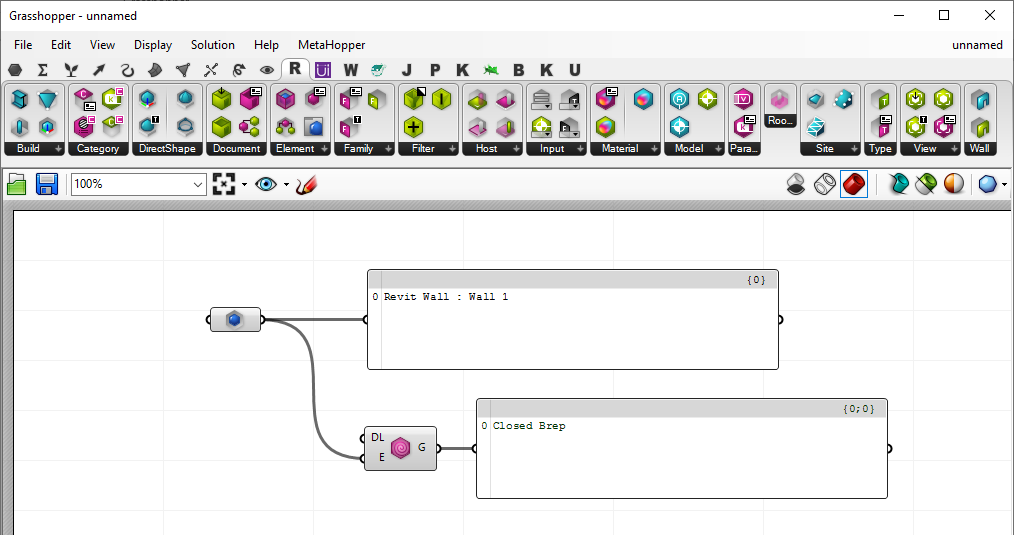
Now Right-Click on the component and click on Select One Revit Graphical Element. Grasshopper switches to Revit window and asks you to select a Revit element. Select the single Wall element we created earlier.
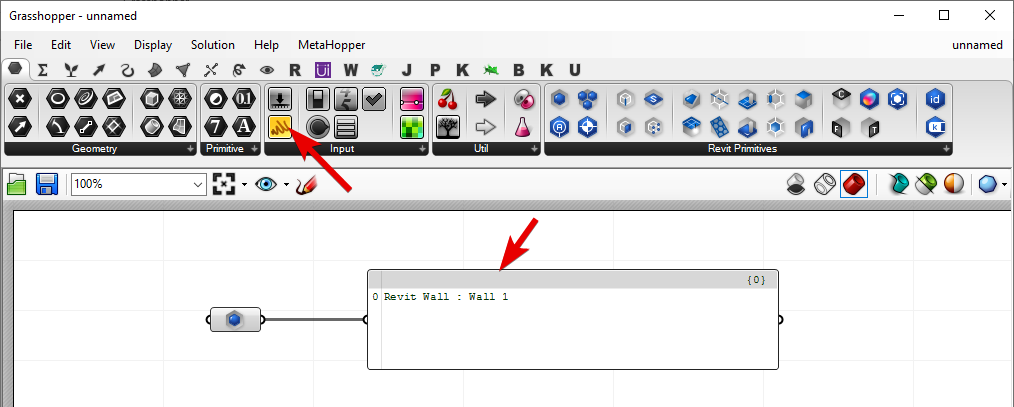
Now drop a Panel component into the definition and connect the
Graphical Element
output to its input. You can see that this parameter now contains the selected wall element:
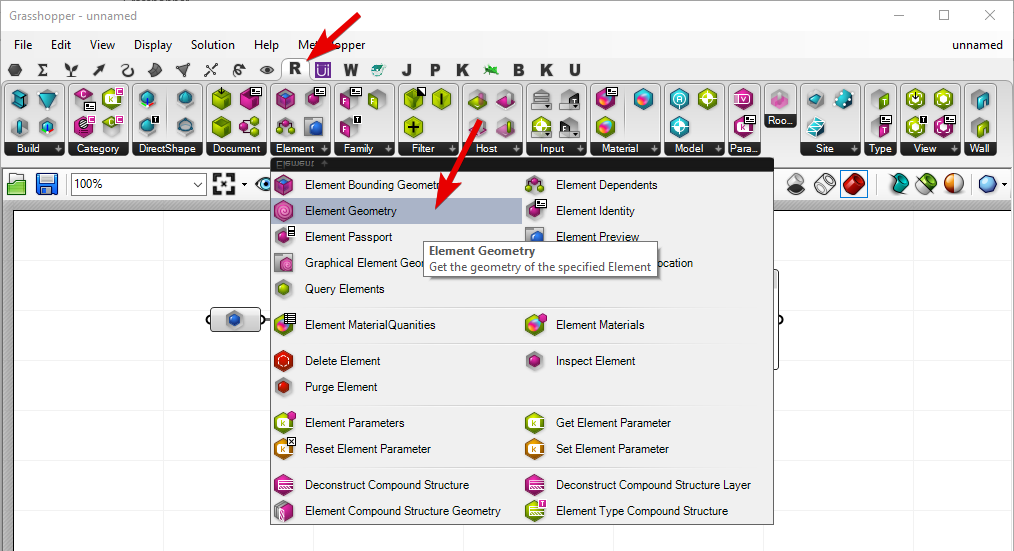
Let’s grab the Wall geometry by using a Revit-specific component. From Revit > Elements add an
 Element Geometry
component.
Element Geometry
component.
After passing the
Graphical Element
output to the input of the
Element Geometry
, the new Revit-specific component extracts the Wall geometry from the Wall element using the Revit API. The geometry is then converted to Rhino Breps (since other Grasshopper components might not be familiar with Revit geometry) so it can be passed to other Grasshopper components for further processing.
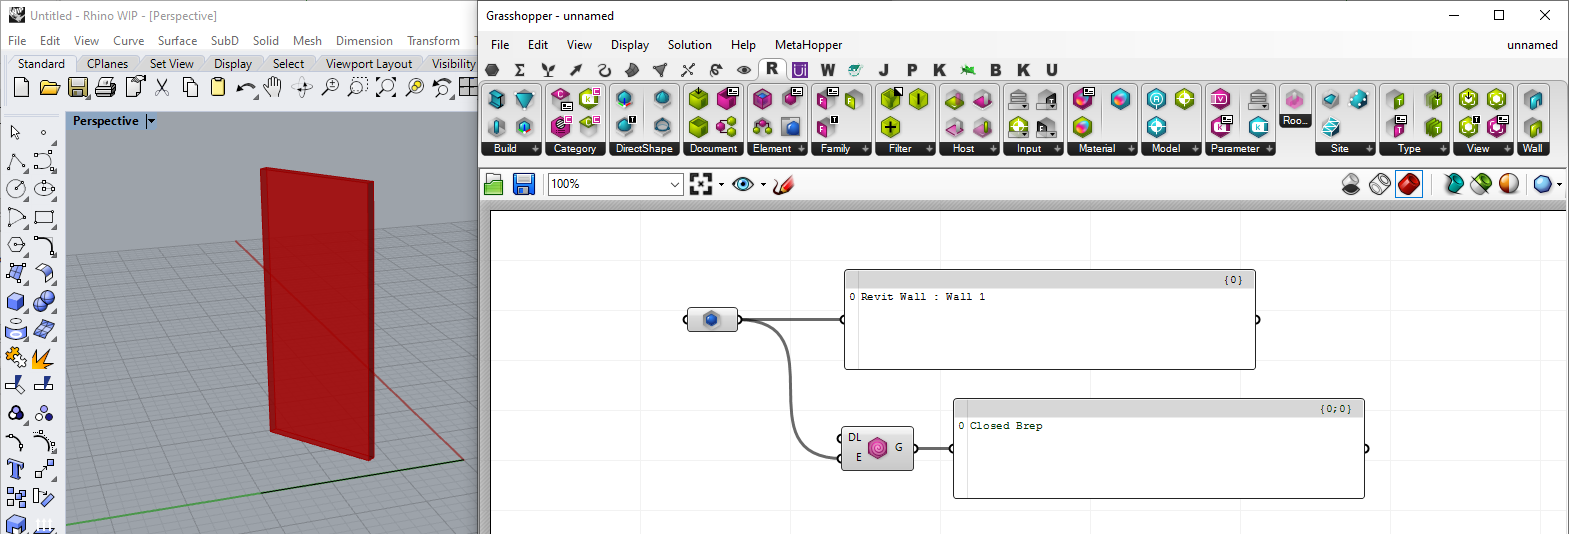
Similar to other Grasshopper geometric components, the output geometry is shows as preview in both Revit and Rhino viewports
As you have seen here, working with Rhino.Inside.Revit is very intuitive and simple. The Revit-specific Grasshopper components are one of the most important aspects of the Rhino.Inside.Revit project. Grasshopper script components (python and C#) can also be used to access Rhino or Revit APIs simultaneously and create custom components in Grasshopper for your specific workflows.
Creating Revit Elements
In the section above, we saw an example of converting Revit geometry into Rhino using custom Revit components in Grasshopper. Grasshopper has many other Revit-specific components. A subset of these components allow the user to create new content inside the Revit document.
Let’s create a simple wall in Revit using a few of these components. To create a wall in Revit we need:
- A line that is the basis of the wall. It defines that start and end point
- Wall type
- Level to host the new wall
- Wall height
Open Rhino (inside Revit) and create a simple line
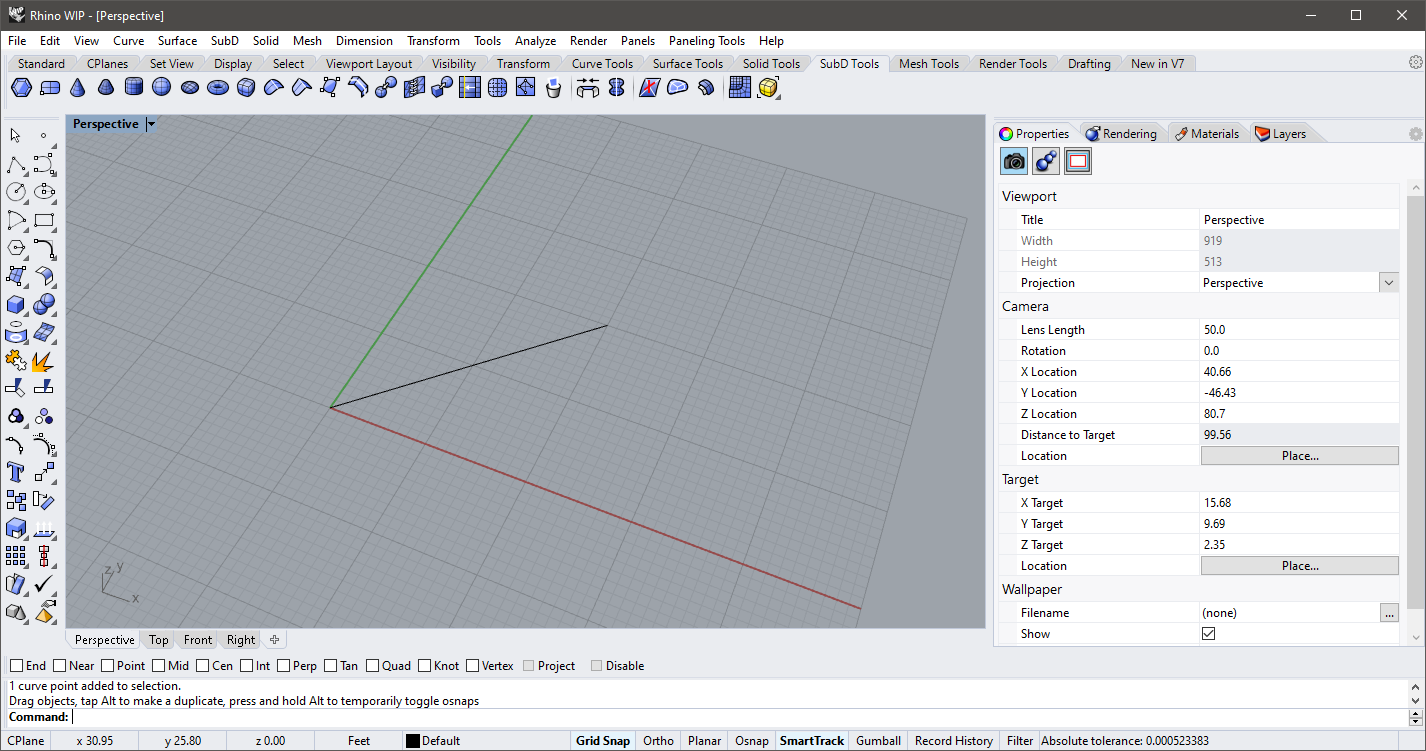
Now open Grasshopper and add a curve component. Right-Click the component and select the newly created line in Rhino.
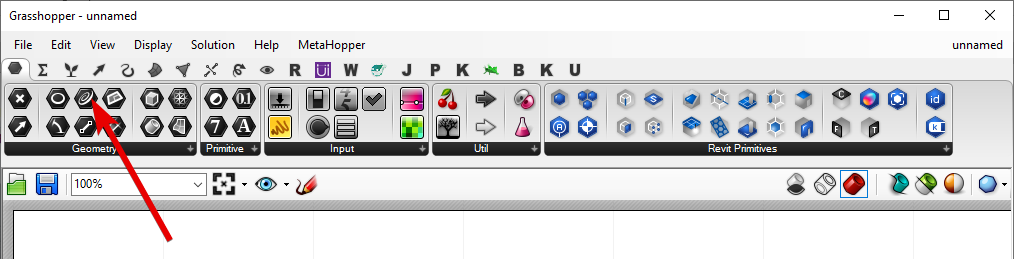
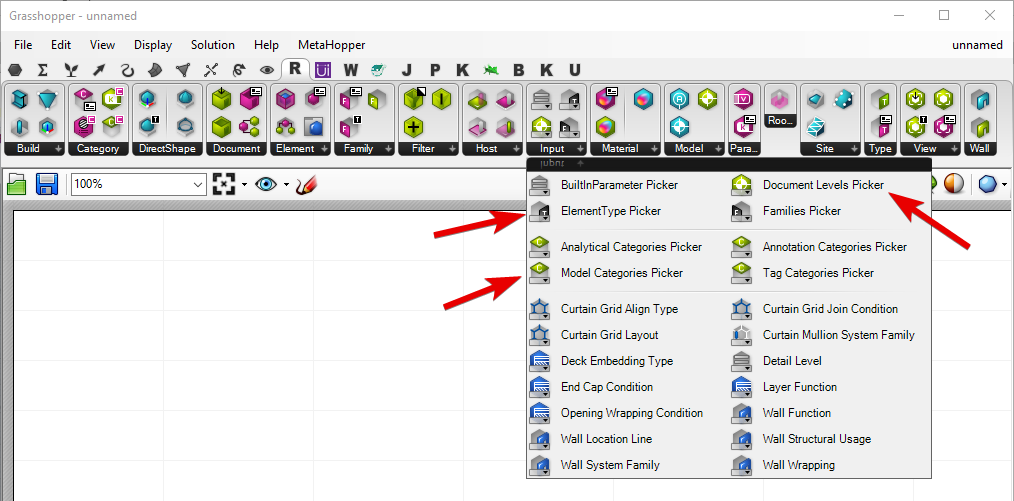
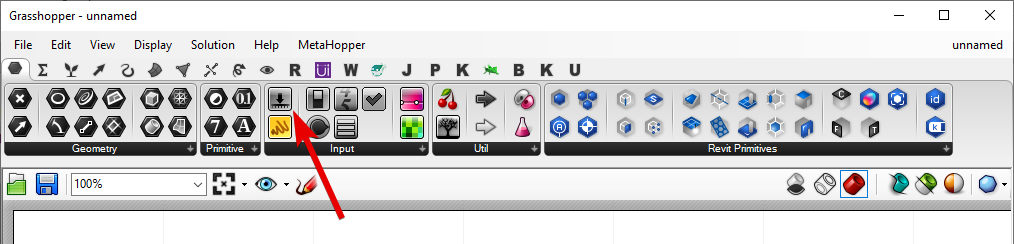
Now from the Revit > Input panel and
 Model Categories Picker
,
Model Categories Picker
,
 Element Type Picker
and
Element Type Picker
and
 Levels Picker
components as well:
Levels Picker
components as well:
Finally let’s add a Grasshopper integer slider as well to provide the height for our new wall
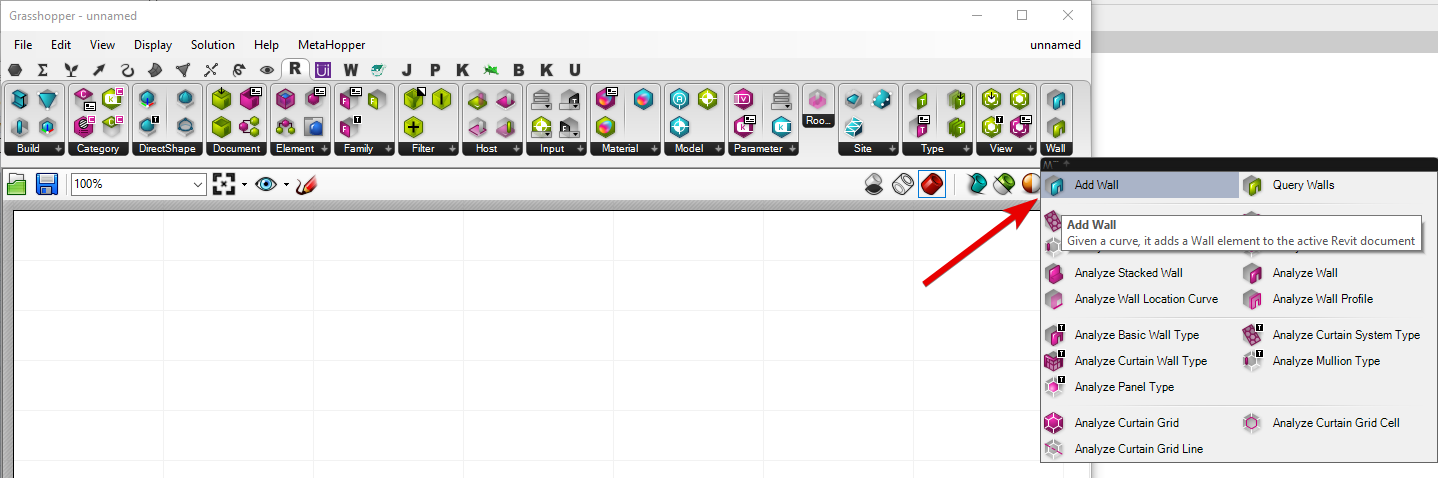
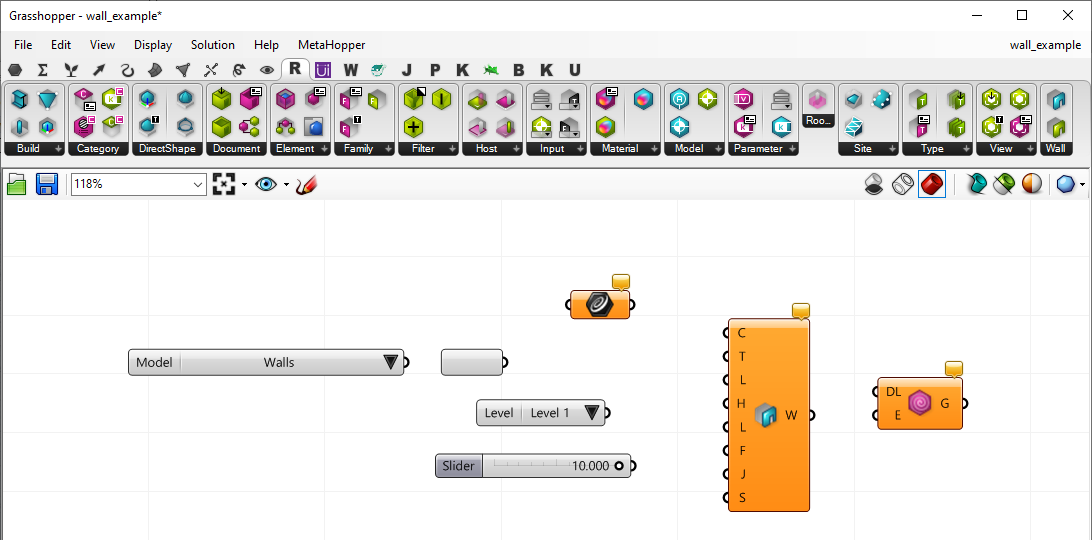
To create a wall, we are going to use a custom Grasshopper node that can create a Revit wall by curve. From Revit > Build panel add a
 Add Wall (Curve)
component.
Add Wall (Curve)
component.
Now that we have all these components inside the Grasshopper definition, let’s organize them before connecting the parameters
From the list of categories shown on the
Model Categories Picker
component, select the Walls category
Now connect the output of the
Model Categories Picker
to the input of
Element Type Picker
(the input parameter is not visible by default. Drag the arrow over to the left of the component where the input parameter is expected to be)

The
Element Type Picker
now shows a list of wall types collected from the model. Select a basic wall type. This wall type is going to be used to create the new wall.
Now connect the rest of the components as shown below
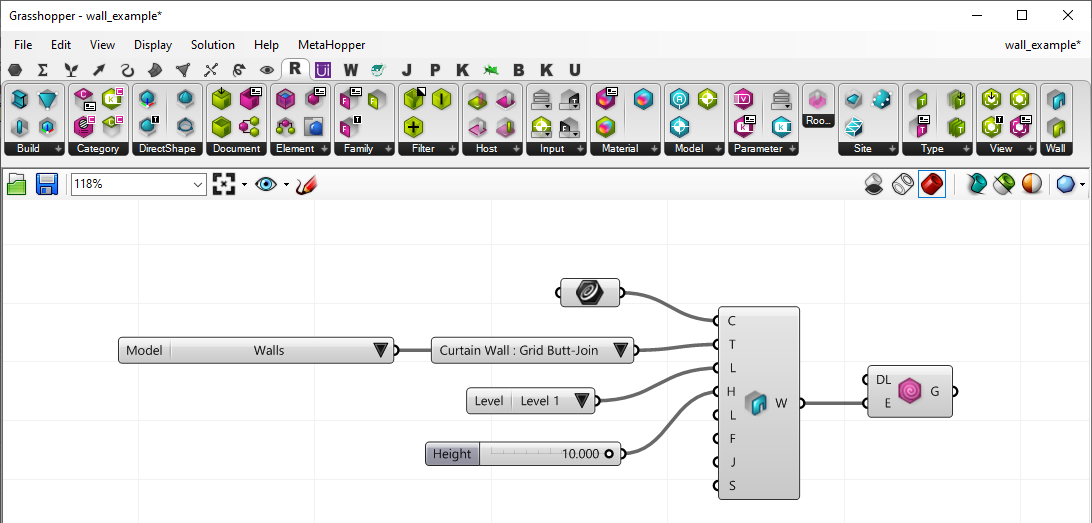
The
Add Wall (Curve)
component now has all the information to create a new wall in Revit.
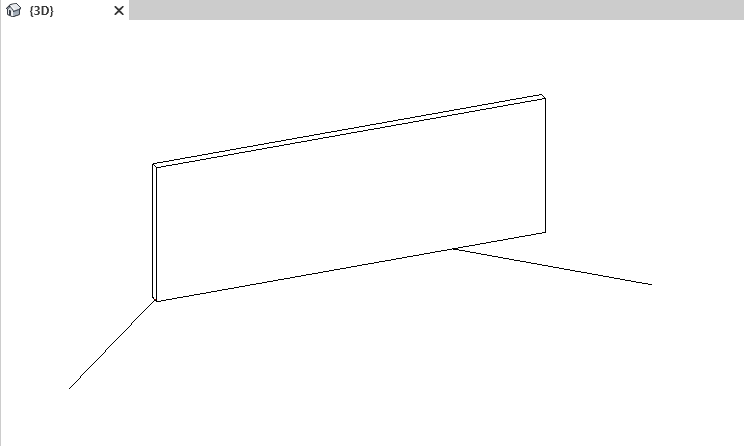
The same wall geometry is also visible in Rhino
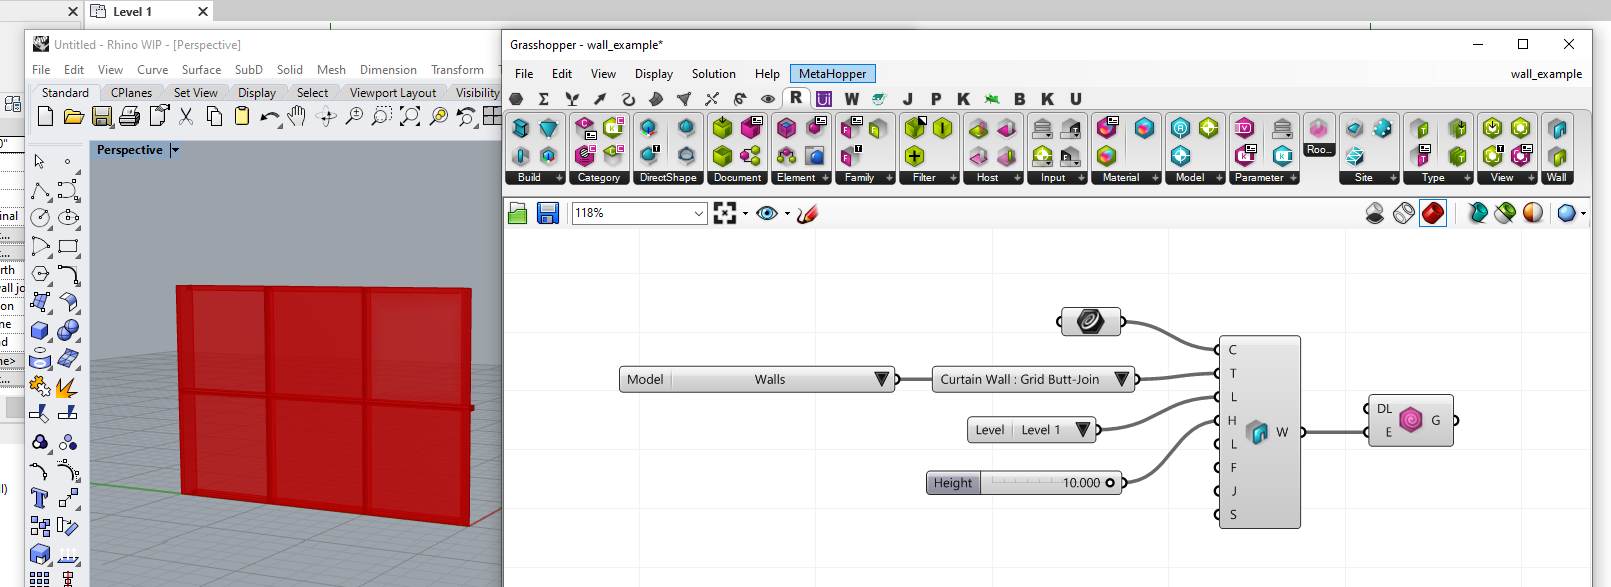
Grasshopper Interactivity
Arguably the most important feature of a visual programming environment like Grasshopper is the interactivity of its components. Rhino.Inside.Revit project brings this interactivity to the Revit environment and allows the designer to explore the design space a lot more efficiently and create novel solutions.
Let’s grab the height slider from the example above, and move it back and forth a bit.
Imagine the possibilities!
GHPython in Revit
Since Rhino is running inside the memory of Revit, potentially all the Rhino and Grasshopper add-ons can also have access to the Revit API. This feature makes the Python scripting in Rhino and Grasshopper exponentially more powerful since the python scripts can use Rhino API, Grasshopper API, and Revit API at the same time. Alongside these APIs, the Rhino.Inside.Revit addon also provides extra functionality that is mostly focused translating Rhino/Grasshopper data types to Revit and vice versa.
Take a look at this example python script. It imports symbols from all the mentioned APIs into the script.
# adding references to the System, RhinoInside
import clr
clr.AddReference('System.Core')
clr.AddReference('RevitAPI')
clr.AddReference('RevitAPIUI')
clr.AddReference('RhinoInside.Revit')

# now we can import symbols from various APIs
from System import Enum

# rhinoscript
import rhinoscriptsyntax as rs

# rhino API
import Rhino

# grasshopper API
import Grasshopper

# revit API
from Autodesk.Revit import DB

# rhino.inside utilities
import RhinoInside API
from RhinoInside.Revit import Revit, Convert
# add extensions methods as well
# this allows calling .ToXXX() convertor methods on Revit objects
clr.ImportExtensions(Convert.Geometry)

# getting active Revit document
doc = Revit.ActiveDBDocument
So to use the example above, we can add the lines below to our script to read the geometry of input Revit element (E) using Revit API (.Geometry[DB.Options()]) and the pass that to the utility method provided by Rhino.Inside.Revit API to convert the Revit geometry into Rhino (Convert.ToRhino()) and finally pass the Rhino geometry to Grasshopper output.
G = [x.ToBrep() for x in E.Geometry[DB.Options()]]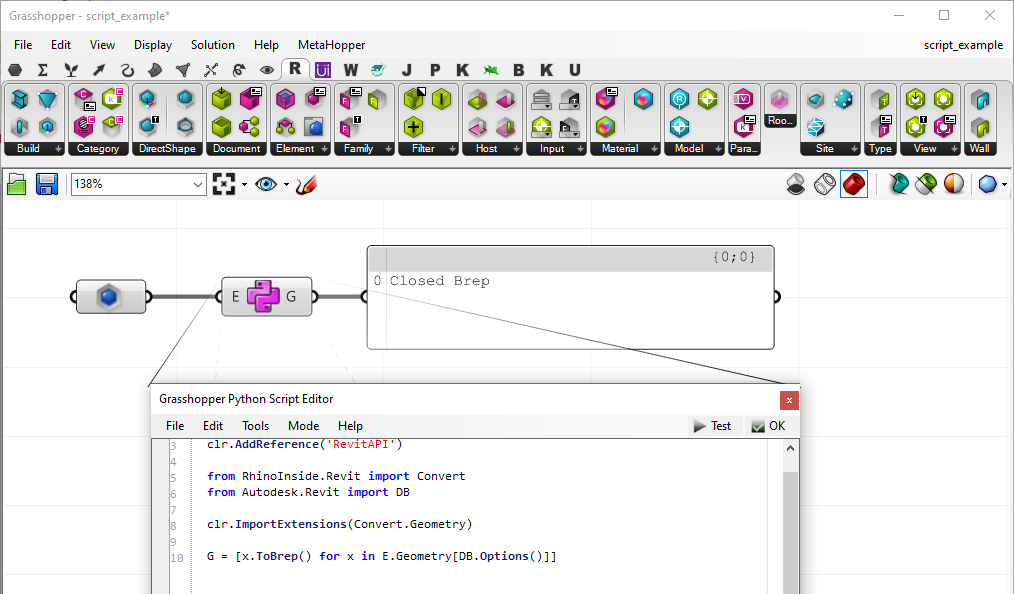
Rhino.Inside.Revit is already a very powerful tool but with Python and C# components, the possibilities are endless.
What’s Next
The Guides section listed on the navigation bar, is a great next point to see how Rhino.Inside.Revit can be used in tackling many design and documentation challenges in Autodesk Revit®. The articles under this page provide many examples on creating Grasshopper definitions and writing your own custom scripts.
Take a look at the Discover page to find out how Grasshopper and Rhino can be used in Revit workflows.
Reach out to Rhino.Inside.Revit developers and the users community on the forum if you came across a special condition that might need a new component or a more detailed explanation.