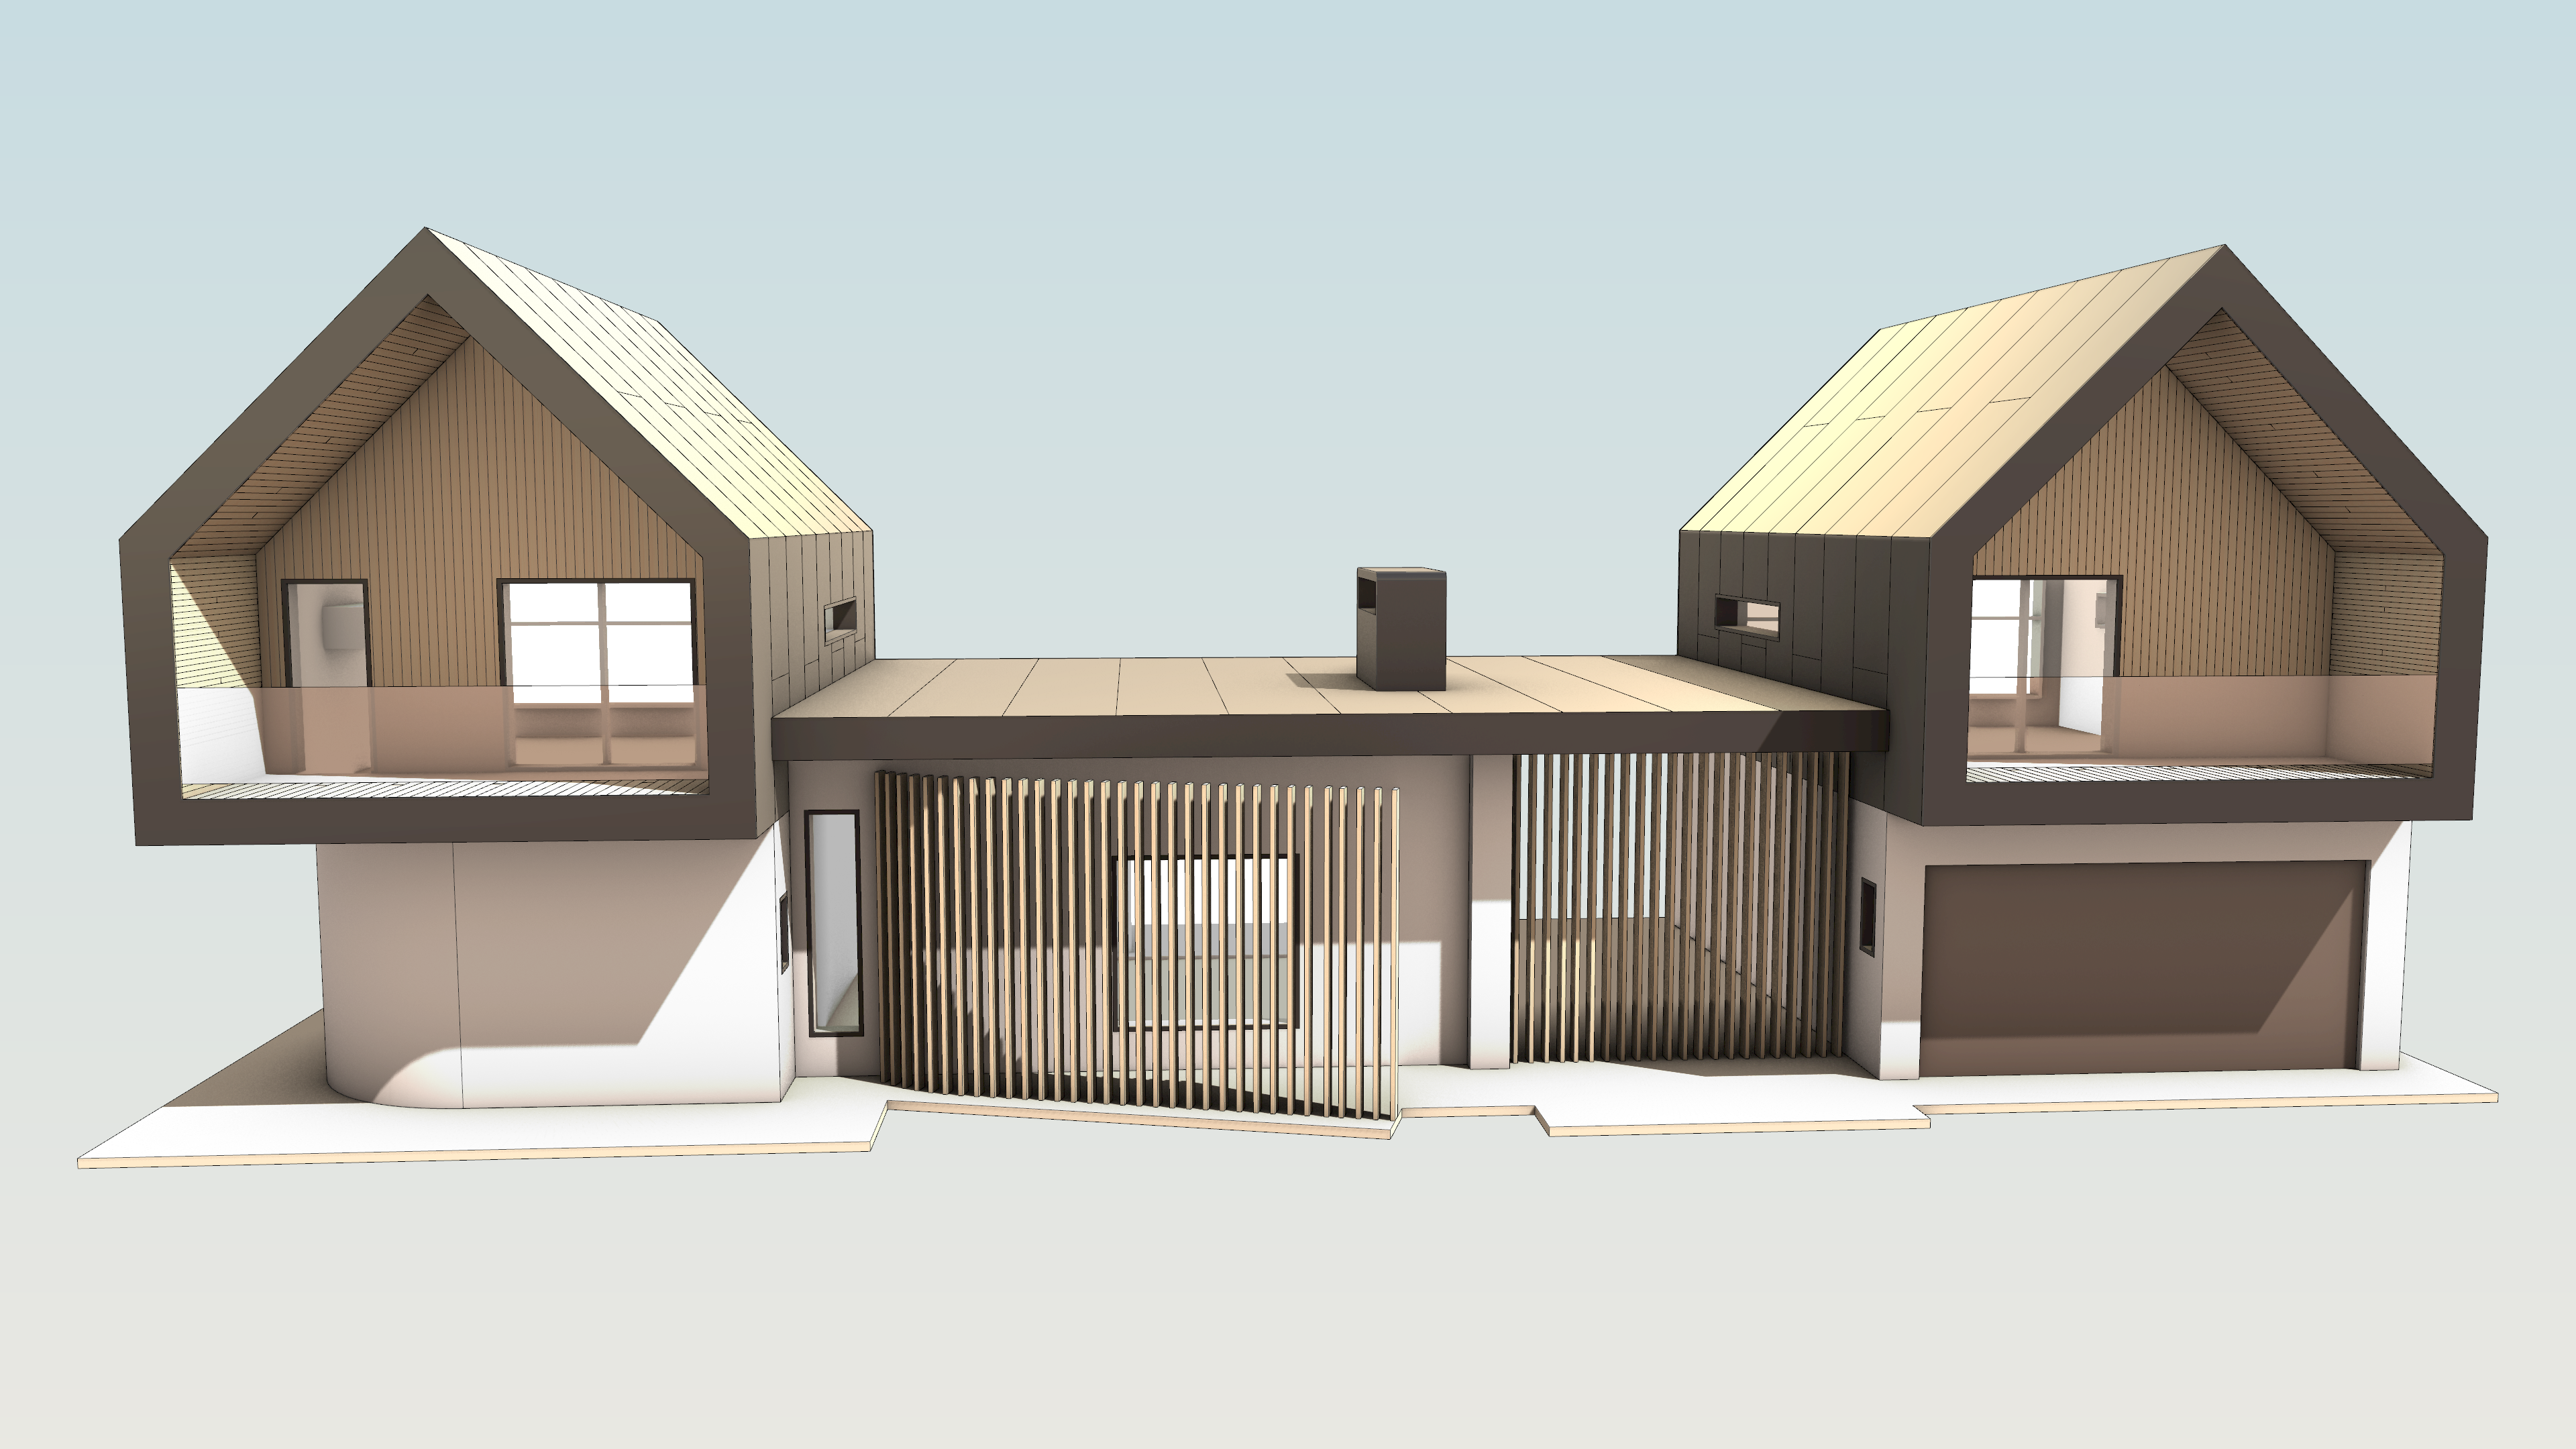
Starting with BeachShack.3dm, this tutorial shows how to refine an architectural concept directly in the Perspective viewport. You will adjust building volumes, develop roof panels, vary repeated elements, and present the result using Rhino 9’s Concept display mode.
The problem this workflow solves
Early design work is about form and volume, and it moves fast. Traditional NURBS modeling can be an indirect way to explore that. You draw curves, set construction planes, extrude or loft, then jump between views to check the result. Changing something often means unwinding part of that chain and building it back up.
Direct modeling offers another route. Instead of describing a shape through a sequence of construction steps, you reshape an existing solid in place: push a wall out, tilt a roof, recess a panel, all by selecting faces and dragging them in a single Perspective viewport.
That difference tells most once a model is already resolved, when the amount of work behind a shape is exactly what makes it awkward to change. Rhino 9 puts five tools behind this idea, and the guide takes each in turn: a  PushPull
that works on several faces at once, an
PushPull
that works on several faces at once, an  Inset
that spans connected faces,
Inset
that spans connected faces,  Gumball
handles that extrude, extend and slope faces directly, a command that varies many objects in a single step, and a display mode built for presenting early-stage design.
Gumball
handles that extrude, extend and slope faces directly, a command that varies many objects in a single step, and a display mode built for presenting early-stage design.
What you will learn
- Add and remove volume across several faces at once with PushPull
Multiface, and control how the corners between them resolve.
- Turn a flat roof into discrete panels with shadow gaps by pairing Inset Group with PushPull
.
- Extrude, extend and slope faces straight from the Gumball
, without running a
 Boolean
.
Boolean
. - Vary repeated elements in a single step with
 ScaleEach
.
ScaleEach
. - Present the result in the Concept display mode.
Prerequisites: Rhino 9, and basic Rhino skills: running commands, selecting sub-objects, and working with layers. Download the model Download BeachShack.3dm. The model is in millimetres. Before you start, turn on the Gumball
in the status bar and maximize the Perspective viewport.
Opening the 3D model and its layers
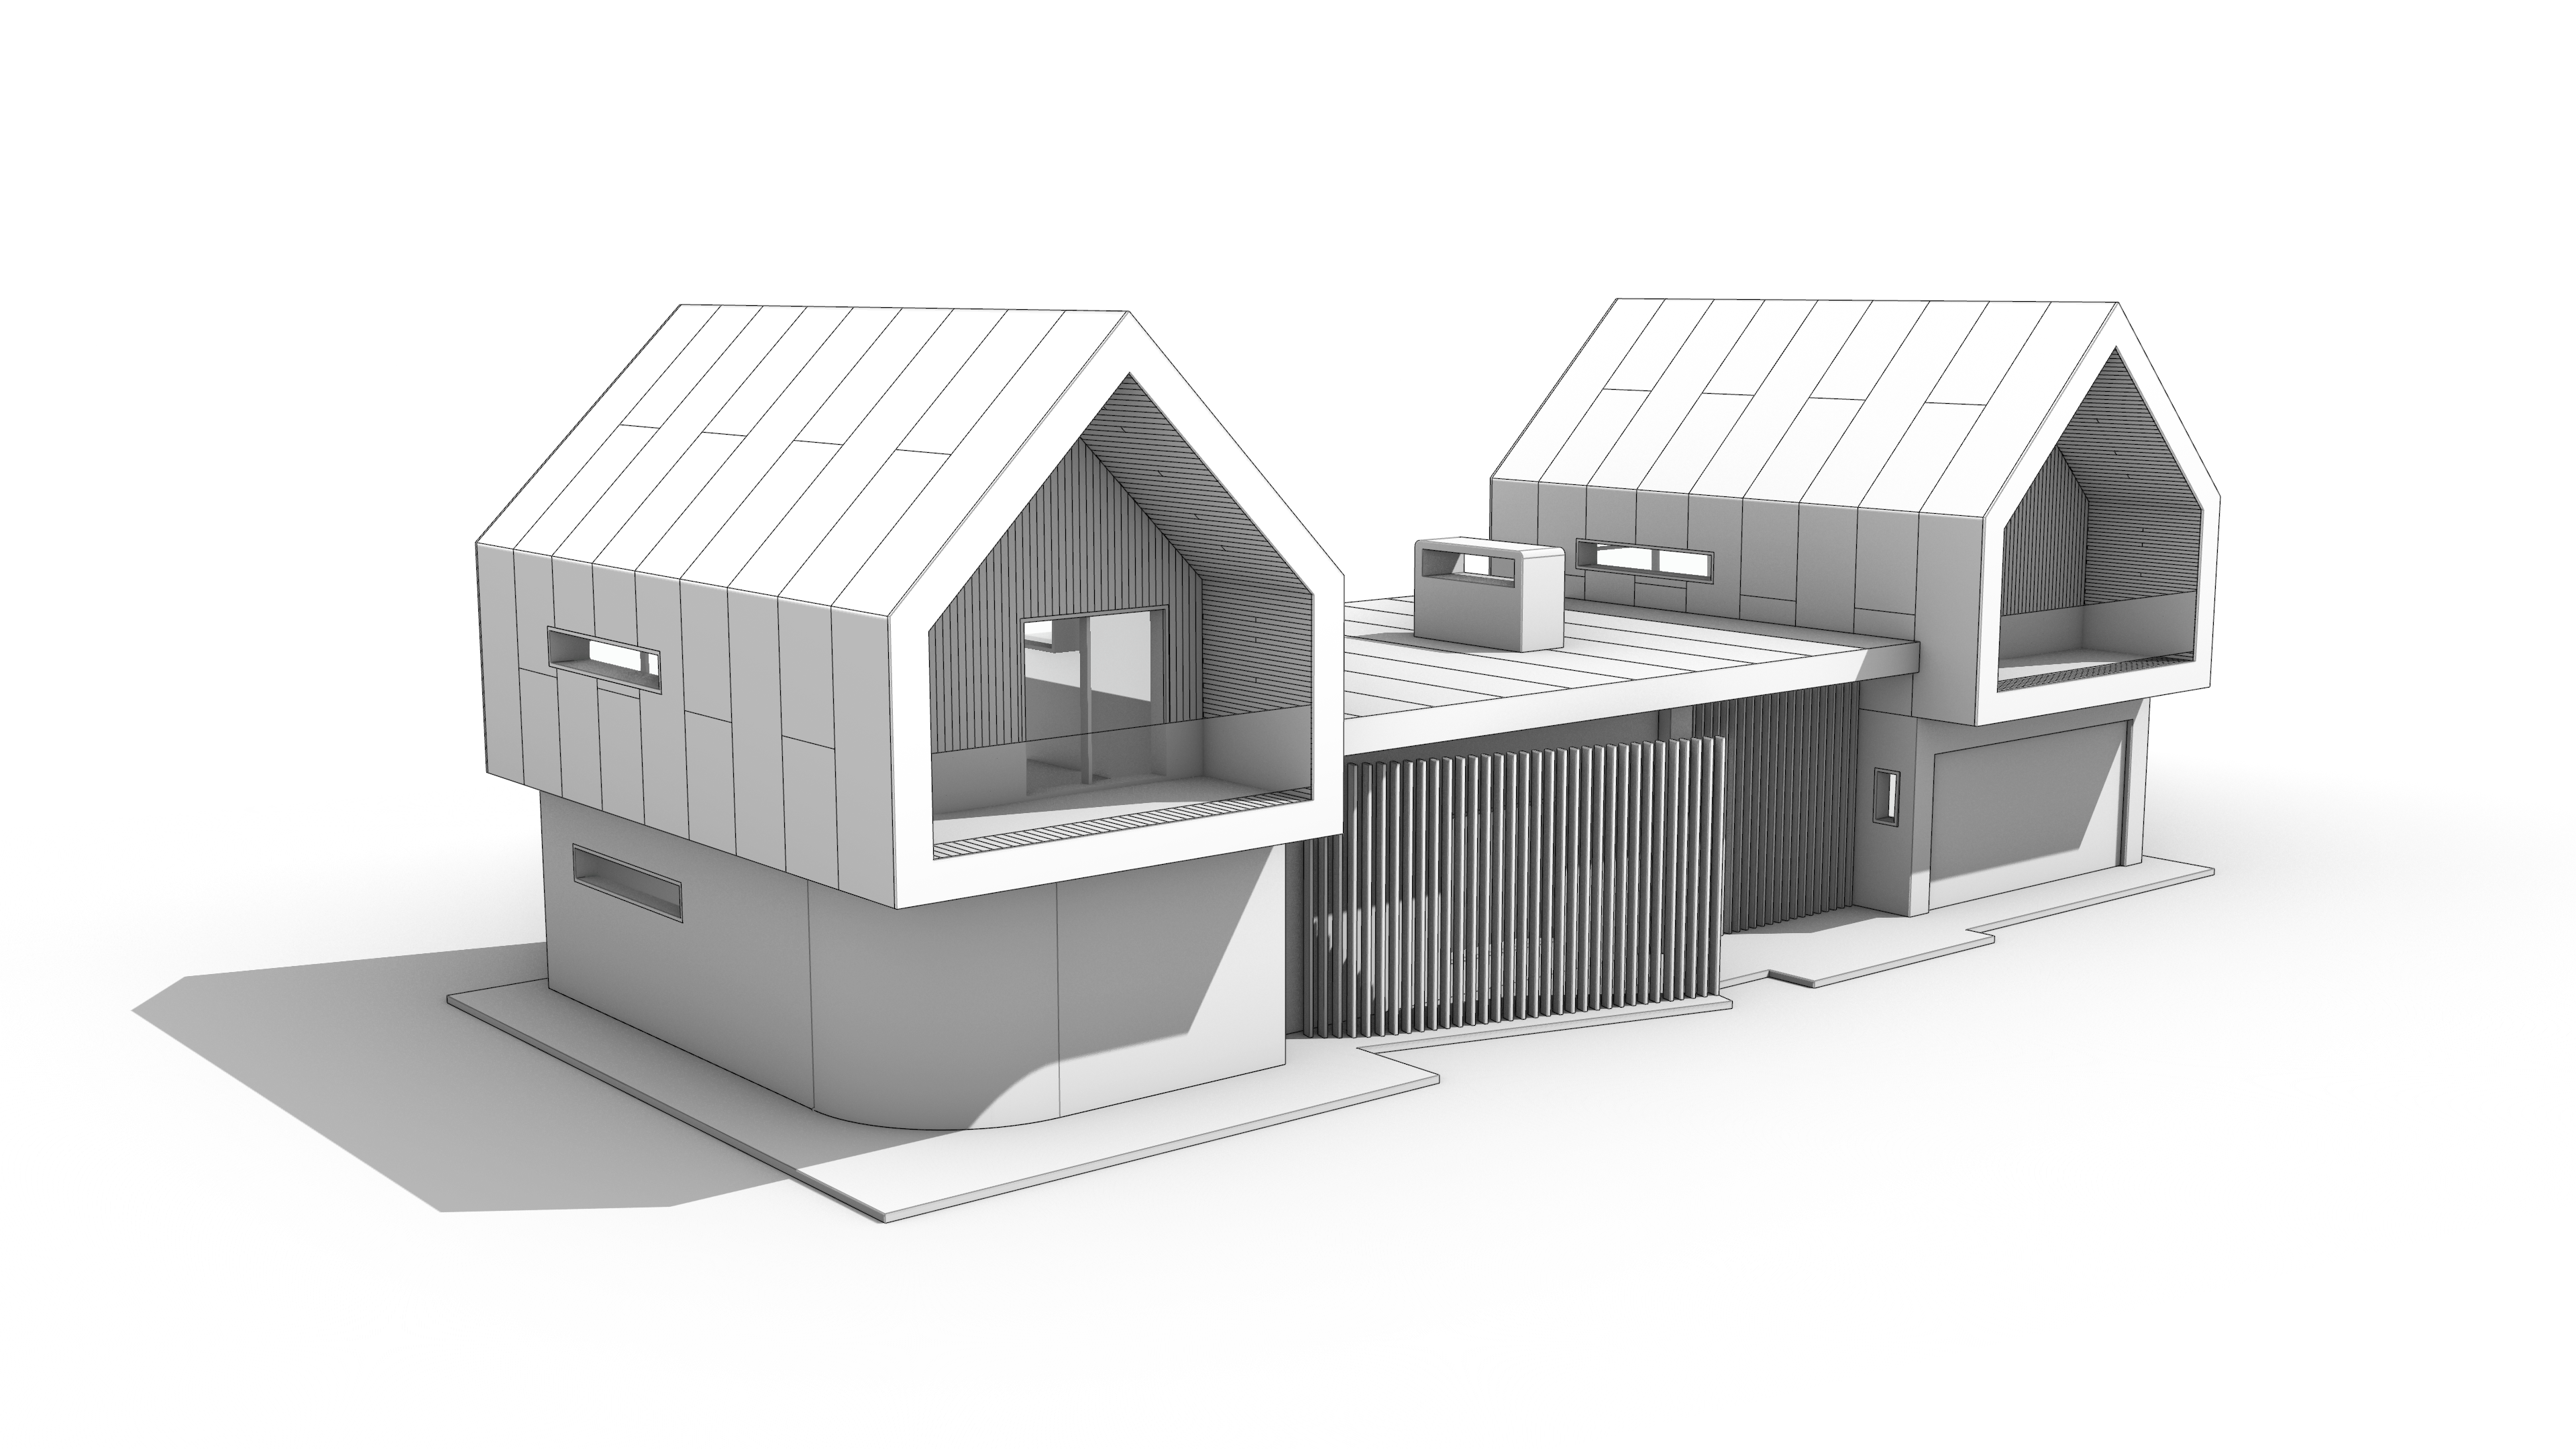
Before anything else, get oriented. This is the model you will edit, and its layers are how you reach the parts you need. Open BeachShack.3dm, maximize the Perspective viewport, and switch to the Monochrome display mode. Working in one shaded viewport keeps attention on form rather than material.
The model is organized into layers including 00_Plinth, 01_Walls, 02_Roof, 03_Openings and 04_Balustrade, each with sublayers for individual elements. Every step below begins by selecting geometry from one of these layers, so keep the Layers panel open as you work.
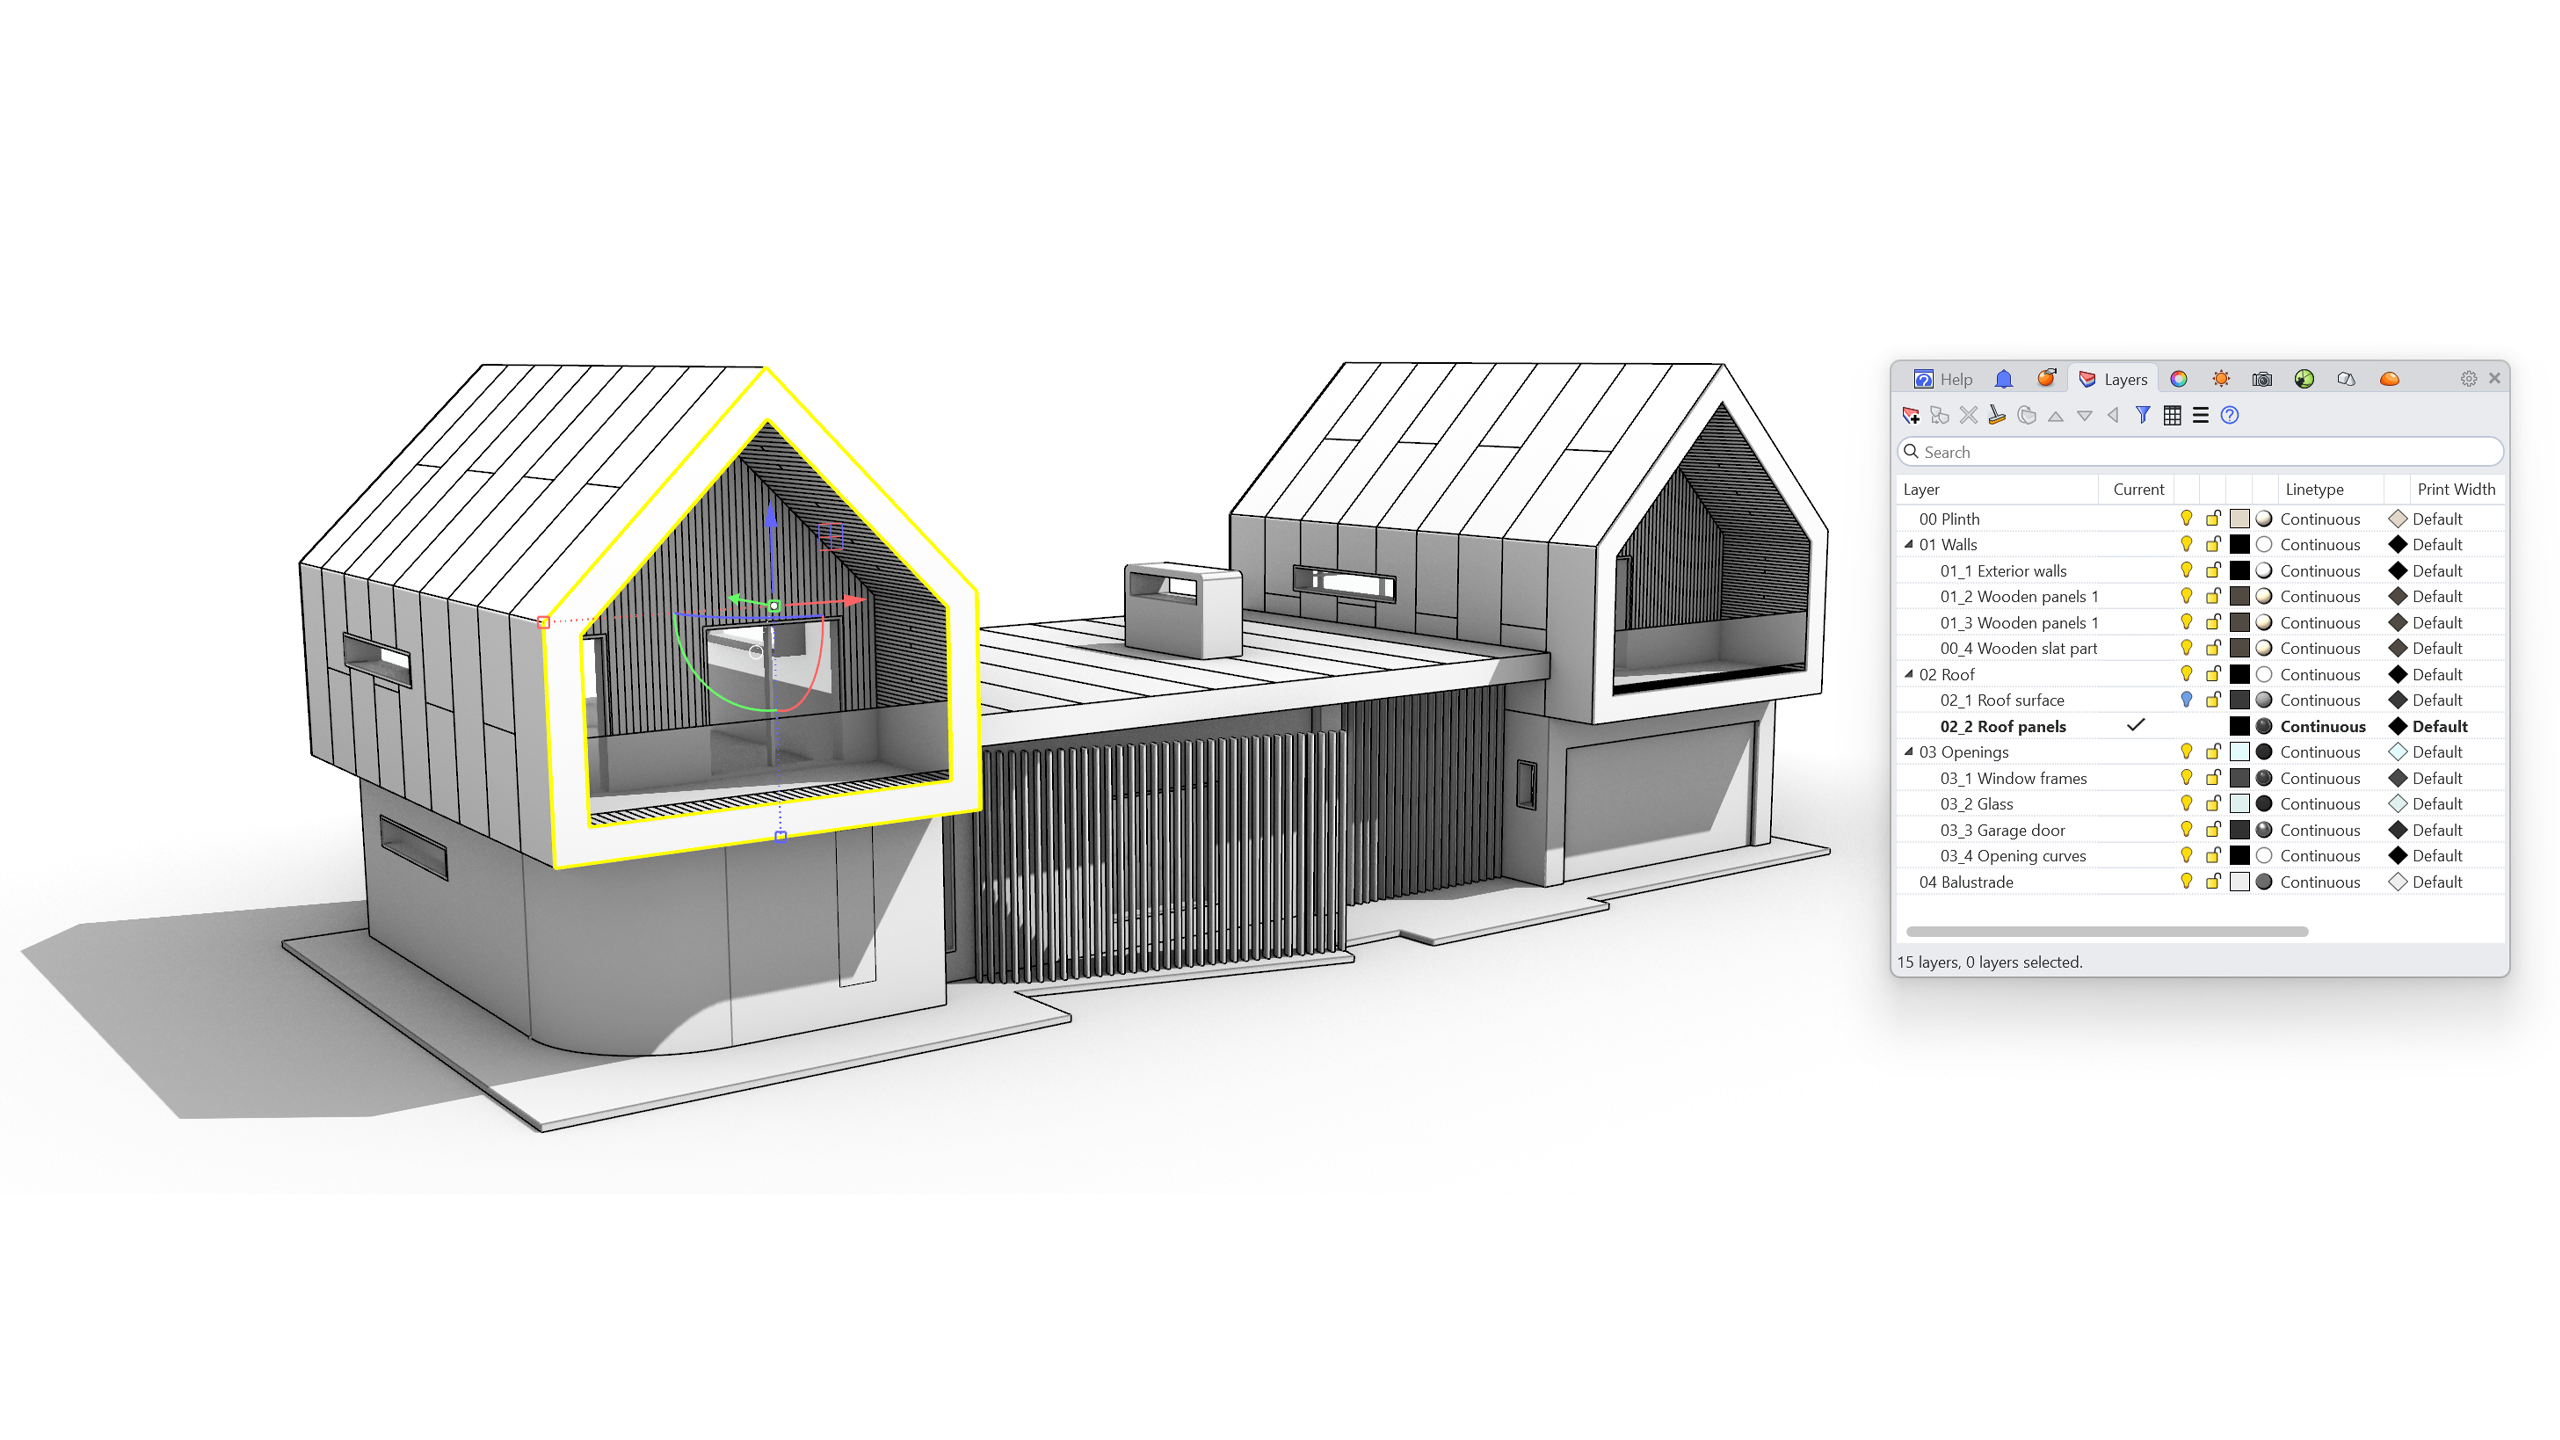
Tip: Confirm the Gumball is switched on in the status bar before you begin. It should appear whenever you select an object.
Extending several walls at once with PushPull Multiface
PushPull
is the core direct modeling command for adding and removing volume. New in Rhino 9, it works on several faces at the same time, which is what massing edits usually need.
- Select. Three adjacent exterior wall faces on the same polysurface, on the
01_1 Exterior wallslayer. - Run. PushPull, then press Enter to accept the selection.
- Value. Move the mouse to set direction and distance, or type
100(mm). - Result. All three walls move together and the corners between them close automatically.
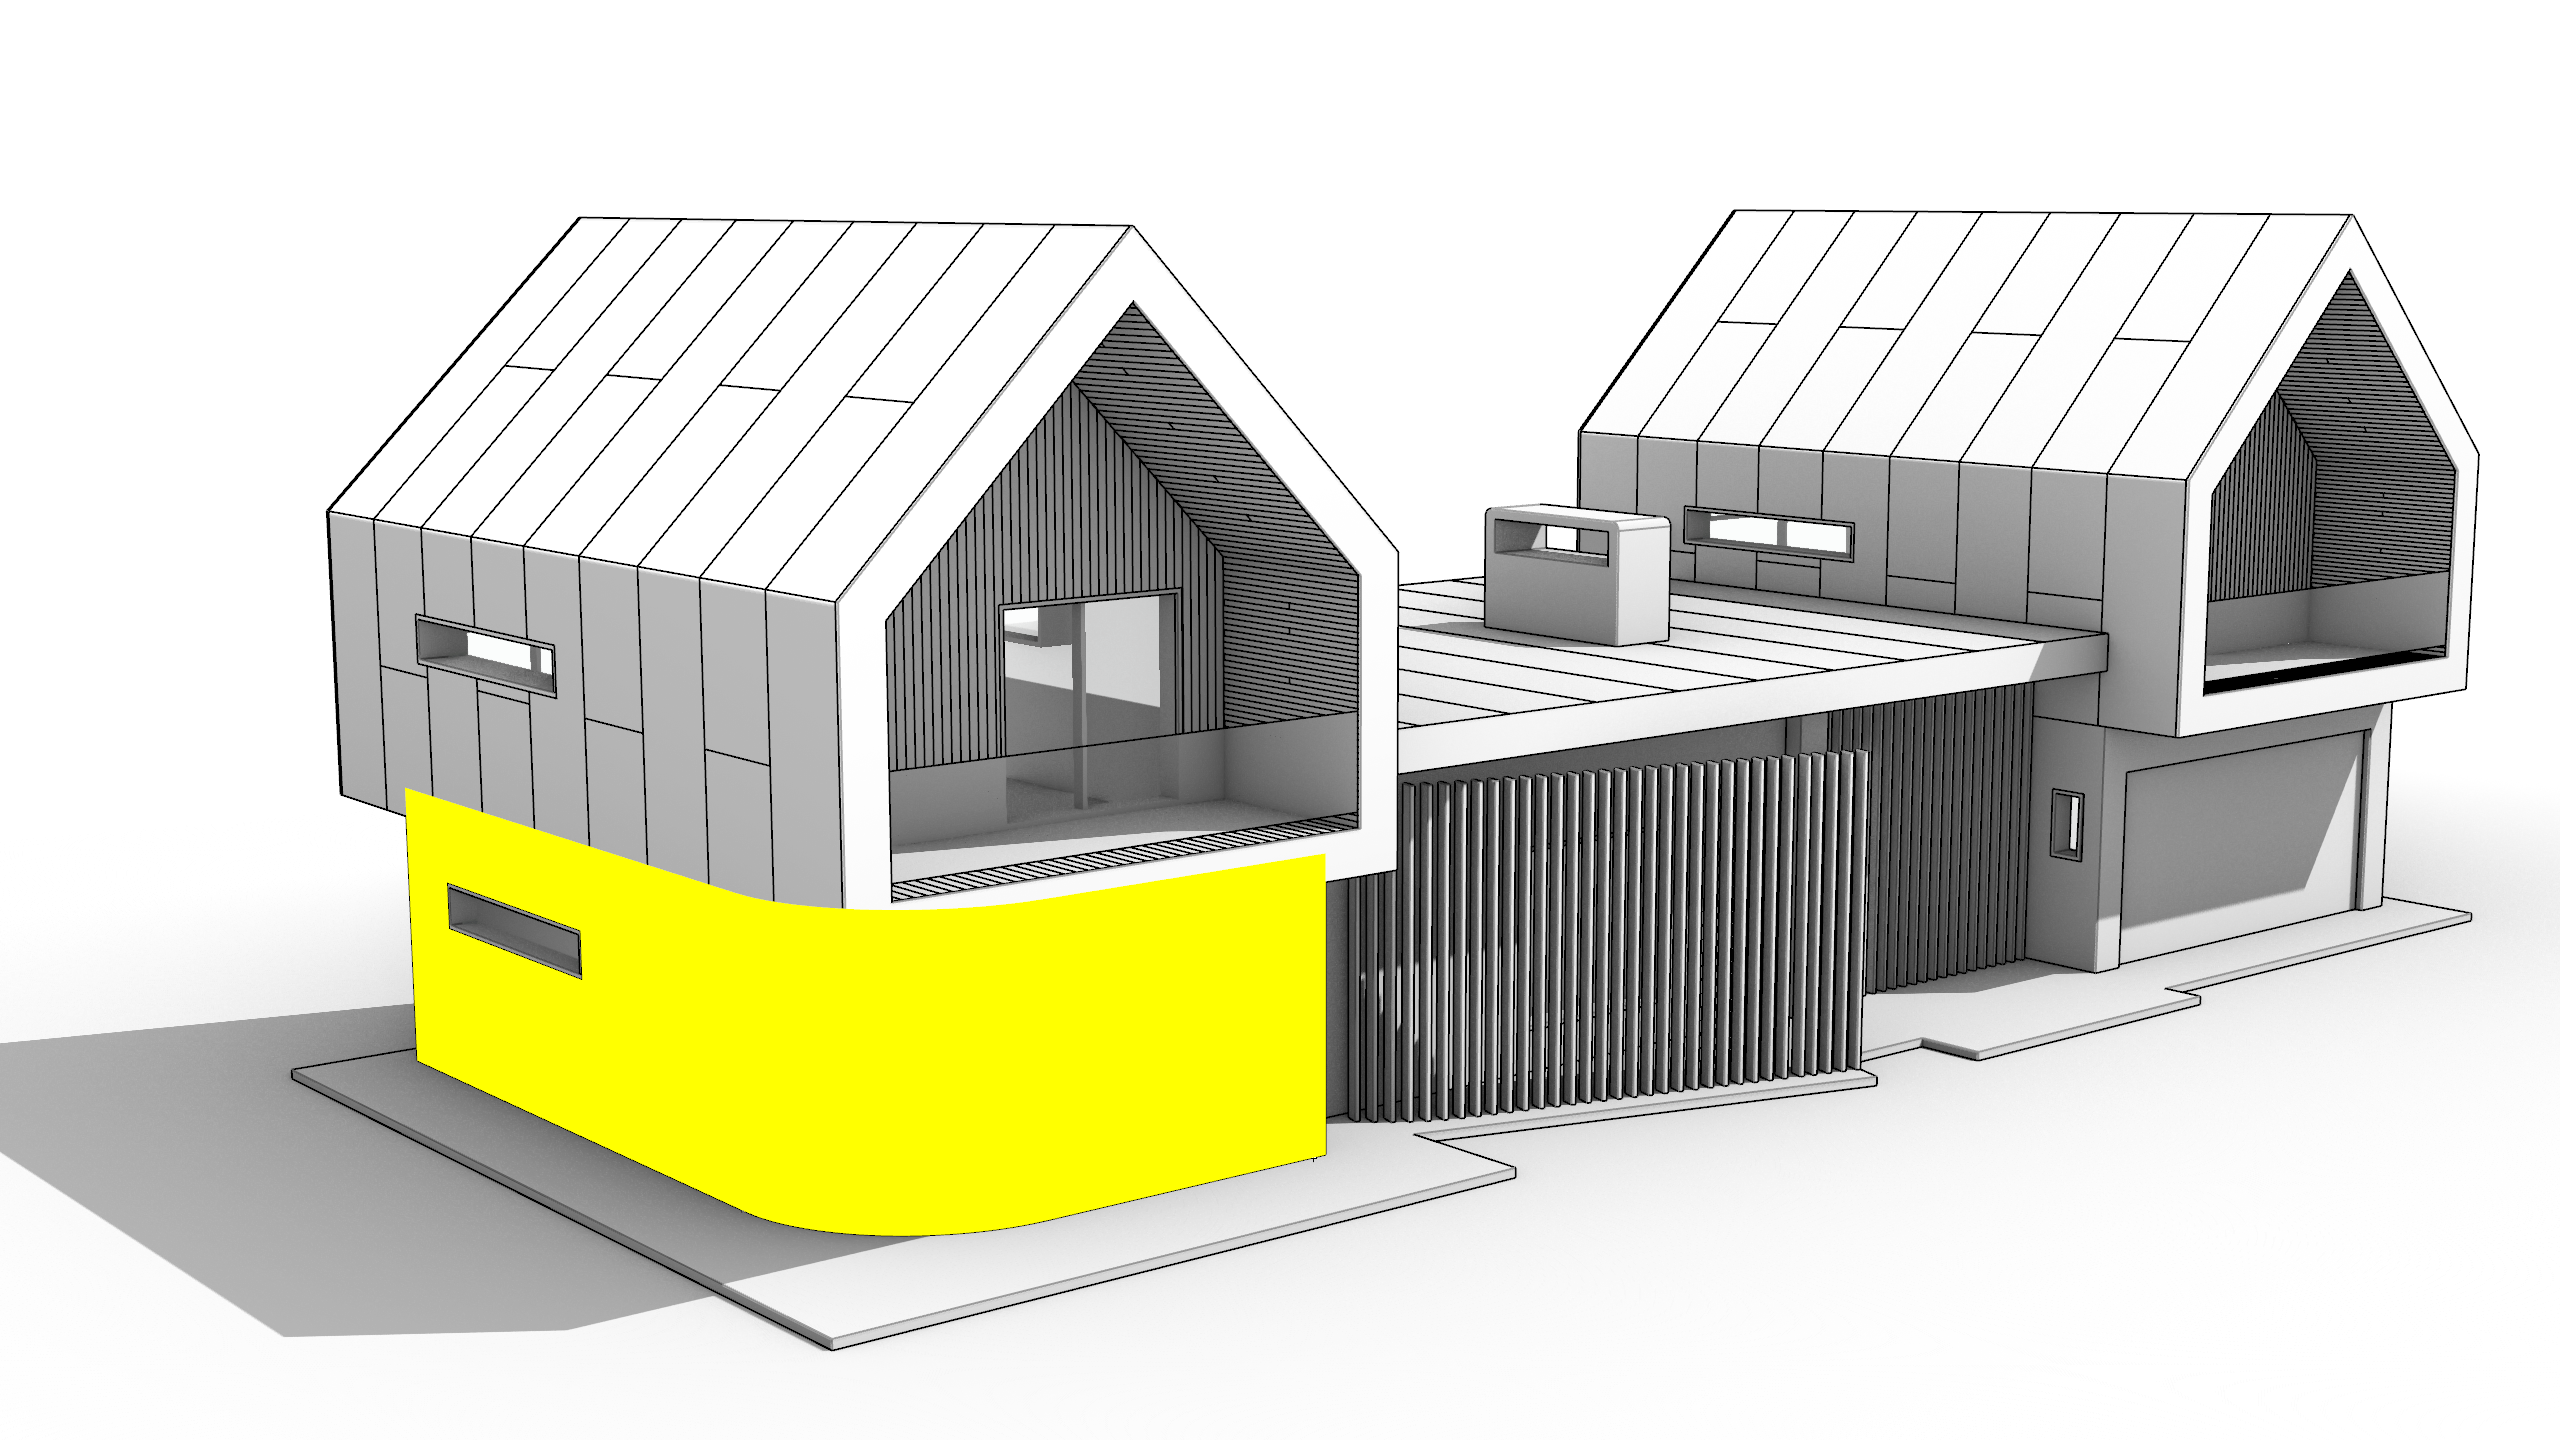
Pushing outward adds volume. Pushing inward turns the preview red, a reminder that volume will be removed.
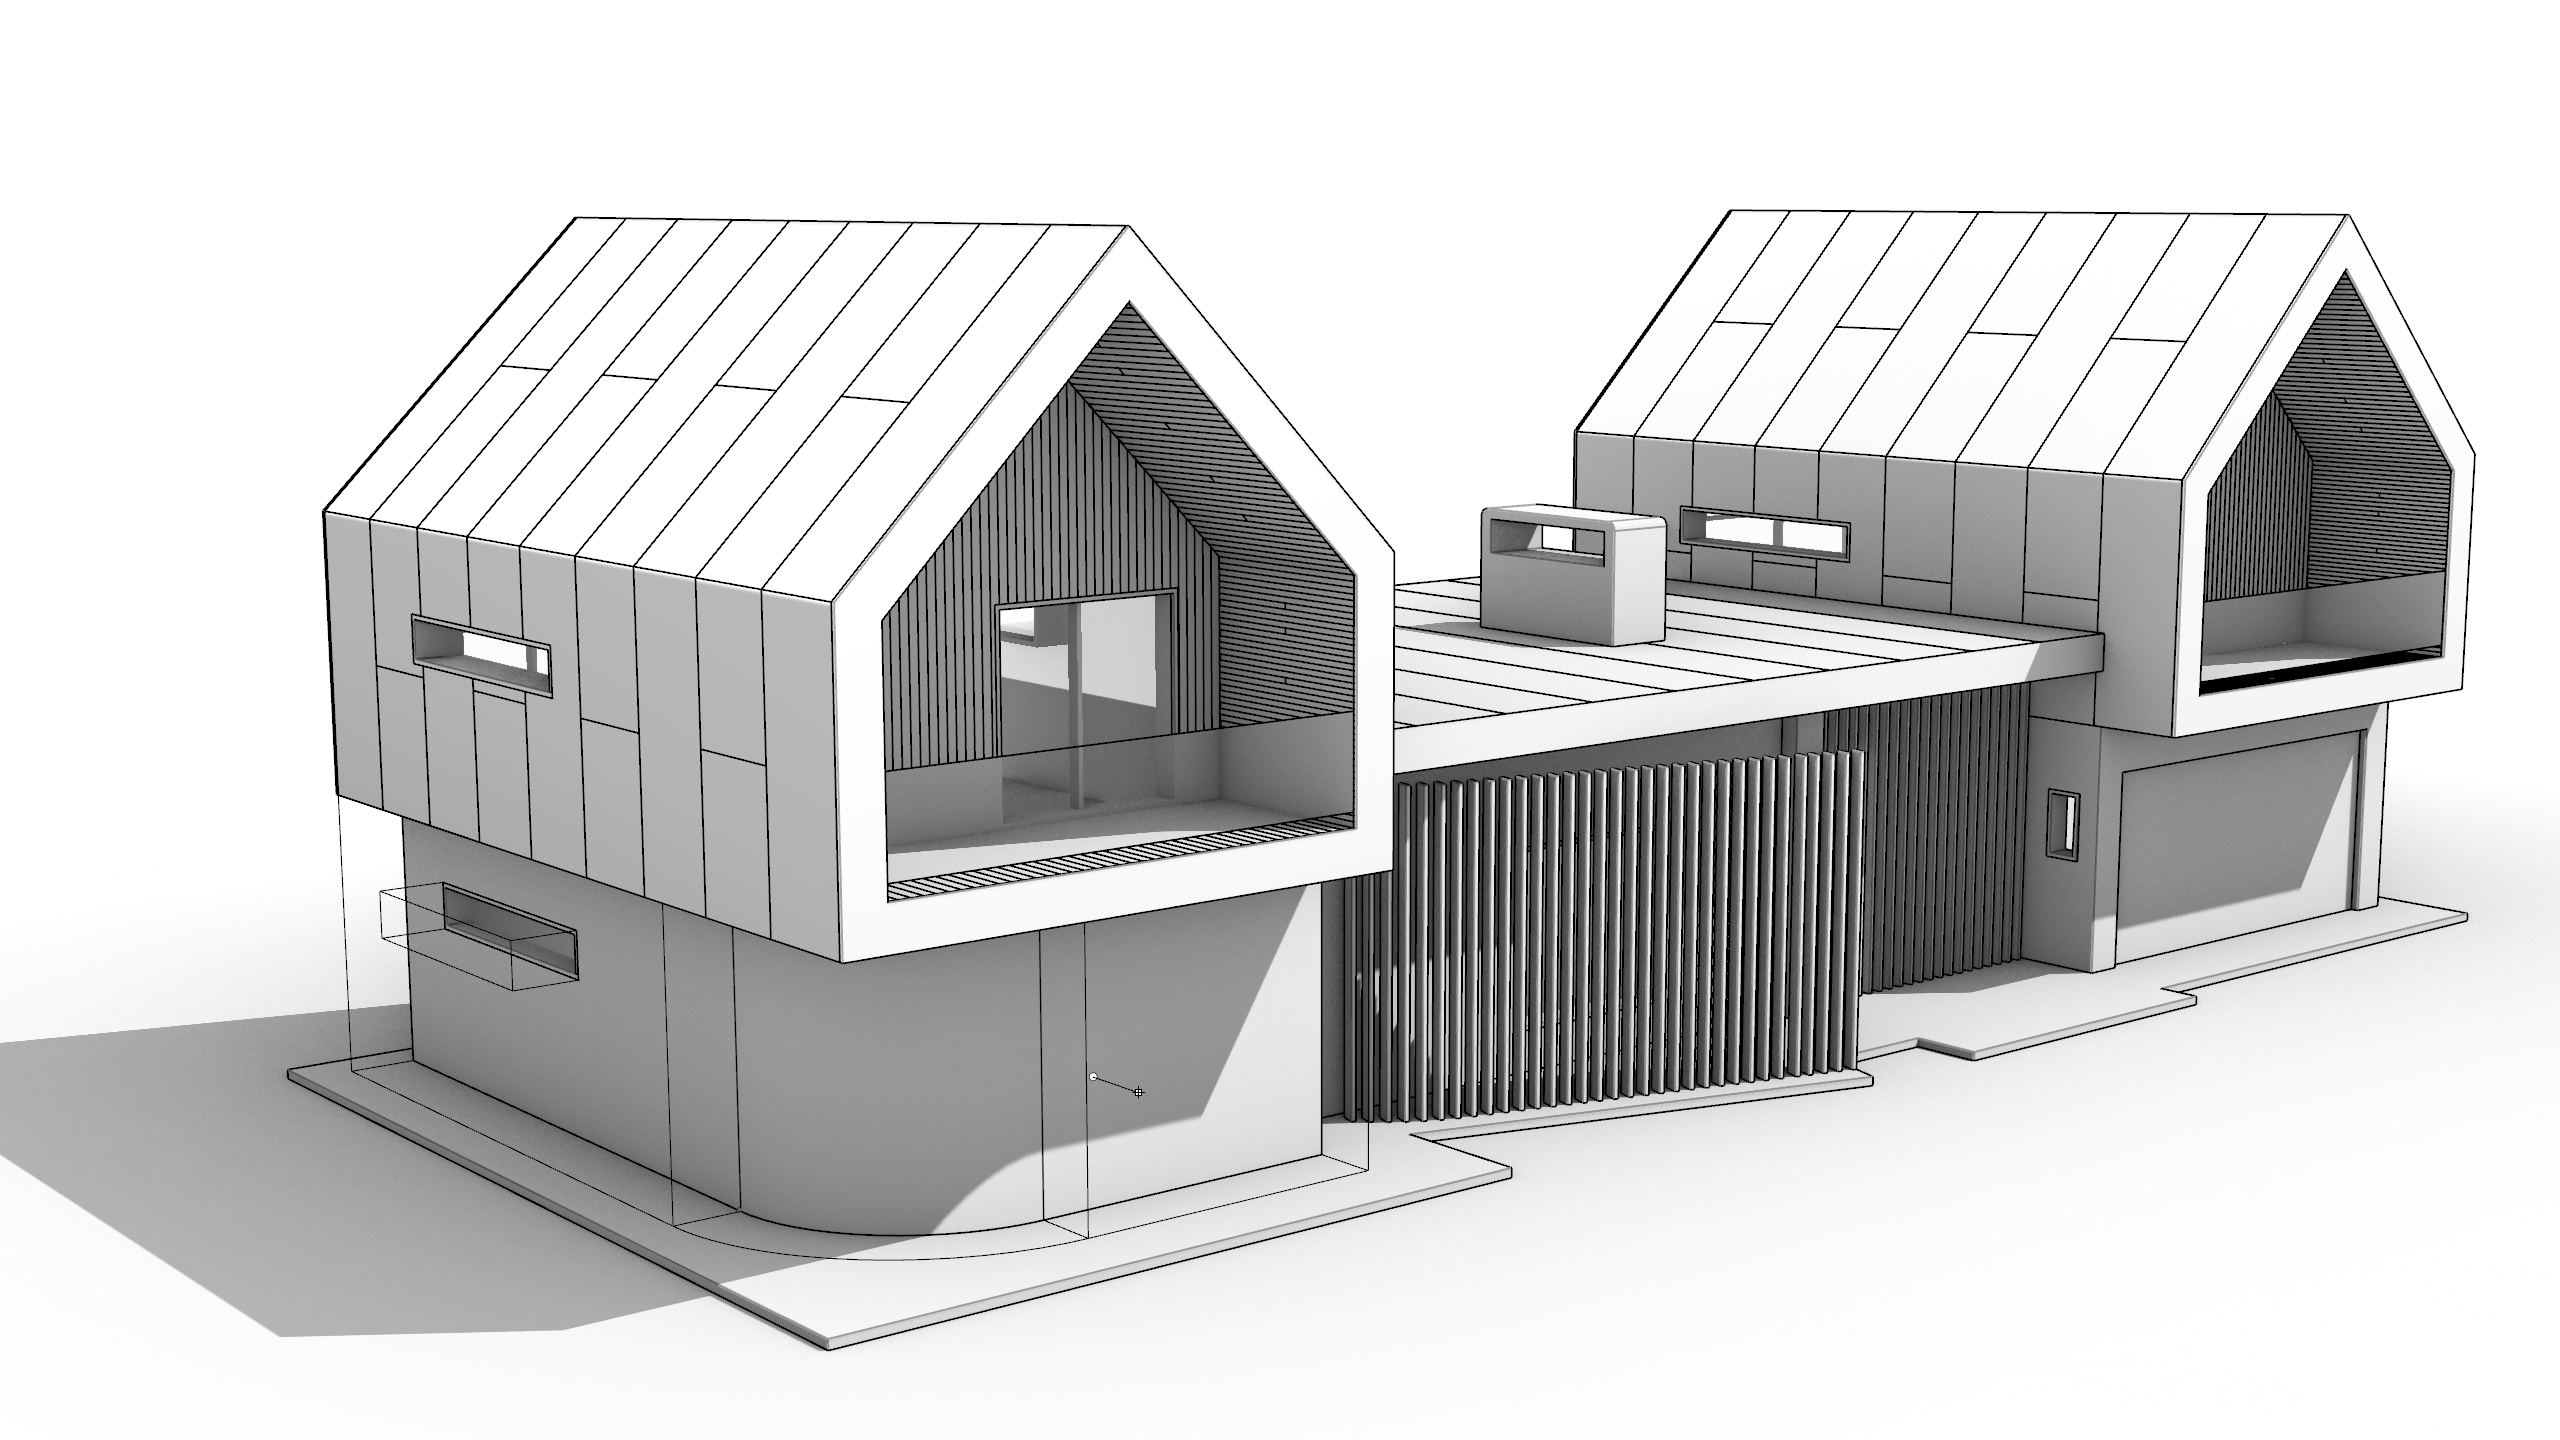
Carving openings
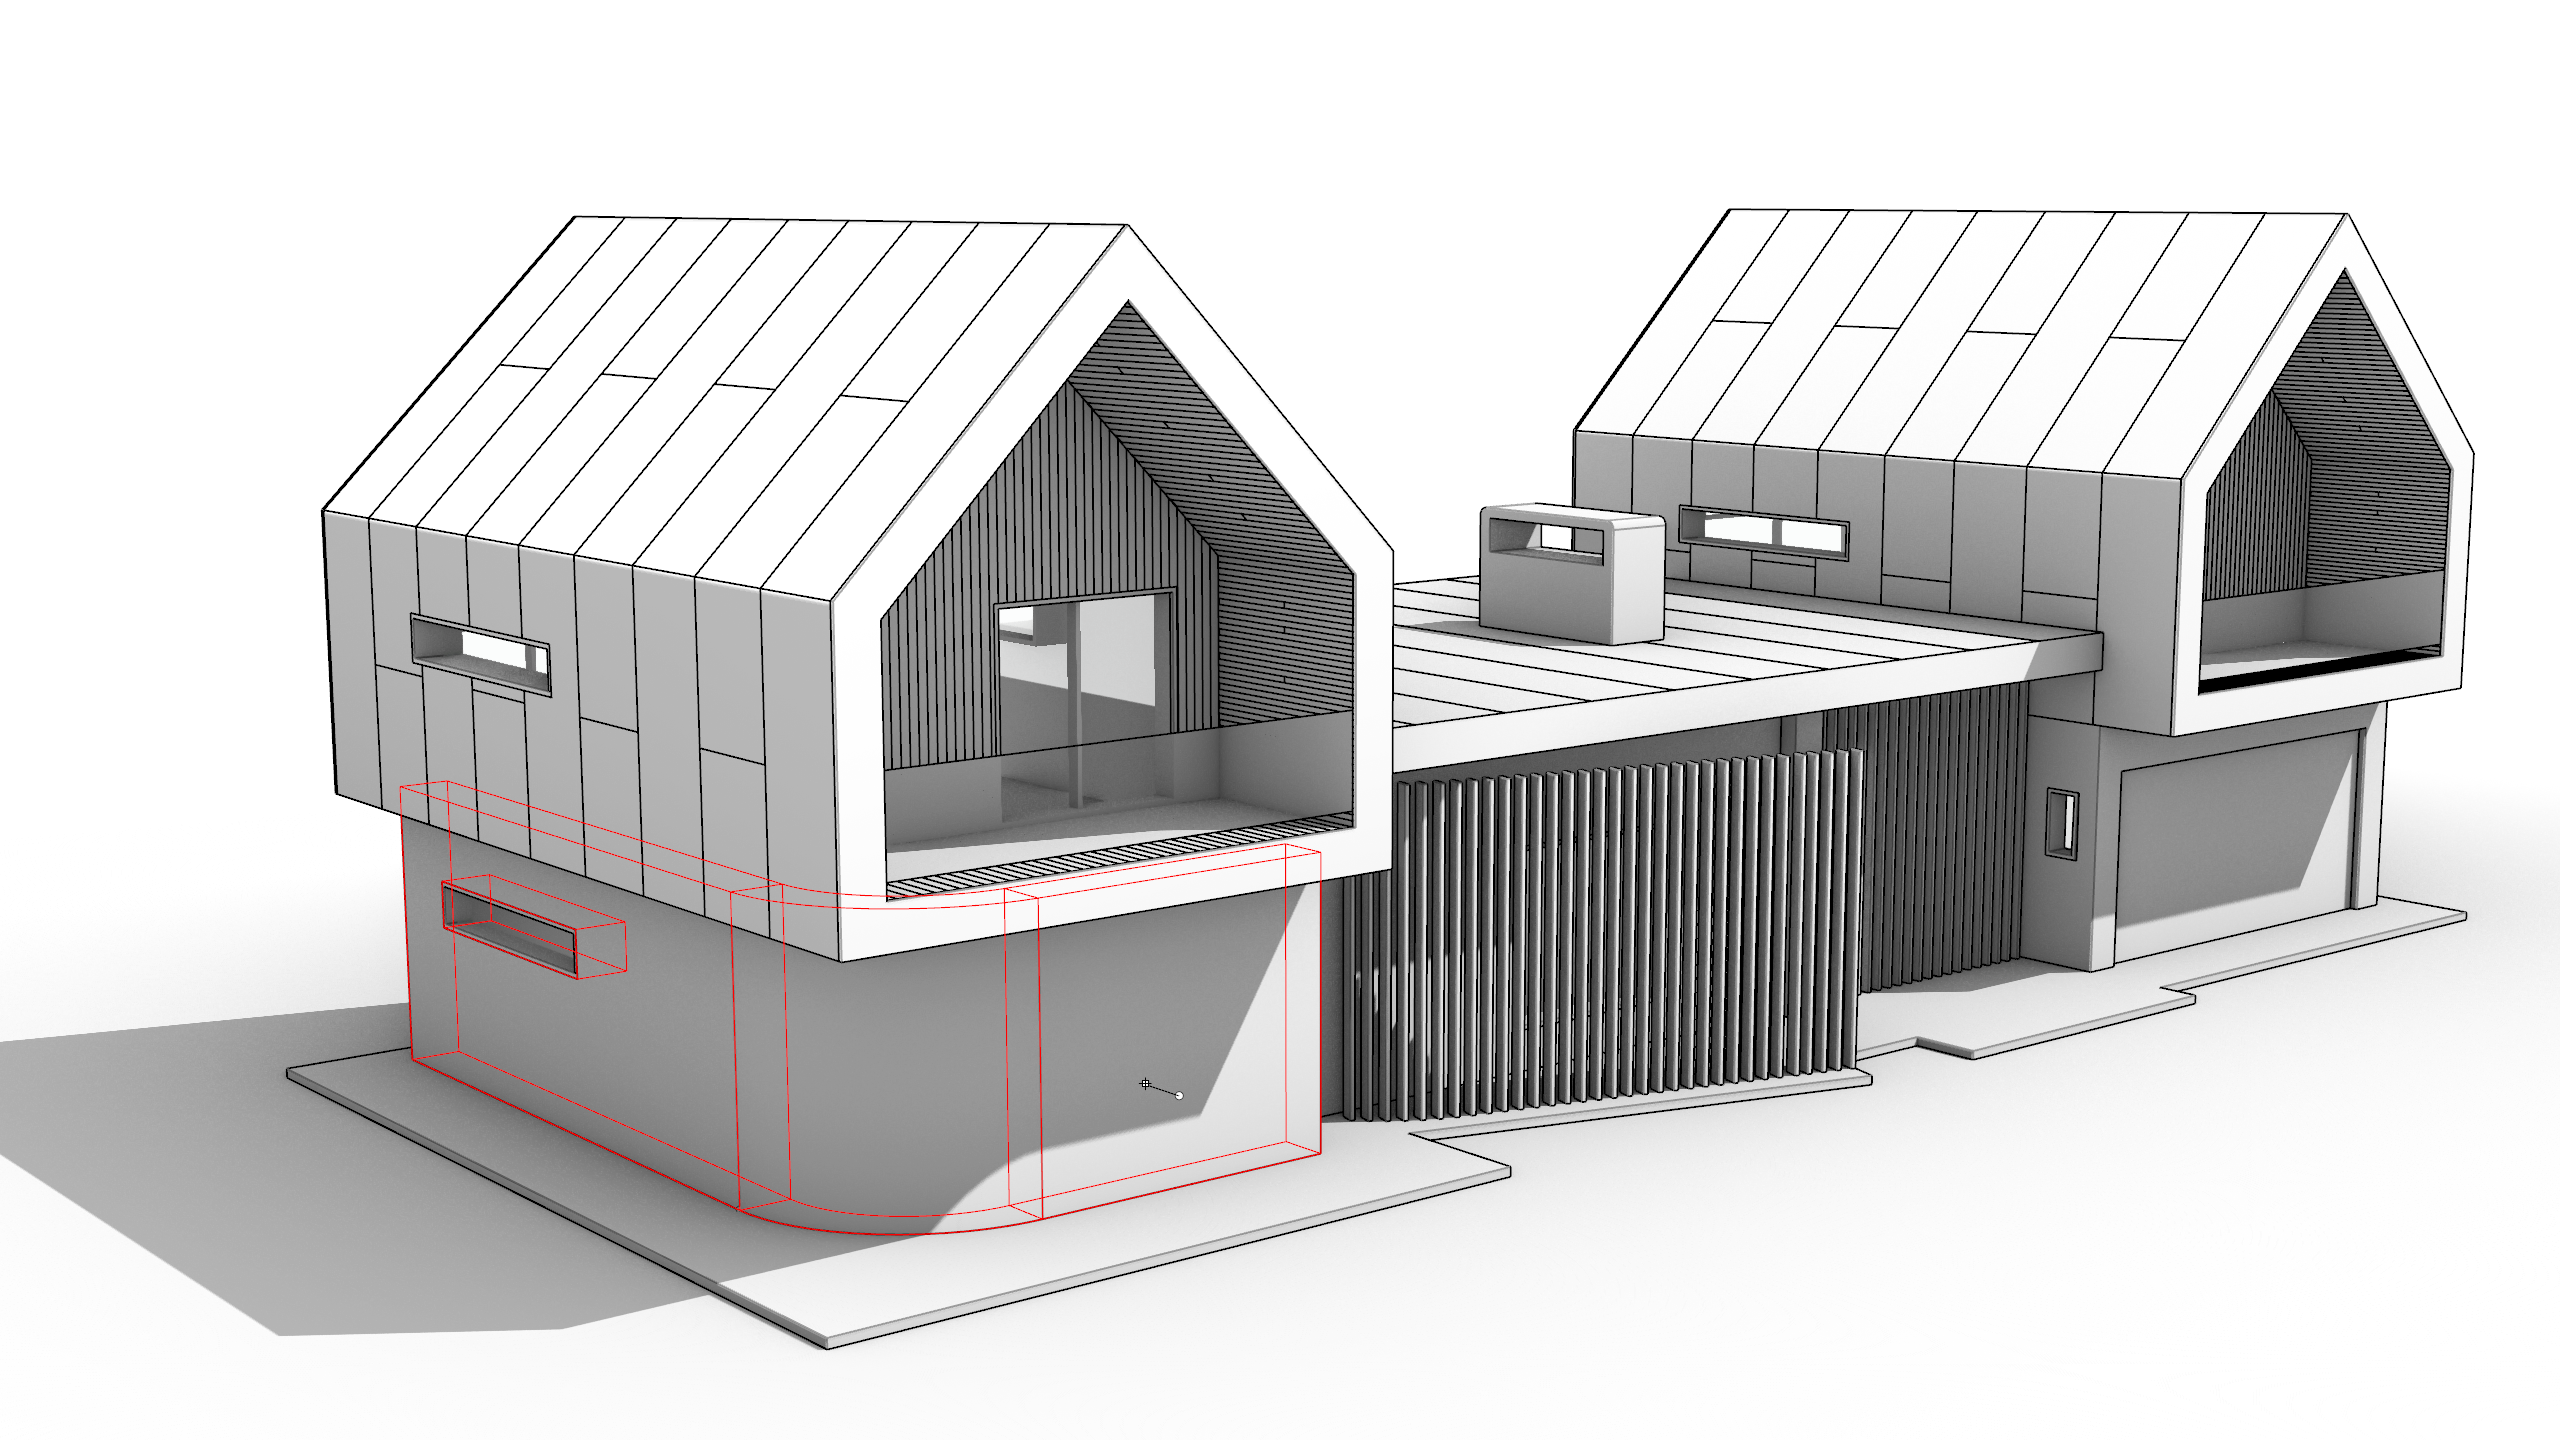
Select the closed curve on the 03_4 Opening curves layer to split the wall into separate regions.
- Run. PushPull
, click inside the rectangle to select that area alone, then press
to accept the selection, enter
400mm, and push it inward to recess it. - Enter. This is a quick route to a loggia, a recessed entry, or a punched opening.
Detailing the roof with Inset Group
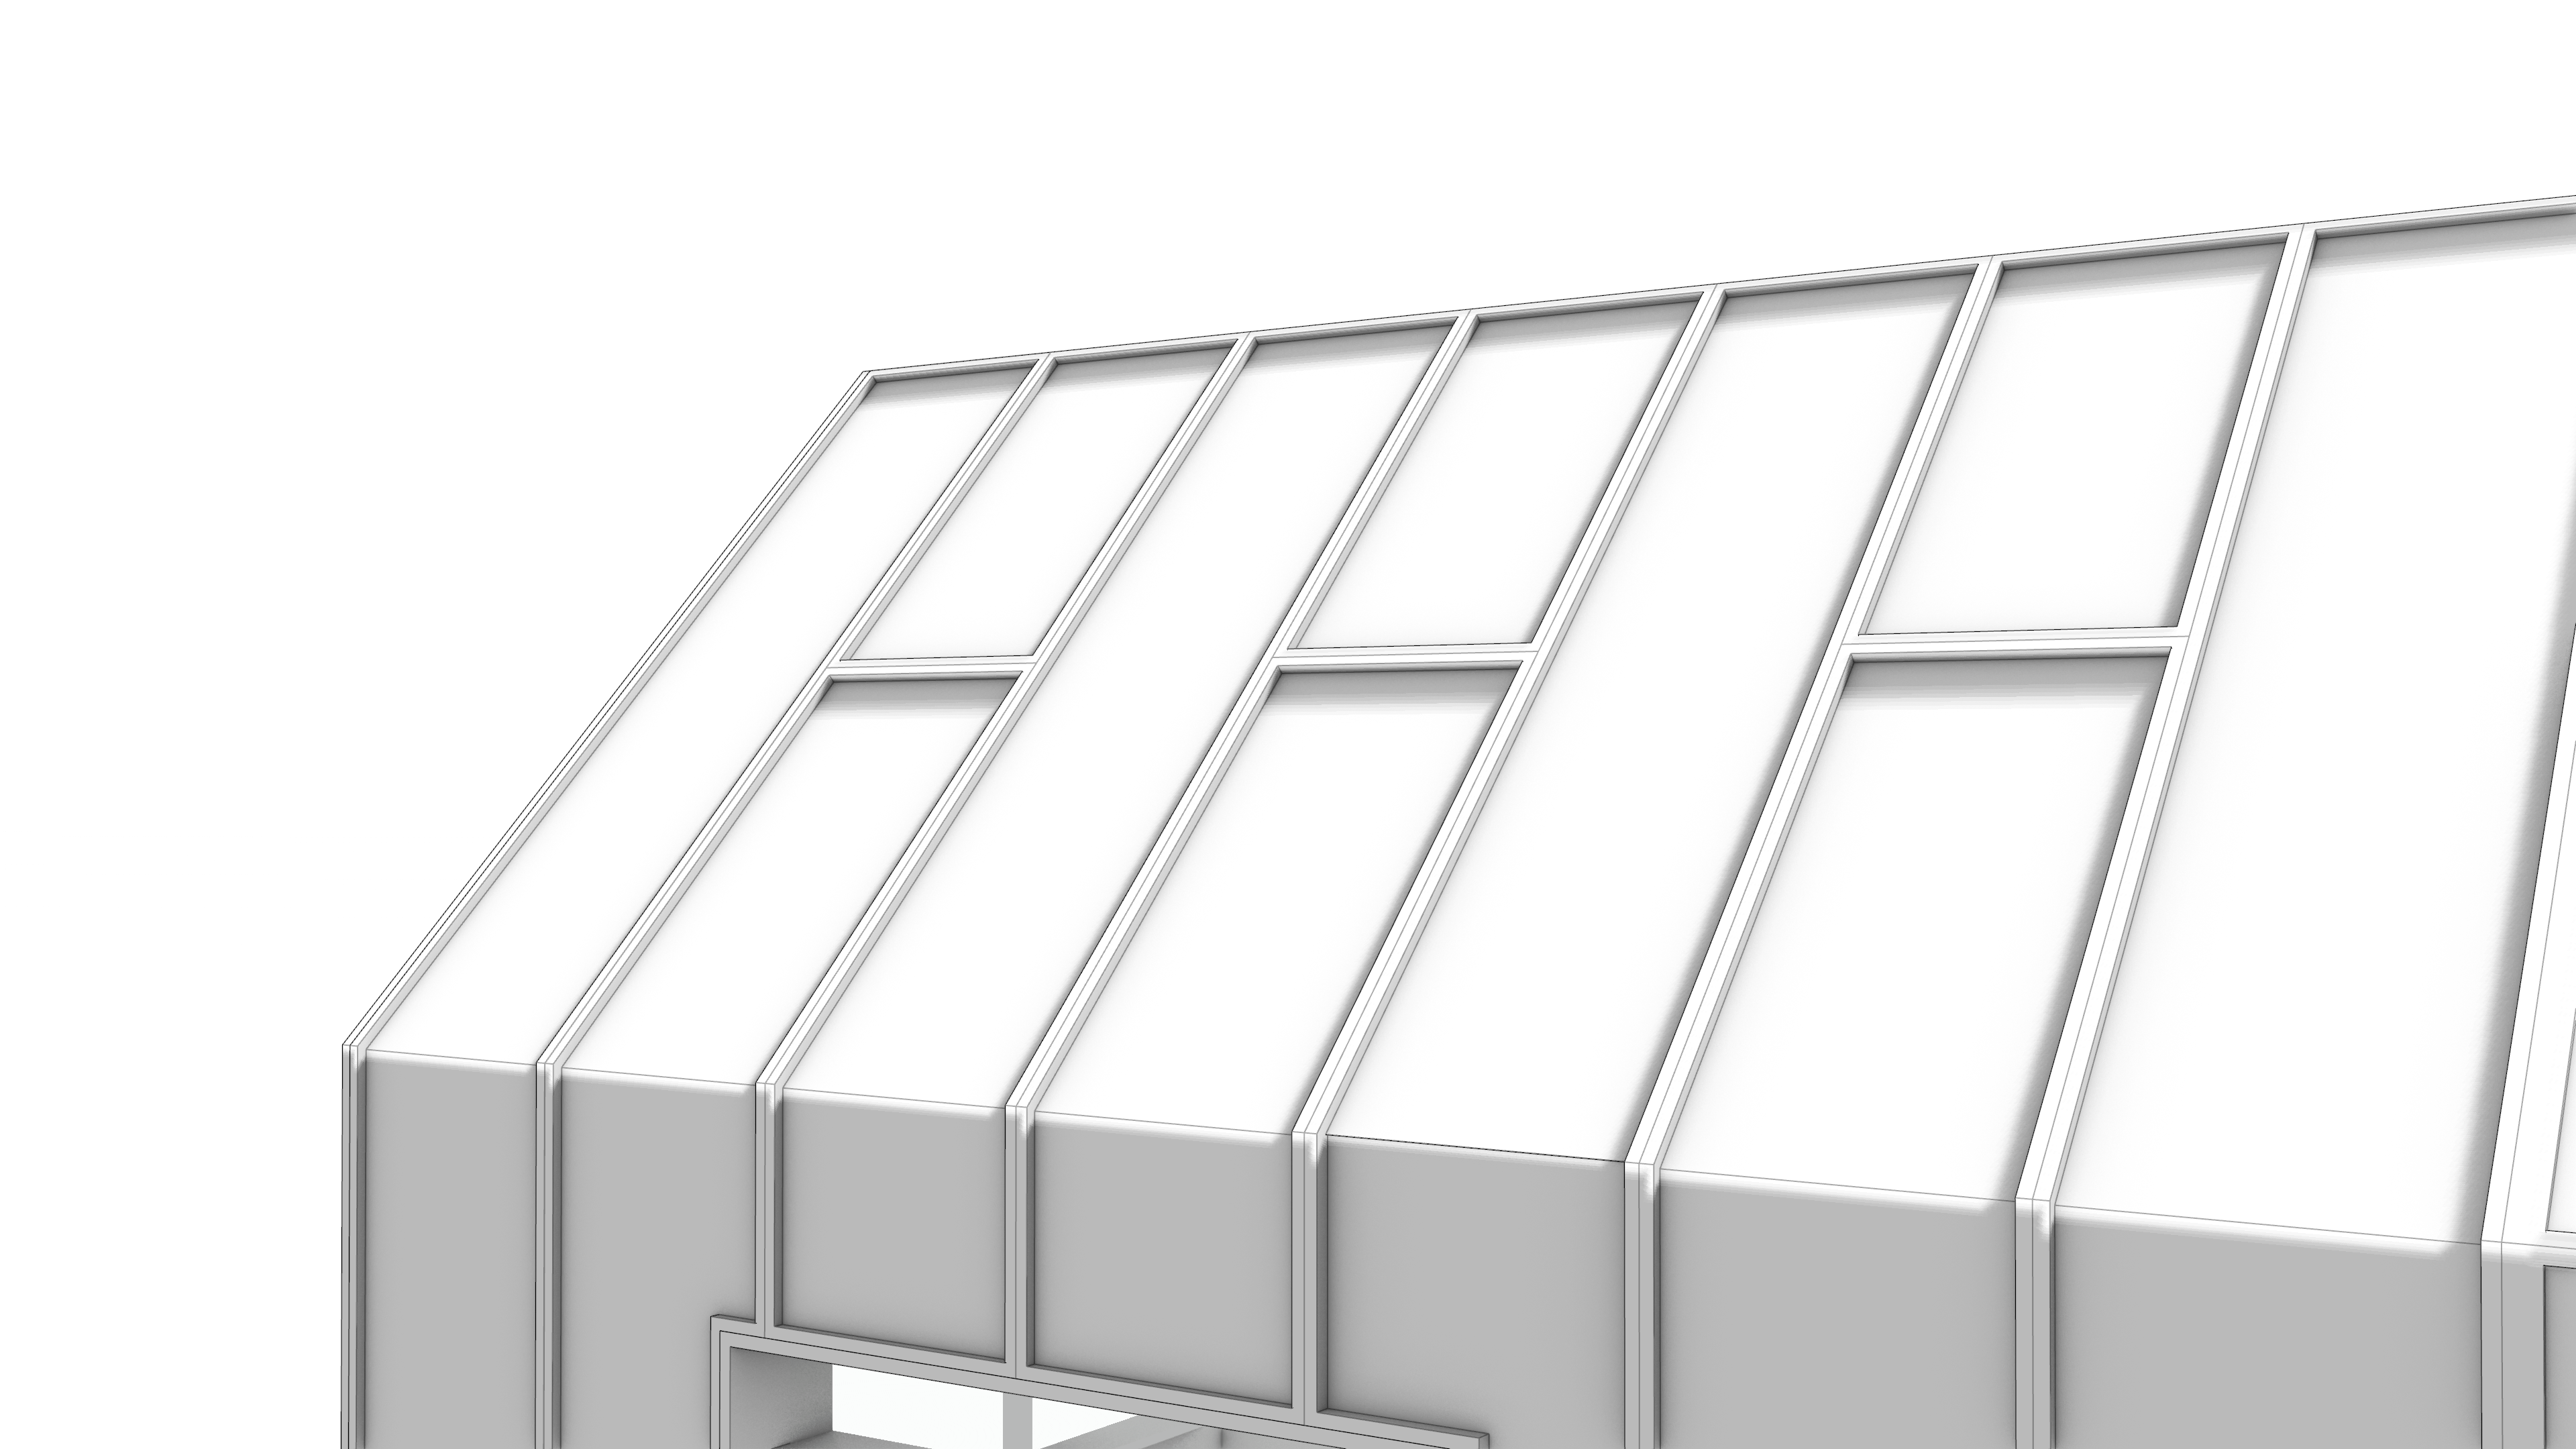
Next, give the roof enough relief to read clearly in the presentation and turn one continuous surface into separate panels with gaps between them.
Inset
offsets the edges of selected faces inward, creating a new inner boundary you can then push or pull. New in Rhino 9, Group mode lets a single inset span connected faces, which is what makes it useful here.
Note: The faces must be joined as a polysurface. If they are still separate surfaces, run
Join first.
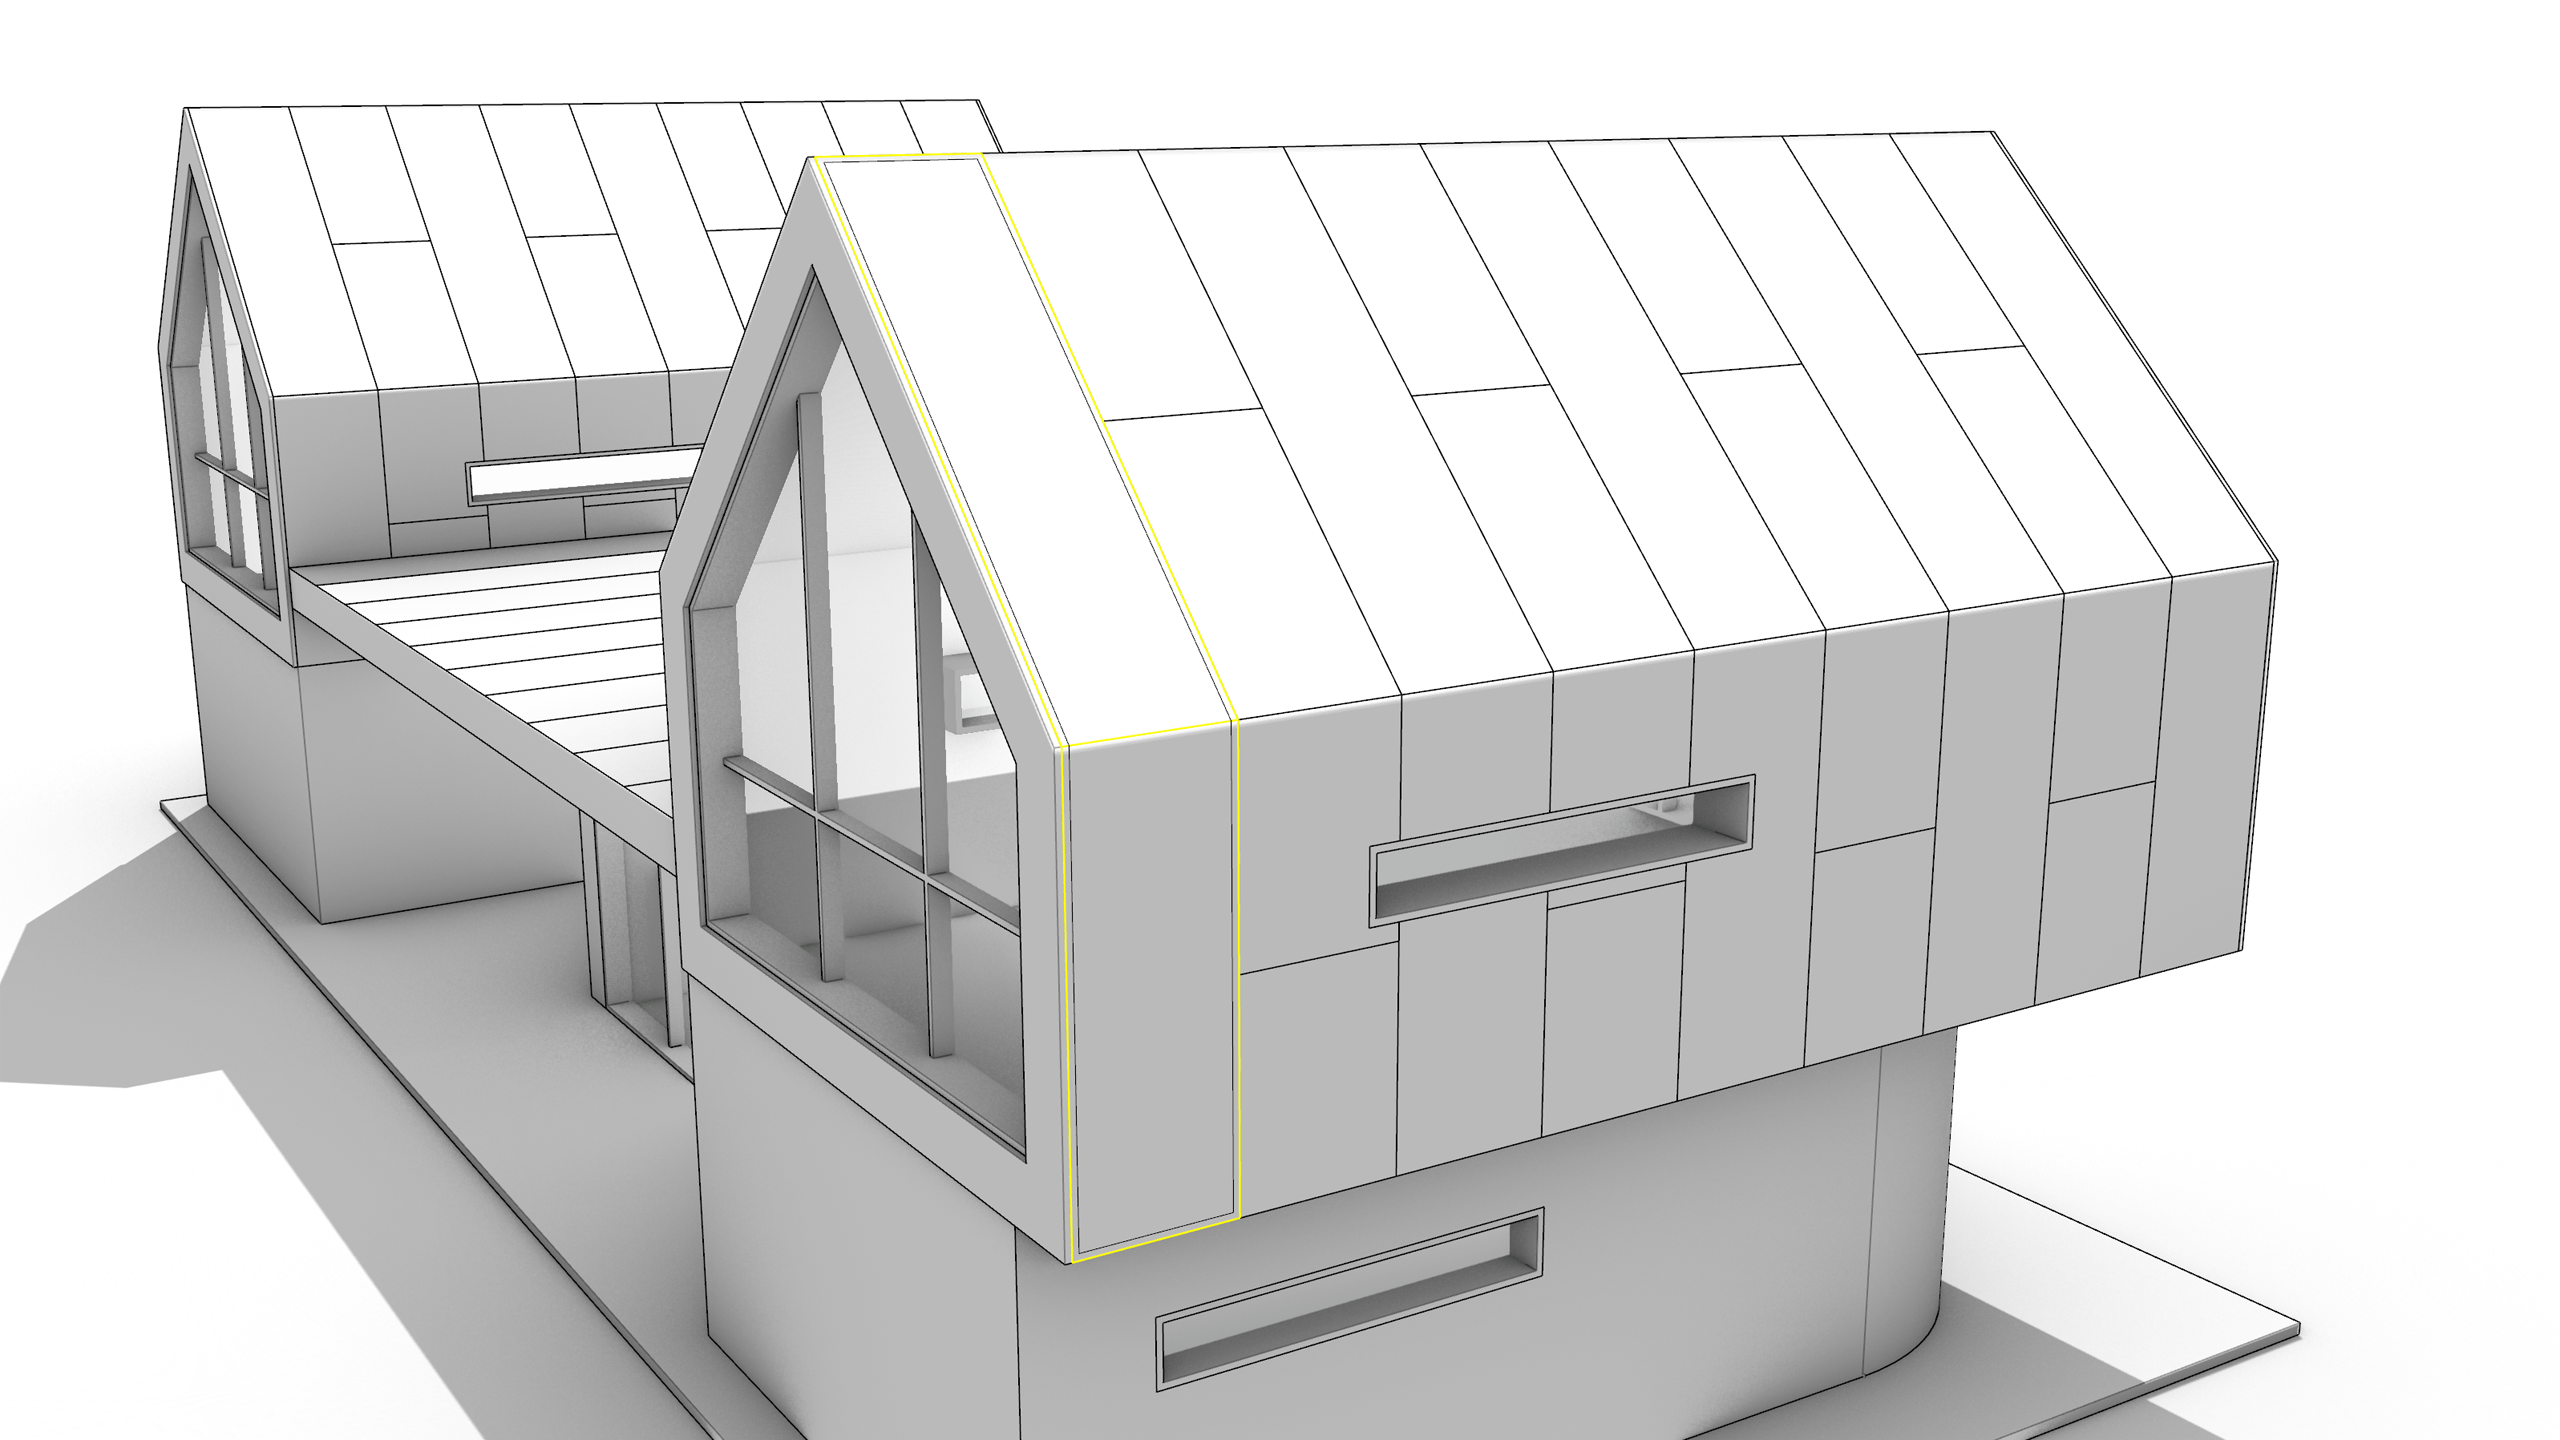
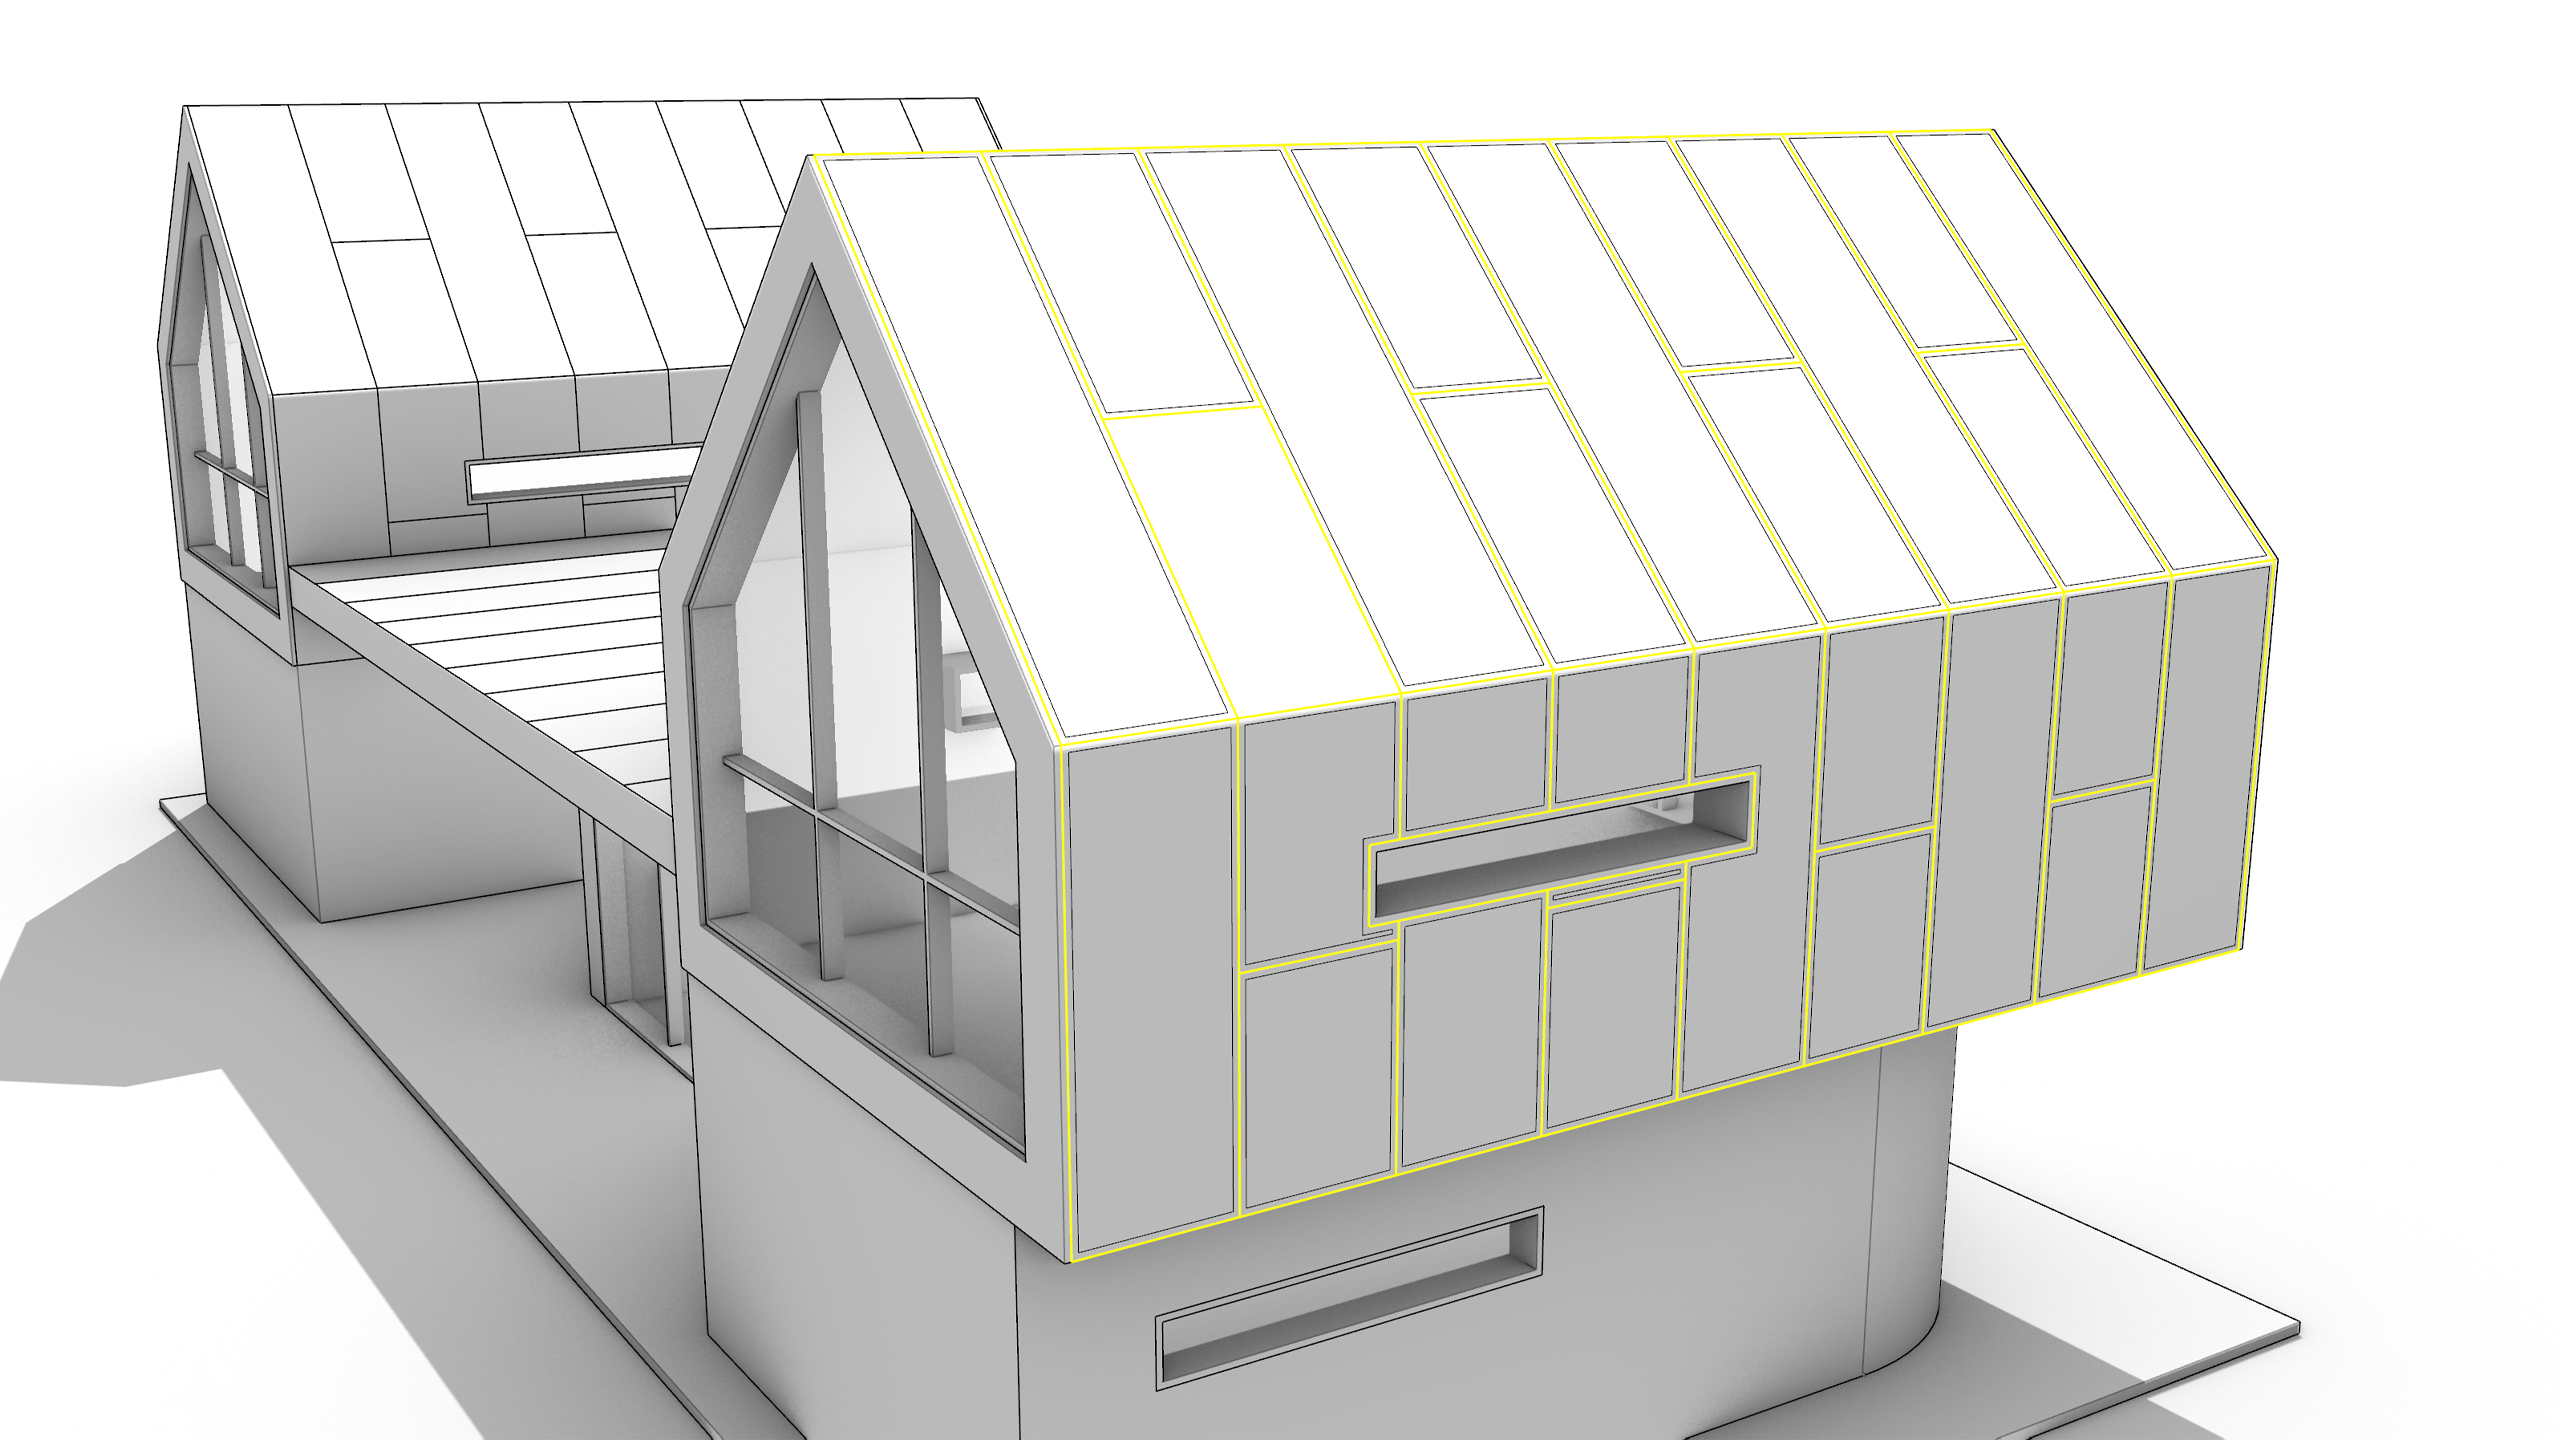
Create the panel boundaries
- Select. The roof faces on the
02_2 Roof panelslayer. - Run. Inset
, then press
.
- Set. Mode = Group (first option in the command line), Split = Yes.
- Value. Type
45for the inset distance, or pick two points. Press . - Result. A continuous inset boundary runs across the selected faces, dividing each one into a panel and a surrounding margin.
The two Mode options behave differently, and the choice matters:
- Group insets the connected faces as a single unit, producing one continuous boundary that wraps across all of them. Use it when a band, a recessed panel, or a shadow gap should read as one element.
- Single insets each face individually, giving a separate boundary per face, which suits repetitive per-face openings.
Raise the panels
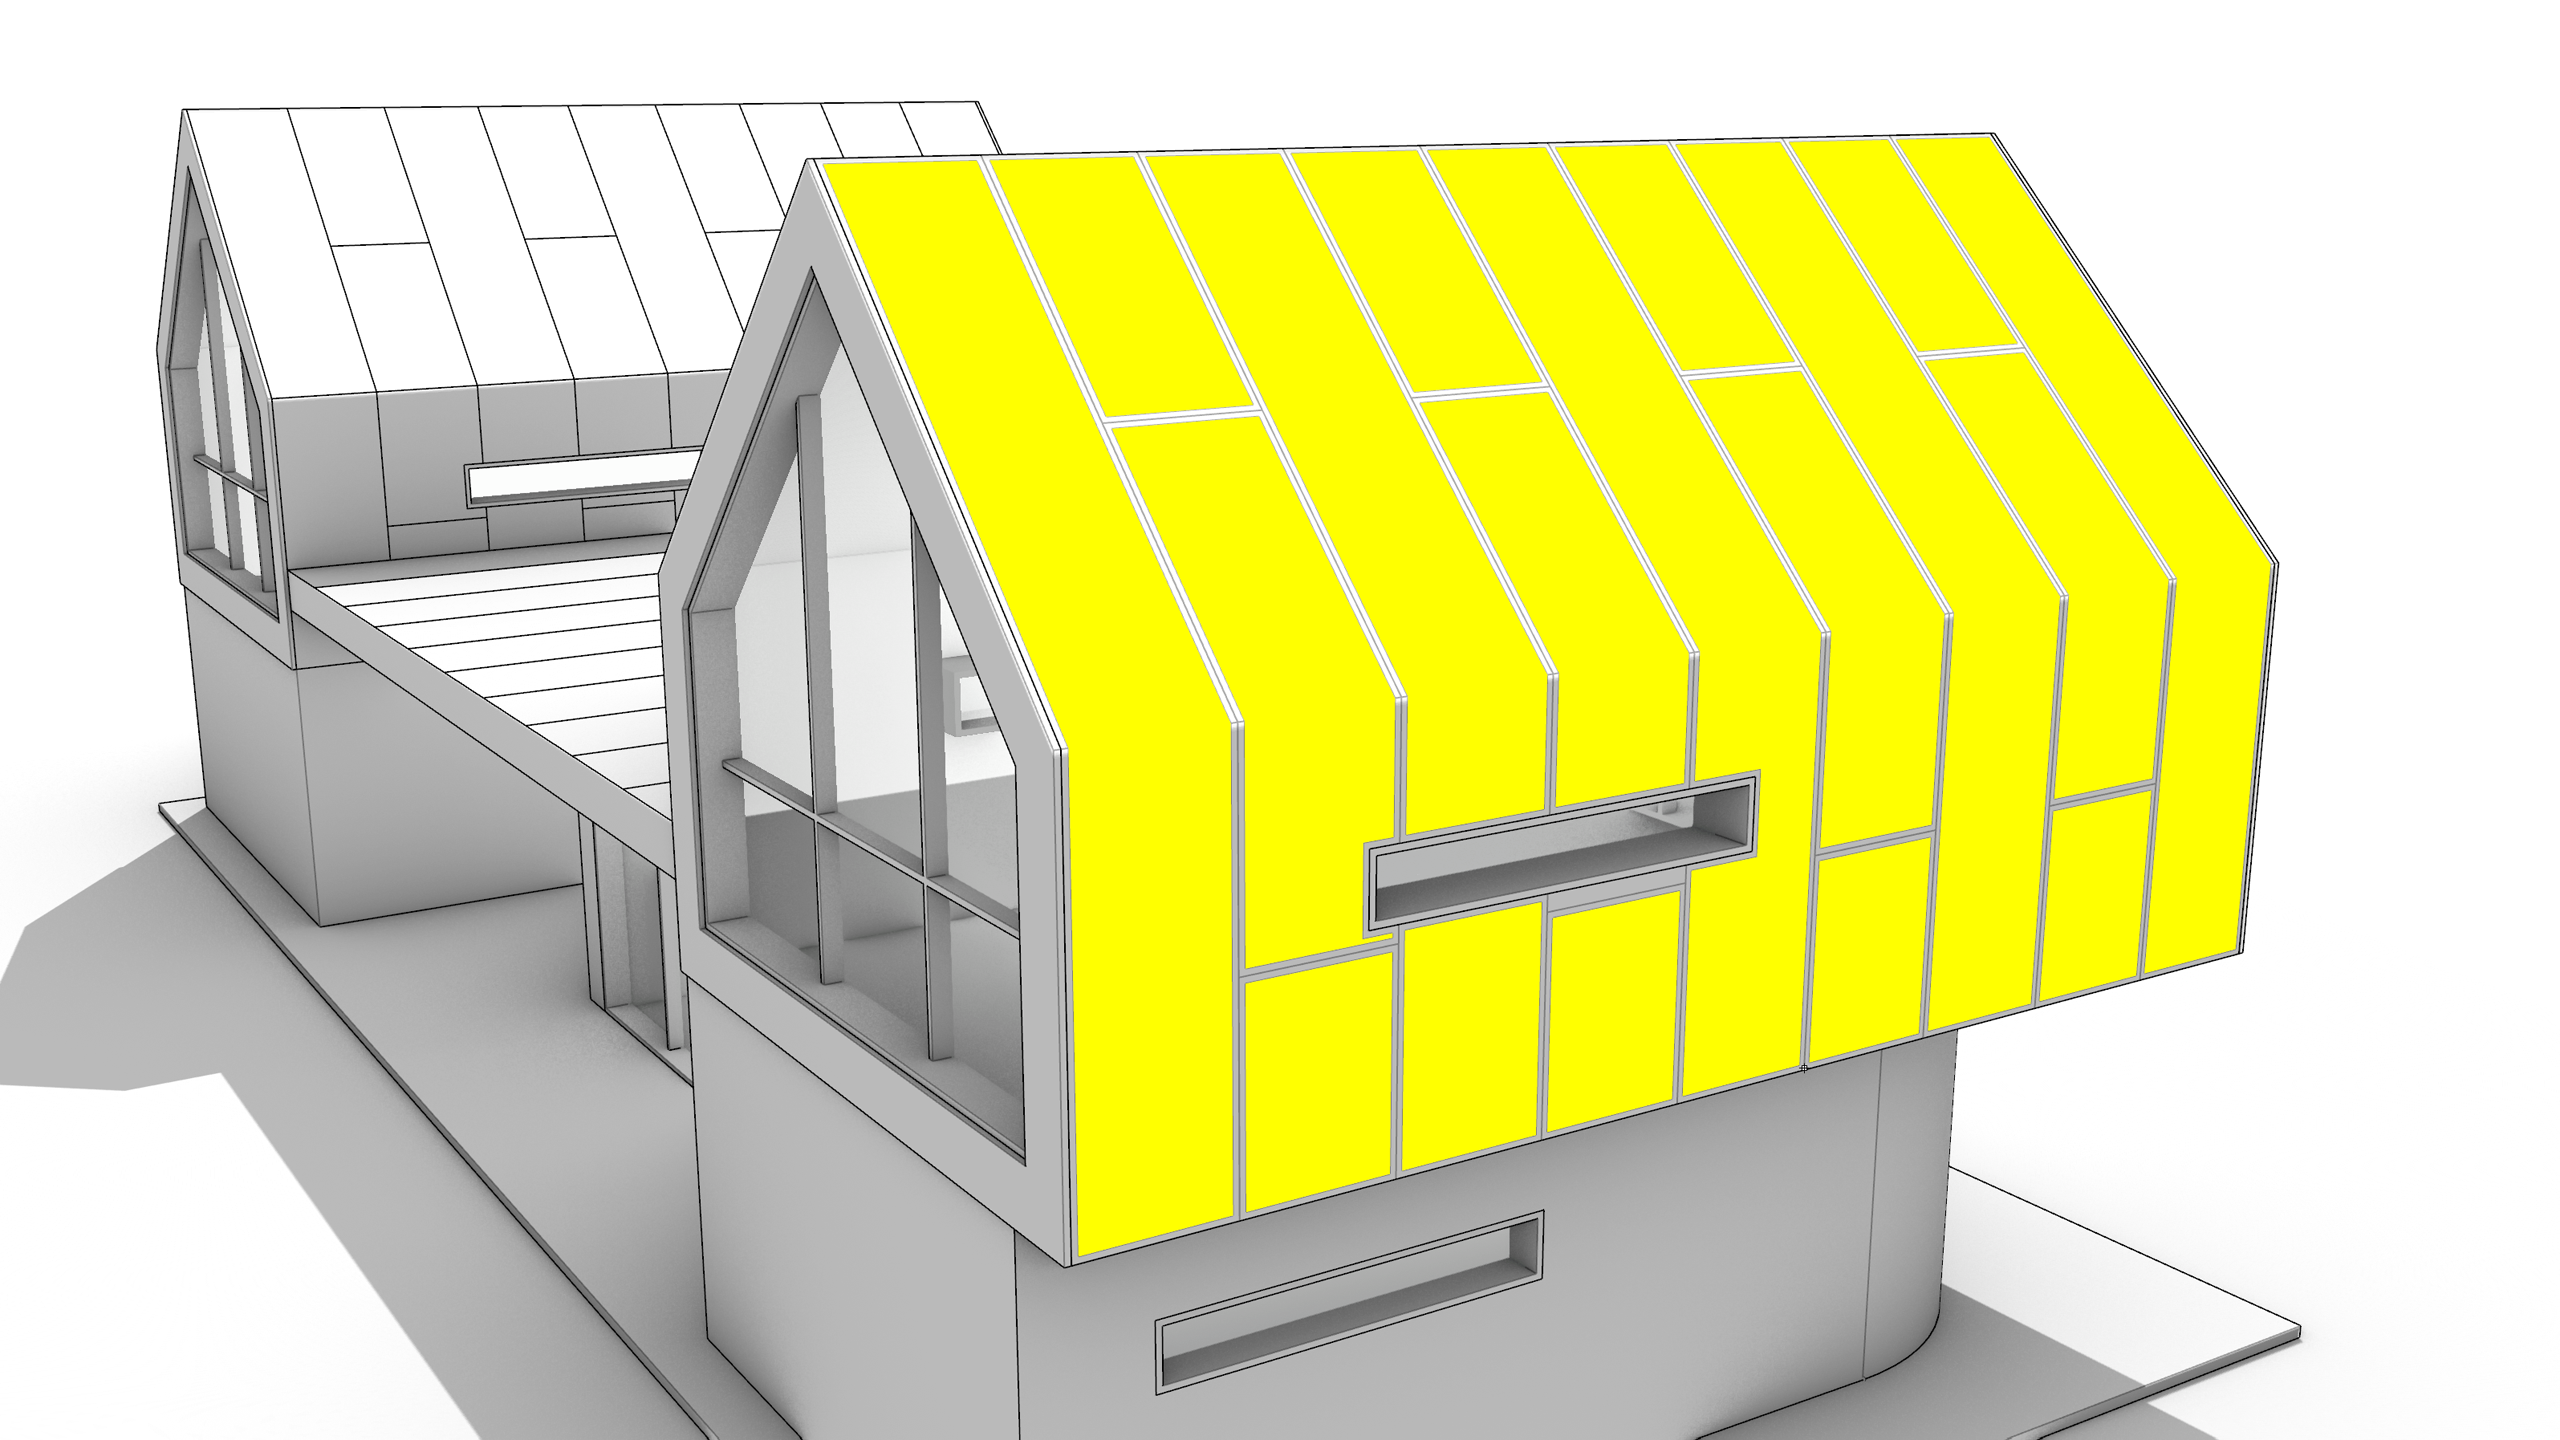
- Select. The inset panel regions you want to raise.
- Run. PushPull
.
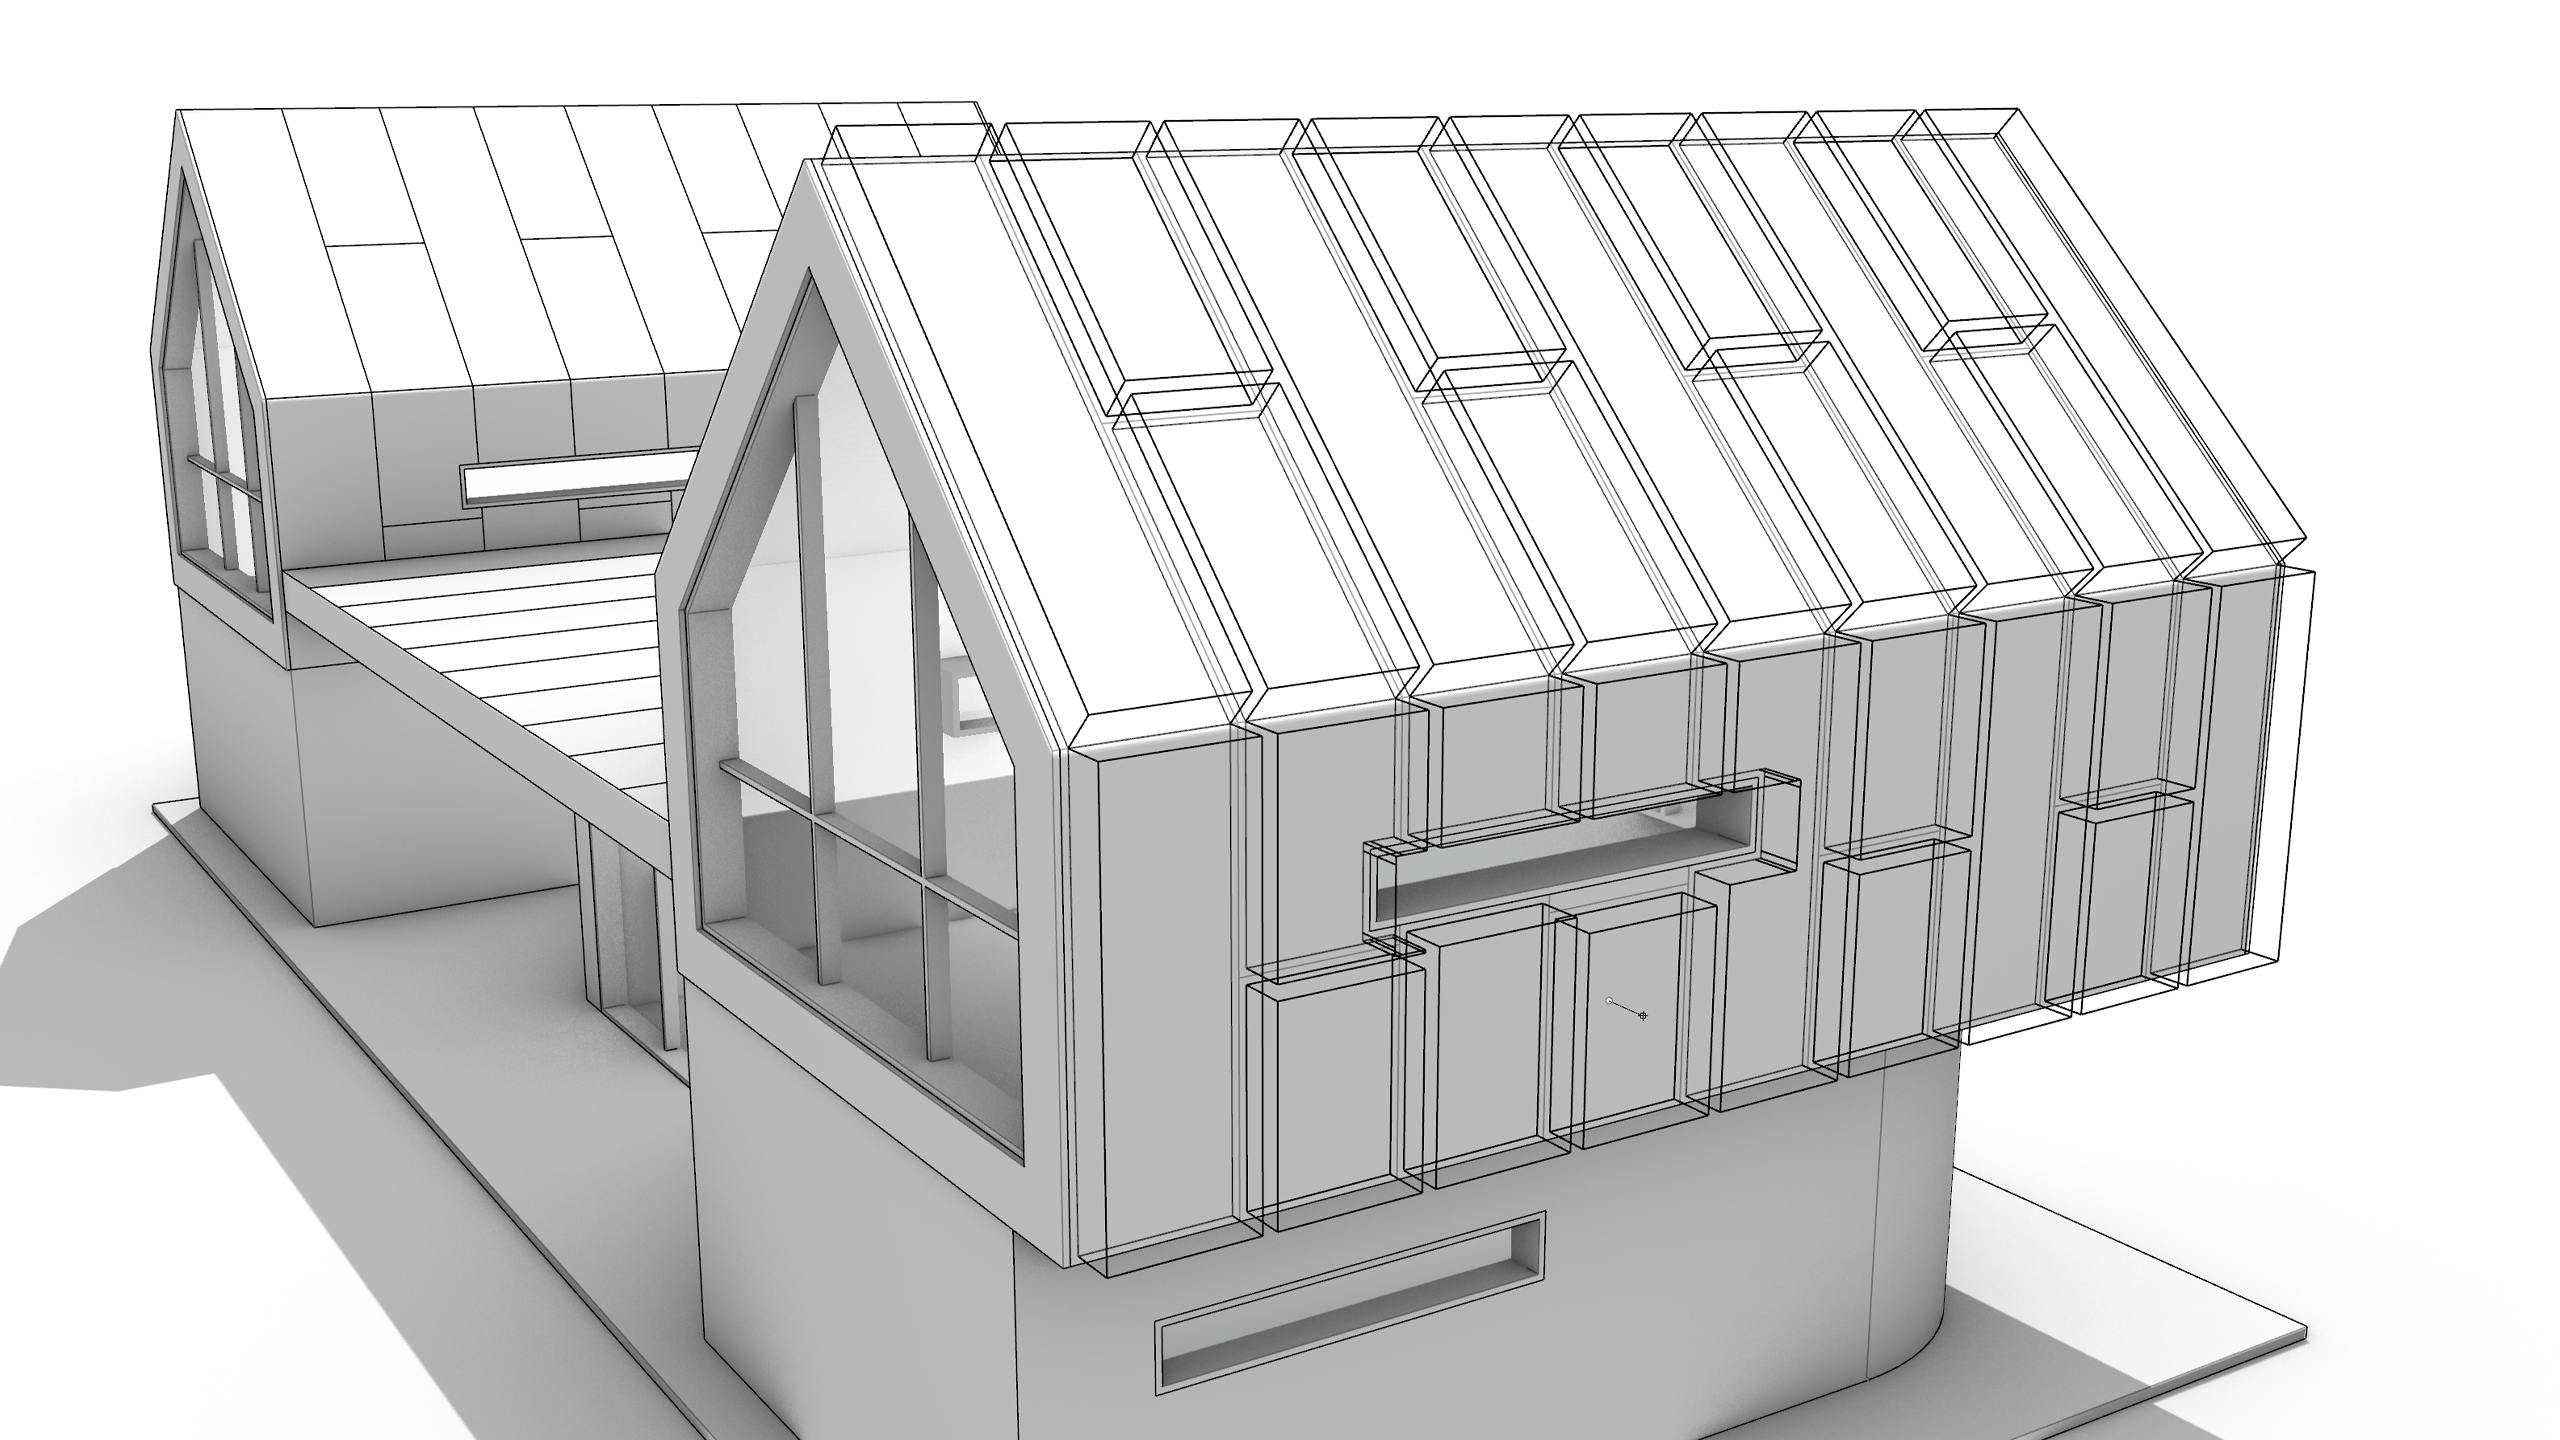
- Value. Pull outward
50mm. - Result. Each panel stands proud of the roof, and the margins left by the inset read as shadow gaps between them.
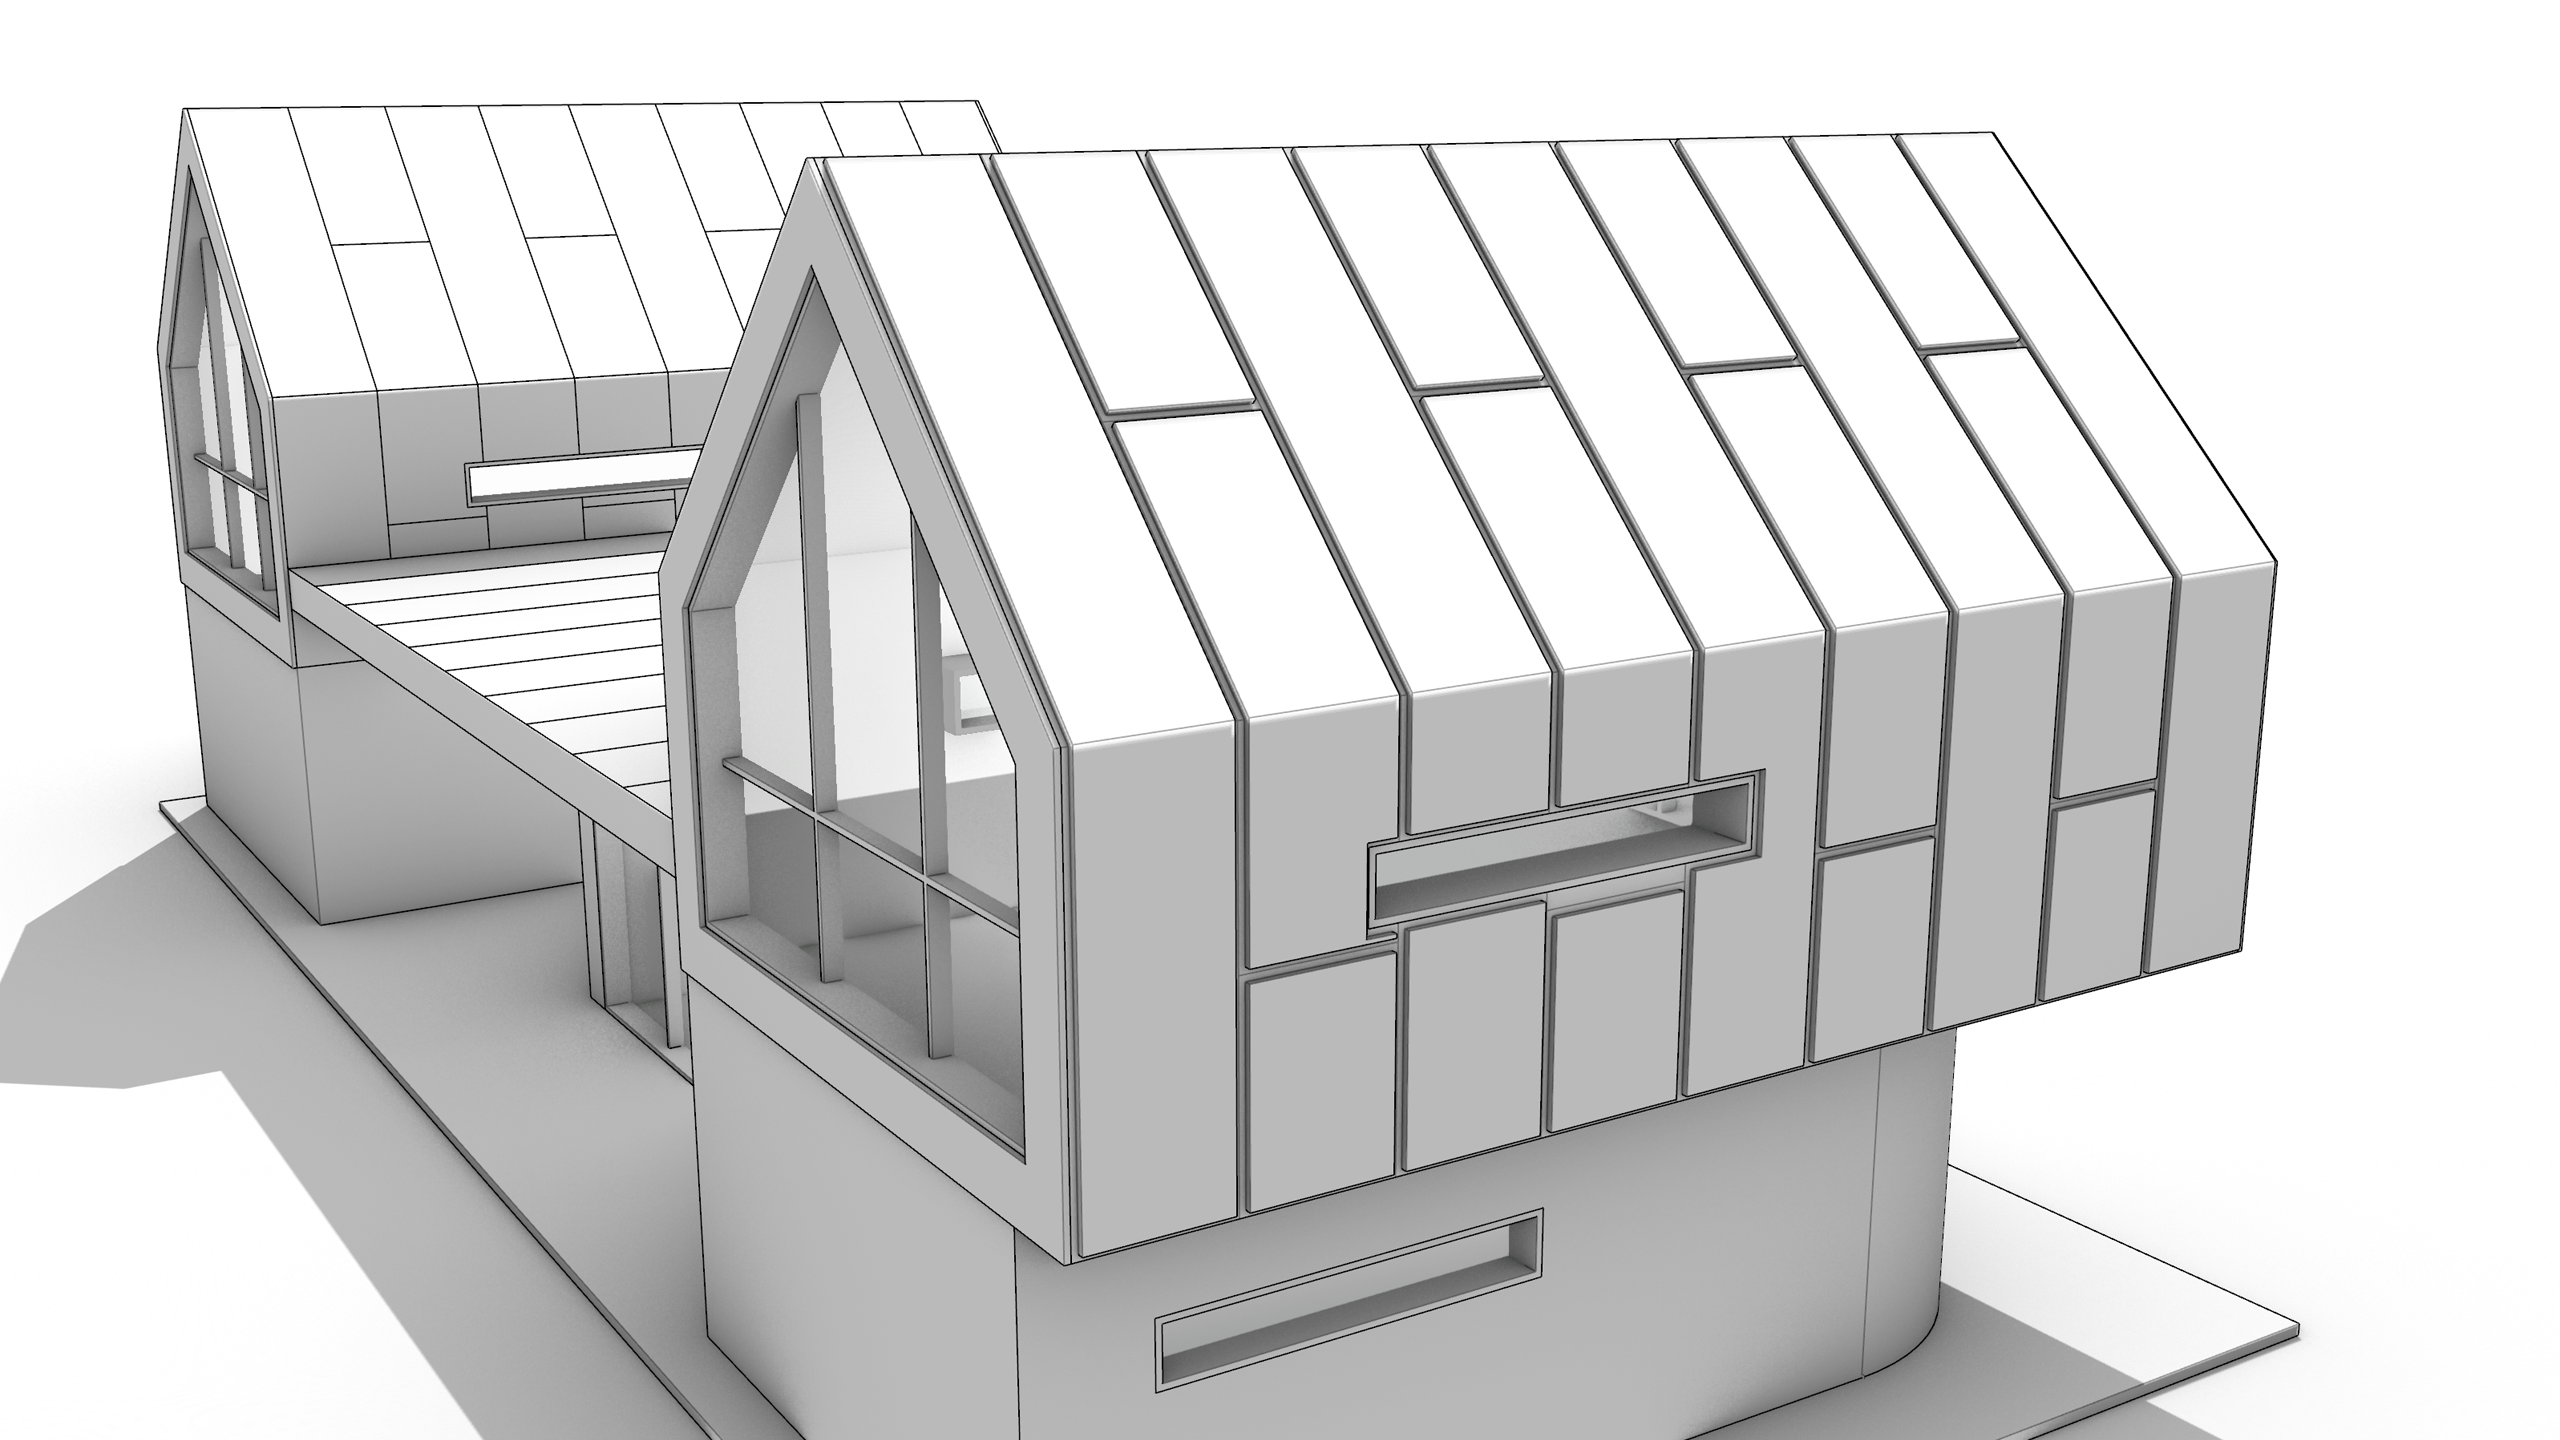
The same pairing works in the other direction. Push inward by 20 mm for a recessed panel, window reveal or shadow gap; pull outward for a raised frame, mullion band or projecting fin.
Automatic corner resolution
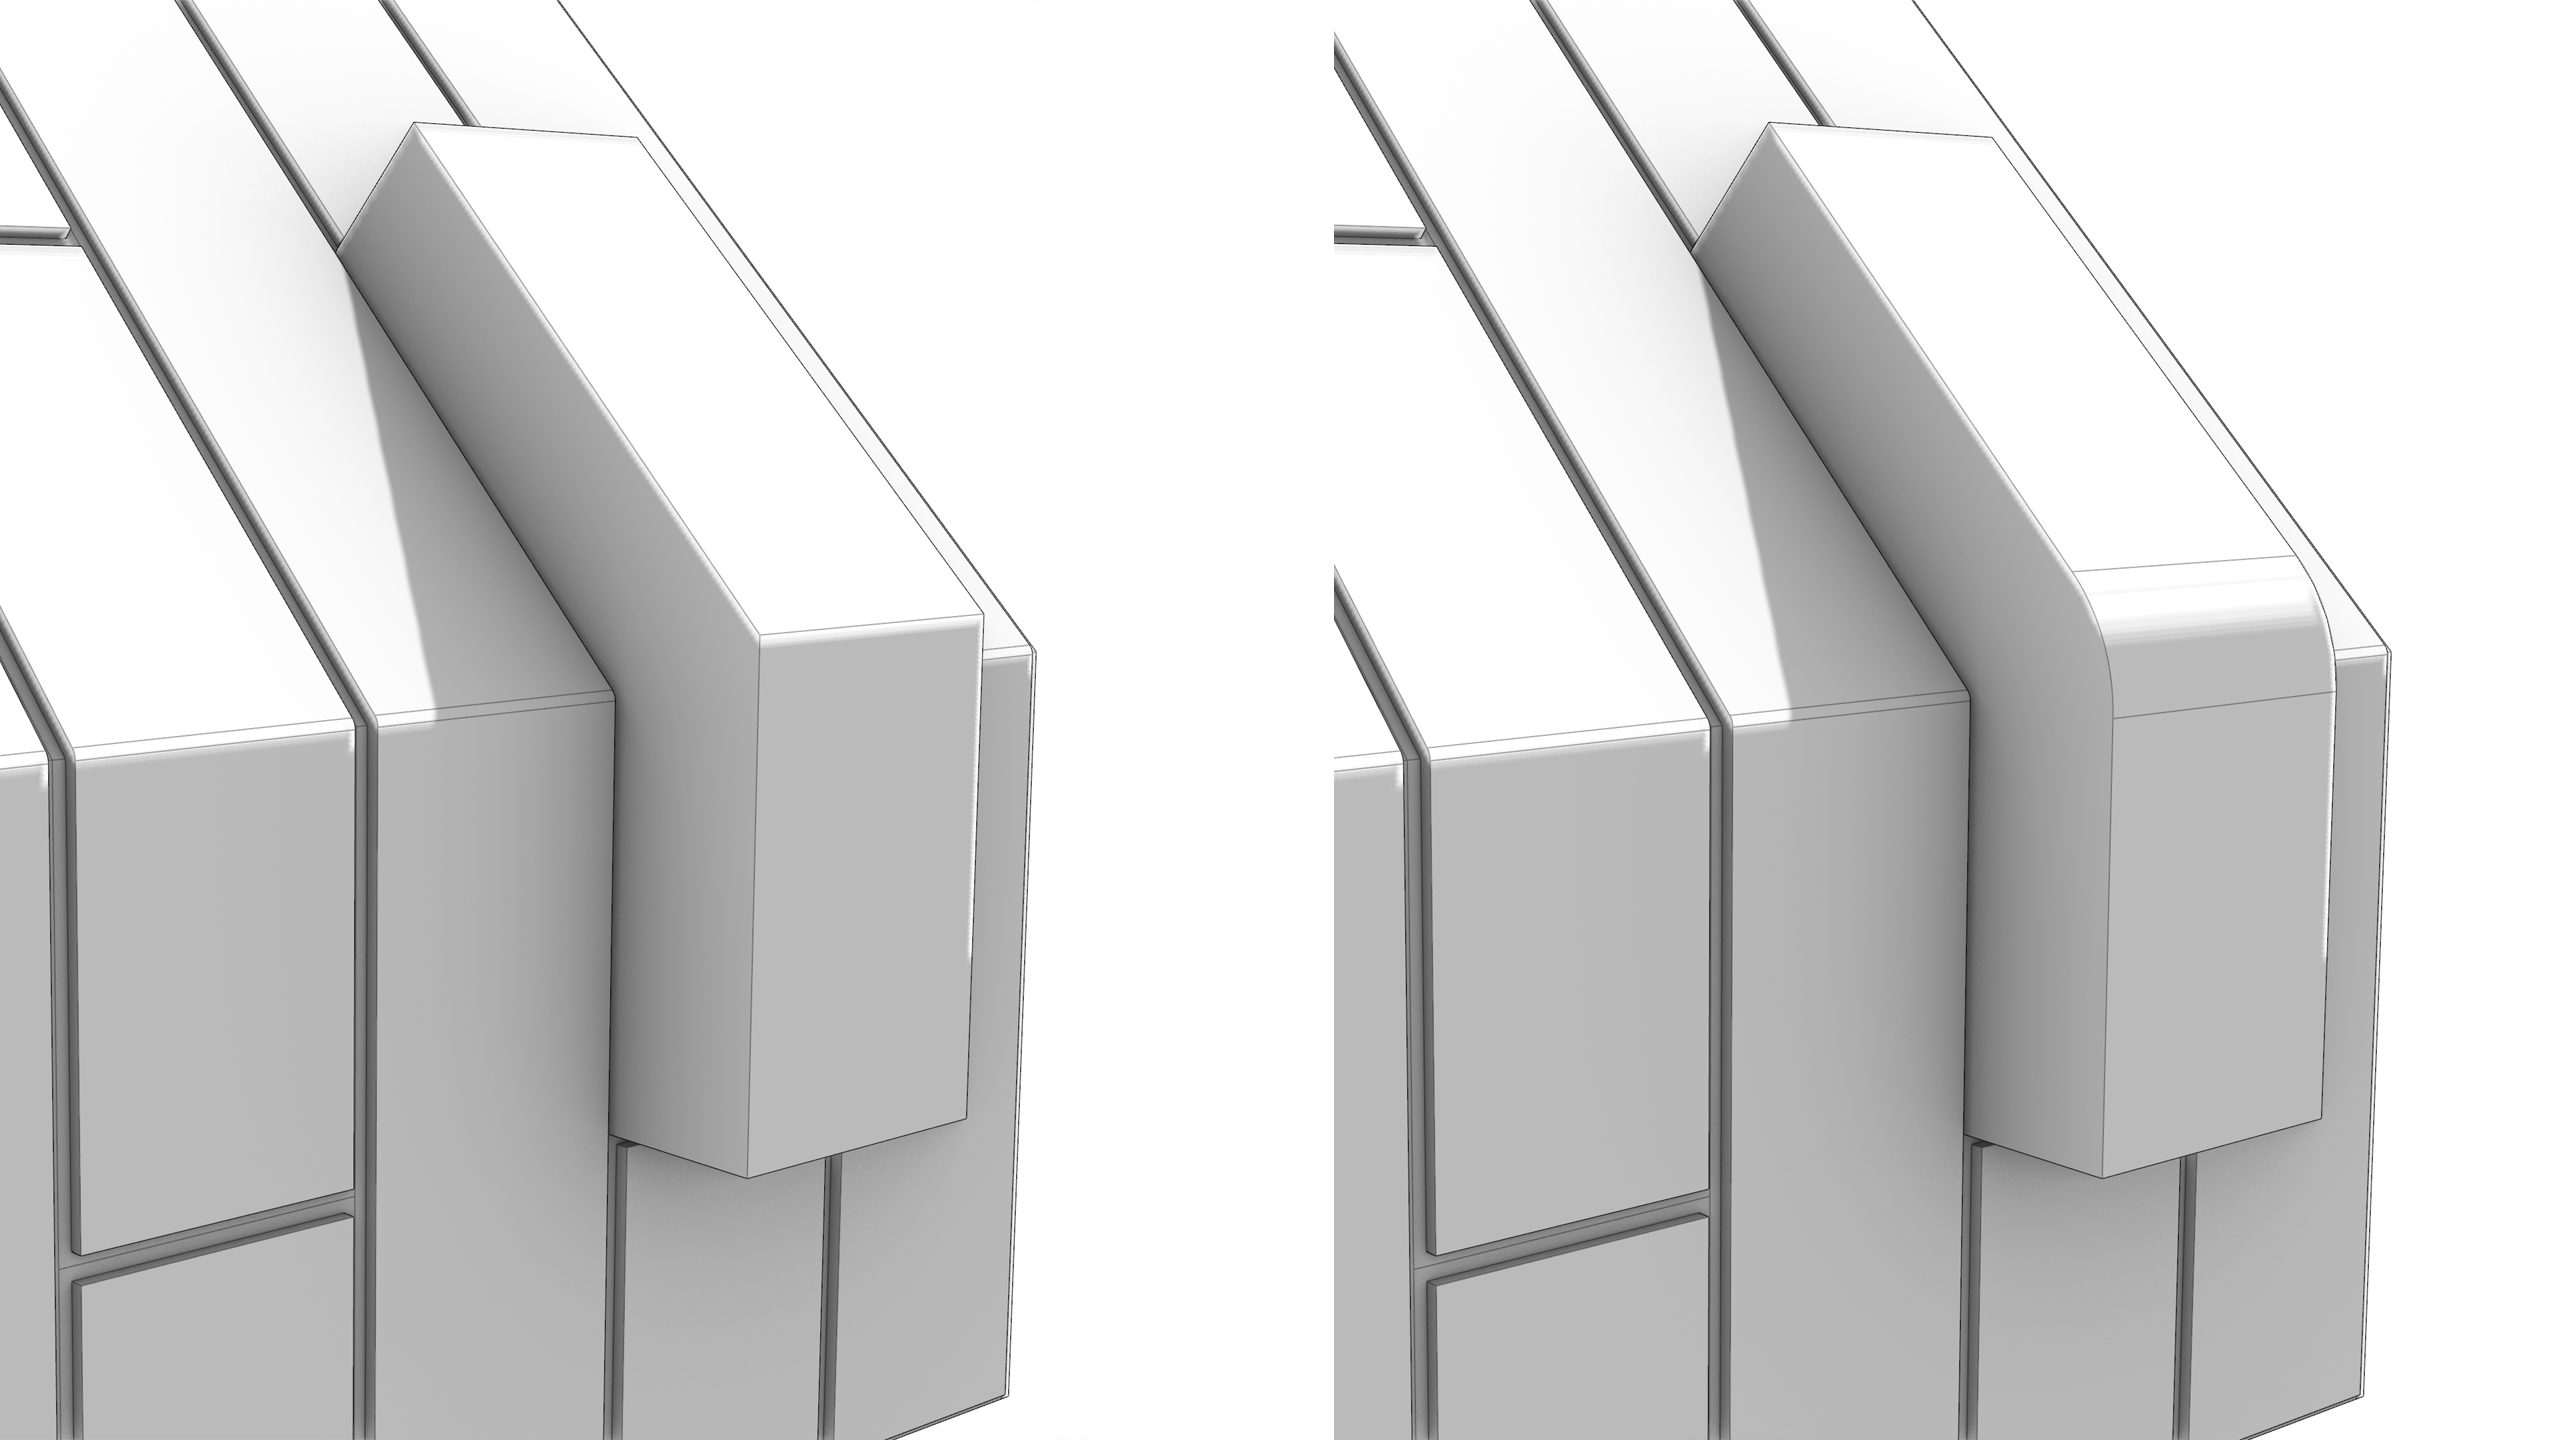
When you extrude adjacent faces together, Rhino resolves the intersection between them for you. The command line Corner option controls how discontinuous corners are filled:
- Sharp extends the new faces so they meet in a crisp corner.
- Round fills the corner with a fillet for a softer massing.
Combining Inset
with PushPull
is an efficient way to add architectural detail during concept design.
Sculpting volumes with the Gumball
With the roof resolved, use the Gumball
for smaller local moves: lengthening the chimney and tilting a roof face.
The Gumball
is a full direct modeling tool, not just a mover. Its handles add and remove volume and slope faces without running a single Boolean command.
- Select. A single face on the
02_1 Roof surfacelayer. Turn the02_2 Roof panelslayer off. Hold + (Windows) or + (Mac) and click the face you want. The Gumball
then appears on that face rather than on the whole object.
Extrude and extend faces
- Select. The upper face of the chimney.
- Drag. The Extrude handle, the dot on the arrow shaft.
- Result. The face moves outward and volume is added.
When every surrounding face is planar, the Extrude handle shows a circle around the dot. That means Extend is available: hold
while dragging, and the neighbouring walls stretch or shorten to keep the solid closed instead of capping a new box on top. This is the same Extrude and Extend behavior PushPull
offers, available directly on the Gumball
.
Slope a roof face
- Select. The top face of a volume.
- Drag. A Rotate arc to tilt it.
- Modifier. Hold + ( + ) so the surrounding walls extend or shorten to follow.
- Result. A flat top becomes a monopitch roof, and the mass stays solid.
Tip: If the
Varying repeated elements with ScaleEach
Finally, break up the regularity. Identical repeated parts are the quickest giveaway that a model is a model.
ScaleEach
, new in Rhino 9, resizes many objects in a single command, scaling each one from its own origin so nothing drifts out of place.
- Select. A set of repeated elements, for example the vertical louvers on the central screen on the
01_4 Wooden slatslayer. - Run. ScaleEach
.
- Set. Choose how the scale factor is applied:
- Normal applies one scale factor to every object.
- Gradient steps the scale progressively from one object to the next, for example louvers widening along the screen.
- Random varies each object within a range you set, so a run of identical parts stops looking like copies.
- Result. Each element keeps its position while its size changes, giving variation across the whole run in a fraction of the time it would take to scale them one by one.
The same command handles site context in one step if you add it: a row of tree blocks along the street edge, planters, or furniture.
Presenting with the Concept display mode
The model is resolved. Now make it presentable.
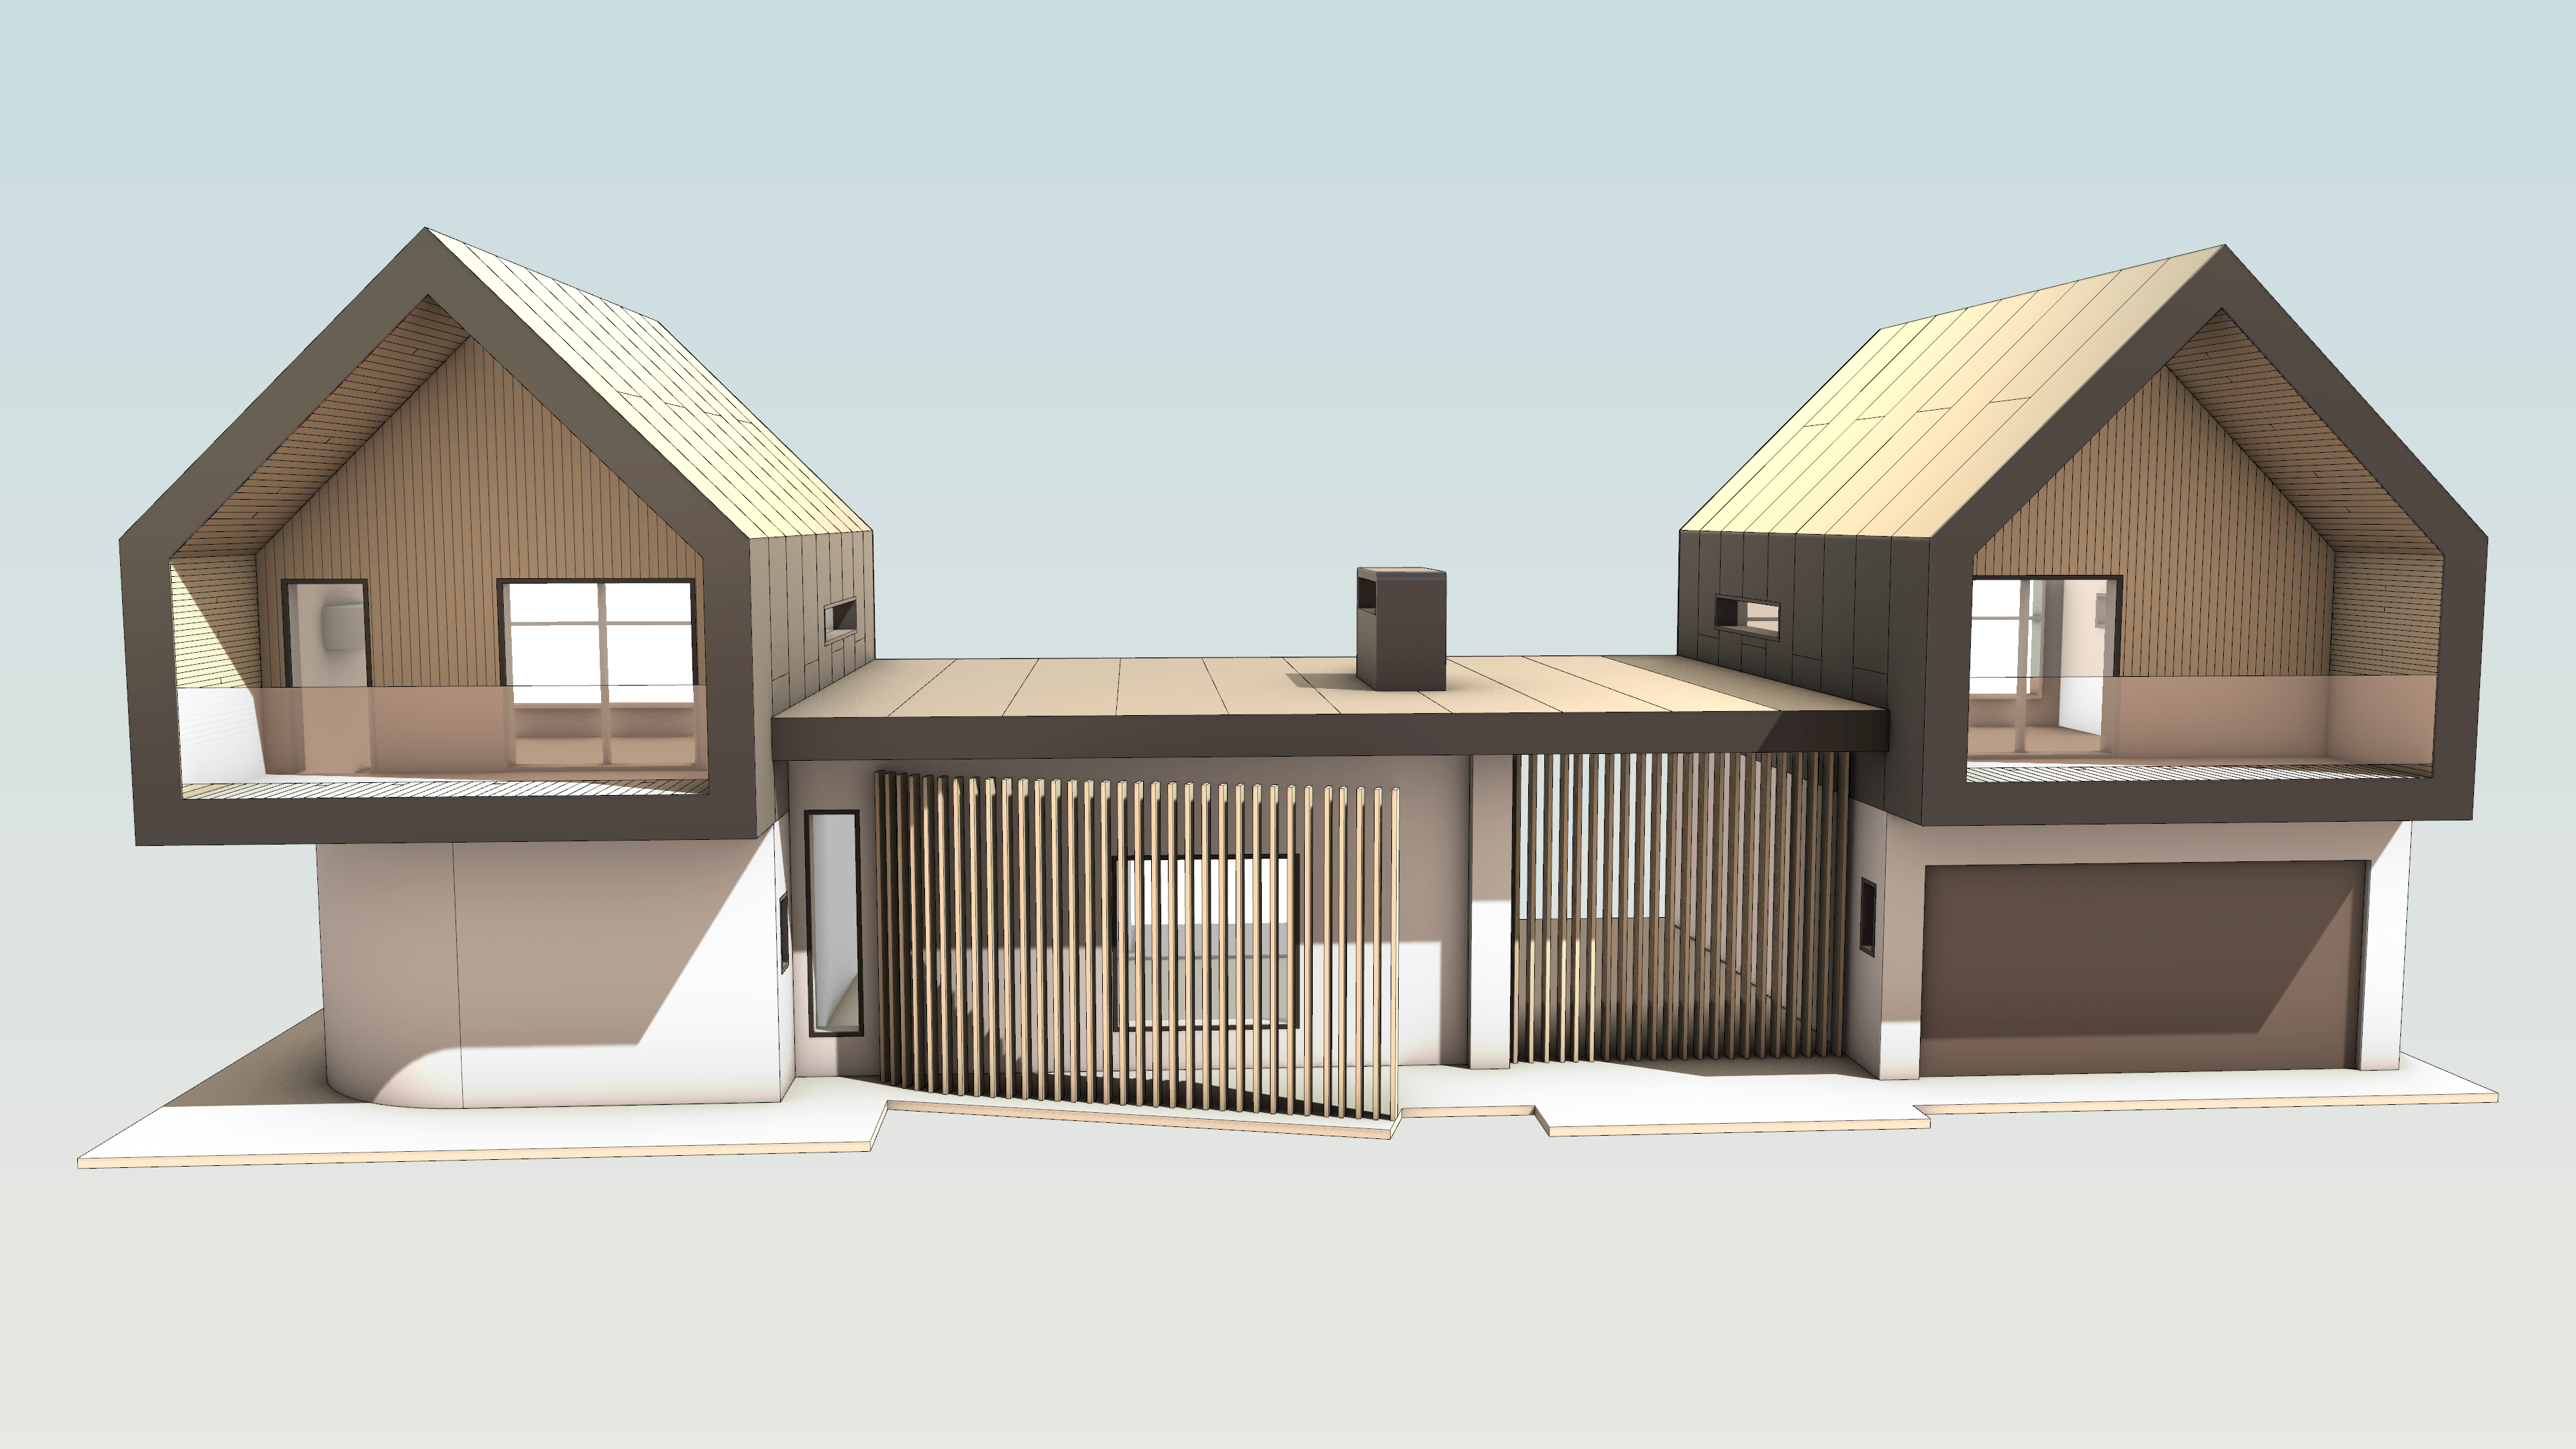
To communicate an early-stage design, switch to the Concept display mode, new in Rhino 9 and built for architectural and design presentation.
Click the viewport title (Perspective, for example) to open its dropdown and choose Concept. The viewport redraws with a gradient background (light blue to light brown, top to bottom), soft shadows, an emphasized silhouette, and a feathered-edge grid, giving a clean, sketch-like look that still holds a clear sense of depth and scale.
To fine-tune it, run DisplayProperties to open the Display panel and adjust settings live; choose Edit Concept settings for finer control such as silhouette thickness. Run  Sun
to open the Sun panel, switch the Sun on, and set the Date, Time and Location to study how shadows fall across the model.
Sun
to open the Sun panel, switch the Sun on, and set the Date, Time and Location to study how shadows fall across the model.
Because Concept applies to Details and Layouts as well, you can carry the same look through to presentation-ready architectural sheets.
Note: Concept is a viewport (or detail) display mode, so it cannot be assigned per-object with SetObjectDisplayMode. Customize it under Options > View > Display Modes > Concept.
Putting it all together
The complete workflow reads as a short sequence:
- Open the model: work from the volumes already in BeachShack.3dm, using its layers to reach each part.
- PushPull Multiface: extend several walls at once and control the corners between them with Sharp or Round.
- Inset Group into PushPull: divide the roof into panels, then raise them so the margins read as shadow gaps.
- Gumball handles: extrude and extend the chimney, and slope a roof face while the surrounding walls follow.
- ScaleEach: vary repeated elements with Normal, Gradient or Random factors.
- Concept display mode: present the result, and carry it into Details and Layouts.
Each of these edits changed the model in place. Nothing was rebuilt, and each step left the previous one intact, which is what makes it reasonable to keep adjusting a concept rather than committing to it early.
Where to go next
- Cut openings and courtyards with the Gumball Cut handle: draw a closed planar curve on a face, then drag the Cut handle into the solid to subtract it, or hold ( ) to boss it outward instead.
- Soften or sharpen roof and parapet edges with FilletEdge for a more resolved massing.
- Use IsolateToViewports to show detail geometry in one viewport while keeping the model clean in the others.
- Place the finished model on a Layout in Concept display mode to produce a presentation sheet at scale.
Downloads
Share what you make on the Rhino Forum.