![]()
Standard > Pan
View > Pan
![]()
View > Pan
Viewport Title > Pan, Zoom, and Rotate > Pan View
![]()
Keyboard Shortcut: Shift + Right mouse button drag
Shifts the location of the view camera and target parallel to the view plane.
Options
Down
Pan the active view down
Left
Pan the active view left
Right
Pan the active view right
Up
Pan the active view up
In
Pan the active view in
Out
Pan the active view out
|
Standard > Pan View > Pan
View > Pan Viewport Title > Pan, Zoom, and Rotate > Pan View
Keyboard Shortcut: Shift + Right mouse button drag |
Zooms the current view in and out.
Steps:
Drag a rectangle in a viewport.
The view defined by the rectangle fills the viewport.
Options
Drag a window to zoom.
Zooms all viewports.
Click an option.
Options
Zooms the view dynamically.
Hold down the left mouse button and drag the mouse up and down to zoom in and out.
Zooms the view to show all objects.
Zooms the view in or out the specified amount. Values greater than 1 zoom in; values between 0 and 1 zoom out.
Zooms the view in.
Zooms the view out.
Zooms the view to show all selected objects.
Zooms the view by specifying a target and window.
Pick a location for the view center.
A rectangular window forms to define the zoom with the target as the view center.
When you rotate a view after Zoom Target, the scene will rotate about the target. This is particularly useful in perspective views.
Zooms the active viewport so that the view is full scale.
The command must be calibrated for this command to work properly.
In perspective views, only objects on the target plane will be displayed full scale; in parallel views objects on any plane perpendicular to the camera axis are displayed full scale.
The model must have units set.
|
Mouse |
Shortcut |
Zoom Action |
|
|
Zoom In and Out |
|
|
|
Ctrl + Right-mouse drag |
Zoom Dynamic |
|
|
Z |
Zoom |
|
|
Page Up |
Zoom In |
|
|
Page Down |
Zoom Out |
|
|
Ctrl + W |
Zoom Window |
|
|
Zoom Extents |
|
|
|
Zoom Extents All Viewports |
|
Standard > Zoom Window View > Zoom Window
View > Zoom Viewport Title > Pan, Zoom, and Rotate > Zoom
Shortcuts: Ctrl + right mouse button drag Page Up key Rotate mouse wheel
|
In a Perspective viewport, moves the camera location and changes the lens length at the same time, keeping the objects at the target plane about the same size.
Steps:
Click the left mouse button in the viewport and drag.
Note: When the cursor moves near the viewport corners, a snapping mode is enabled. The Lens length of the view camera snaps in 5mm increments.
|
Lens Length > Dolly zoom View > Dolly zoom
View> Set Camera > Adjust Lens Length and Dolly Viewport Title > Set Camera > Adjust Lens Length and Dolly |
Sets the amount of blank space between objects and the viewport edges when the Zoom command, Extents option is used.
After the object extents bounding box is calculated, this box is scaled based on the scale factors set by this command, increasing the space between objects and the viewport borders.
Steps:
Specify a scale for the view border.
Options
Scale factor
Greater than 1
Increases the space between objects and the viewport borders.
Less than 1
Decreases the space between objects and the viewport borders.
ParallelView
Sets the border size for parallel views.
PerspectiveView
Sets the border size for perspective views.
|
None
None |
Adjusts the lens length of the viewport camera in a perspective view.
|
View > Zoom lens (Right click)
View > Set Camera > Adjust Lens Length Viewport Title > Set Camera > Adjust Lens Length |
Finds and marks naked edges.
Steps:
Select objects.
The active view zooms to display the first naked edge.
Options
All
Zooms to all naked edges.
Current
Zooms to the current naked edge. This useful if you zoom out with the mouse and want to zoom back in.
Next
Zooms to the next naked edge. If the selected objects have only one naked edge, this option is not displayed.
Previous
Zooms to the previous naked edge. If the selected objects have only one naked edge, this option is not displayed.
Mark
Marks the current naked edge by adding point objects at each end. If the All option was previously selected, all naked edges are marked.
|
None
None |
Calibrates the screen for the Zoom command, 1To1 option.
Steps:
Measure the bar on the screen with a ruler.
Type the length and unit system in the calibration box.
|
View > Calibrate 1:1 scale (Right click)
None |
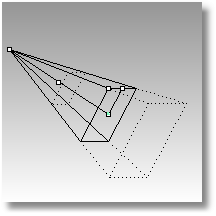
Shows, hides, and toggles the visibility of the viewport camera.
Keyboard Shortcut: F6
Steps:
The view camera is a representation of the view displayed in a one viewport and is visible in all the other viewports.
Use the view camera's control points to drag the camera and target points and change the lens length of the perspective viewport.
The view camera that displays is a representation of the camera and target for the viewport that is active when the Camera command is started, or the viewport where you switched on Show Camera in the right-click viewport title menu.
The camera is associated only with the viewport for which it is shown. However, it is only seen in the other viewports.
The pyramid shape indicates the camera field of view. The control point at the tip of the pyramid is the camera viewpoint. The point at the opposite end of the straight line that runs through the axis of the pyramid is the target point. The point on the middle of one side of the pyramid base is the roll control. The point on the corner adjusts the field of view/lens angle. The dotted rectangles are near and far clipping planes. You cannot see anything farther away than the far clipping plane, nor nearer than the near (to the camera point) clipping plane.
The purpose of the view camera is to show a graphical representation of the camera's location, angle, and field of view. For example:
You may want to place a light above and to the left of the camera of the perspective view. You can turn on that camera and see it while you place the light using the other views.
You may want a light to have a strong specular reflection in the top surface of the object to render: if you can see the camera, you can set the light to be opposite to, and at the same angle as, the camera.
You can set the camera's viewpoint to a specific part of a model with object snaps by dragging the camera point to the endpoint of a line, surface edge, etc.
The Zoom command Target option lets you set the camera target and then zoom to a window around it. You don't need to see the camera to do this, but the camera helps to illustrate the target's usefulness.
Options
Hide
Hides the view camera.
Click Hide or type H.
Toggle
Toggles the visibility of the view camera.
Click Toggle or type T.
|
None
View > Set Camera > Show Camera Viewport Title > Set Camera > Show Camera |
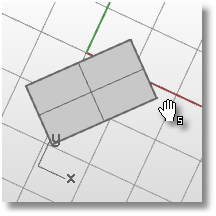
Moves a viewport's camera and target locations to align along a selected surface normal.
Steps:
Options
SetConstructionPlane
If Yes, the viewport's construction plane is set to the modified view.
|
None
View > Set Camera > Orient Camera to Surface Viewport Title > Set Camera > Orient Camera to Surface |
Moves a viewport target's position to the center of the bounding box of selected objects.
Steps:
Select objects.
|
None
View > Set Camera > Move Target to Objects Viewport Title > Set Camera > Move Target to Objects |
Rotates the view around the camera.
Steps:
Click the left mouse button and drag in a perspective viewport to rotate the viewport camera.
- or -
Click an option.
Notes
This command uses the settings from the Rotate section of the Options dialog box View page to control what axis the viewport camera is rotated about and which way things move when you press and arrow key, etc.
Options
Down
Rotate the target down.
Left
Rotate the target left.
Right
Rotate the target right.
Up
Rotate the target up.
|
Standard > Rotate Camera (Right click) View > Rotate Camera (Right click)
View > Set Camera > Rotate Camera Viewport Title > Set Camera > Rotate Camera
Keyboard Shortcut: Ctrl + Alt + Right mouse button drag |
Rotates the view camera around the target.
Keyboard Shortcut: Ctrl + Shift + drag with the right mouse button.
Note: Views that are not looking perpendicular to the construction plane rotate with the right mouse button.
Options
Down
Rotate the view camera down.
Left
Rotate the view camera left.
Right
Rotate the view camera right.
Up
Rotate the view camera up.
|
Standard > Rotate View View > Rotate View
View > Pan, Zoom, and Rotate > Rotate View Viewport Title > Pan, Zoom, and Rotate > Rotate View
Keyboard Shortcut: Ctrl + Shift + Right mouse button drag |
Rotates the view around the axis formed by the line between the view camera and target.
Steps:
Click and drag in a viewport to tilt the view.
Note: When the cursor moves near the viewport corners, a snapping mode is enabled. The view rotation snaps in five-degree increments. The keyboard shortcut, Shift + Alt + Right mouse button displays an "s" to indicate the snap mode is on.
Options
Left
Rotates the view anti-clockwise.
Right
Rotates the view clockwise.
|
View > Tilt View
View > Set Camera > Tilt View Viewport Title > Set Camera > Tilt View
Shortcuts: Shift + Alt + Right mouse button drag |
Continuously rotates a view around the viewport target point.
Steps:
Control the speed and direction with the dialog box controls.
|
View > Turn table
View > Set Camera > Turntable Viewport Title > Set Camera > Turntable |